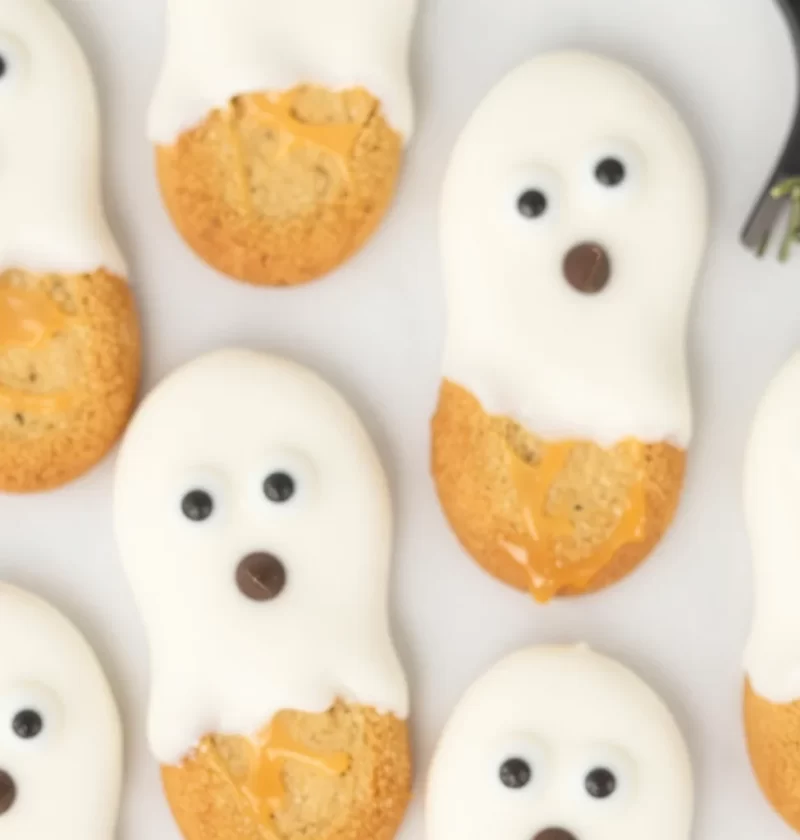
Nutter Butter Ghost Cookies: A Spooky Delight for Everyone
Halloween is just around the corner, and nothing gets me more excited than creating sweet treats that bring a smile to everyone’s face – especially when they’ve got a spooky twist! Today, we’re diving into the world of fun and fright with these adorable Nutter Butter Ghost Cookies. Whether you’re hosting a Halloween bash, looking for festive lunchbox treats, or simply want to indulge in a delightful dessert, these ghost cookies are a perfect choice. They’re easy to make, irresistibly cute, and — let’s be real — who doesn’t love a good peanut butter cookie covered in white chocolate?
But first, let me take you down memory lane.
A Sweet Nostalgic Memory
Growing up, Halloween was always a time for creativity. From hand-carving pumpkins to devising elaborate costumes, we poured our hearts into making the holiday special. I distinctly remember one year when my mom and I decided to make our own spooky desserts for the neighborhood party. We set up a little assembly line in the kitchen, giggling more than actually cooking (don’t tell her I said that!). After hours of mixing, frosting, and decorating, we had a monstrous spread of treats—including what I now refer to as “ghostly delights,” just like our Nutter Butter Ghost Cookies!
The thrill of crafting that first spooky ghost cookie and seeing my little brother’s eyes light up made it all worthwhile. Those moments in the kitchen, filled with laughter, flour fights, and spontaneous taste tests, are what sparked my love for cooking. So, let’s conjure up some of that joy and create these delightful ghost cookies together!
Ingredients You’ll Need
To whip up a batch of these Nutter Butter Ghost Cookies, gather the following ingredients:
-
12 Nutter Butter cookies
These peanut butter sandwich cookies are the star of the show! Their unique shape makes perfect little ghosts. If you can’t find Nutter Butters, any similar sandwich cookies could work, but the peanut butter flavor is essential. -
1 cup white candy melts
This is what will transform our Nutter Butters into festive ghost treats! White candy melts are super easy to work with. You can also use white chocolate chips — just make sure to add a little bit of shortening if they don’t melt smoothly. -
24 candy eyeballs
These little guys bring personality to our ghost cookies! You can find them in craft stores or the baking aisle of your local supermarket. If you’re in a hurry, mini chocolate chips work just as well for ghostly eyes. -
12 mini chocolate chips
For those who like a little variety, these tiny tidbits add a nice spooky touch if you opt to use them instead of candy eyeballs. Plus, isn’t everything better with chocolate?
Step-by-Step Instructions
Now, let’s get down to the nitty-gritty of making these delightful ghost cookies. Follow along with these detailed steps, and don’t forget to enjoy the process!
-
Melt the White Candy Melts:
Begin by placing your white candy melts in a microwave-safe bowl. Heat in the microwave on high for about 30 seconds. Stir, then continue to heat in 10-second intervals until the melts are fully melted and smooth. Be careful not to overheat; burnt candy melts are a huge bummer! -
Dip the Nutter Butters:
Next, take a Nutter Butter cookie and hold it by the ends. Dip it into the melted candy until it’s completely covered. The key here is to ensure it’s evenly coated. Allow any excess to drip off—this helps create that nice, even coating. -
Place on Baking Sheet:
After dipping, lay the dipped cookies on a parchment-lined baking sheet. This makes cleanup a breeze and also prevents the cookies from sticking. -
Add the Eyes:
While the candy coating is still wet, gently press two candy eyeballs (or mini chocolate chips) onto each ghost cookie to give them life! You can place them however you like—give your ghosts some personality! -
Freeze to Set:
Pop the baking sheet into the freezer for about 10-15 minutes, or until the candy melts have completely hardened. This helps your cookies set quickly and perfectly! -
Finish with Mini Chocolate Chips:
If you’d like to add little “mouths” to your ghosts using mini chocolate chips, now’s the time to do so! Simply place one mini chocolate chip under the eyes of each ghost before they set completely.
And just like that, your Nutter Butter Ghost Cookies are ready to enchant!
Serving Suggestions
Displaying your Nutter Butter Ghost Cookies can be as fun as making them! Here are a few simple ideas:
- Halloween Dessert Platter: Arrange them on a festive serving platter. Add some colorful sprinkles or candy corn for a pop of color.
- Cookie Bags: For a sweet party favor, place each cookie in a clear bag tied with a Halloween-themed ribbon.
- On a Cake Stand: Elevate those ghostly treats by placing them on a cake stand. It instantly adds a whimsical touch to any gathering.
Recipe Variations
Feeling a little adventurous? Here are some creative twists to try with your Nutter Butter Ghost Cookies:
- Nut Butter Swap: If you’re feeling nut-free, use sandwich cookies filled with non-nut spreads (like sunbutter) to accommodate allergies.
- Colorful Melts: Get festive and use colored candy melts in orange, purple, or green for a vibrant twist.
- Add Spices: Mix in a pinch of cinnamon or nutmeg into the white chocolate for an added layer of flavor – it’s subtle but delightful.
- Sprinkles and Decorations: Top your ghosts with fun sprinkles for added texture and color.
Chef’s Notes
These Nutter Butter Ghost Cookies have such a special place in my heart. Over the years, I’ve seen them evolve, and they’ve become a staple at my Halloween gatherings. One thing I love is that they’re not just tasty; they bring people together. I often find myself catching up with friends as we snack and share memories while enjoying these ghostly treats.
And let’s not forget—the simplicity of these cookies is part of their charm! I’ve made them with my younger cousins, and it’s been such a joy to see their creativity shining through as they customize each ghost cookie with unique designs.
FAQs and Troubleshooting
1. What if my candy melts won’t melt smoothly?
If your candy melts are clumping or won’t melt smoothly, add a teaspoon of vegetable oil or shortening and microwave again in short bursts, stirring in between. This should help get that silky texture!
2. Can I make these in advance?
Absolutely! These cookies can be made a few days ahead of any event. Just store them in an airtight container at room temperature, and they will stay fresh for days.
3. How do I prevent sticking?
Using parchment paper is key! If you find they’re sticking, ensure the candy coating isn’t too thick and that they are completely set before removal.
4. Can I freeze these cookies?
Yes! You can freeze them for up to 2 months. Just make sure you wrap them tightly in plastic wrap or place them in a freezer-safe container.
Nutritional Info (Optional)
For those who are curious about the nutritional content, here’s a quick rundown per cookie (approximation):
- Calories: 120
- Total Fat: 5g
- Saturated Fat: 3g
- Carbohydrates: 17g
- Sugars: 9g
- Protein: 1g
Conclusion
These Nutter Butter Ghost Cookies are not just delicious—they encapsulate the very essence of what cooking is all about: creating memories, sharing with loved ones, and spreading joy. Whether you’re snacking on them during a Halloween movie marathon or sharing them at a party, they’re bound to bring smiles all around. I hope you whip up a batch and maybe even create a few sweet memories of your own in the process!
So what are we waiting for? Grab your ingredients, roll up your sleeves, and let’s make something delicious together. Happy Halloween from Buttered Table! 🎃👻
PrintNutter Butter Ghost Cookies

Adorably spooky Nutter Butter Ghost Cookies, perfect for Halloween parties and gatherings.
- Prep Time: 20 minutes
- Cook Time: 15 minutes
- Total Time: 35 minutes
- Yield: 12 cookies 1x
- Category: Dessert
- Method: No-Bake
- Cuisine: American
- Diet: Vegetarian
Ingredients
- 12 Nutter Butter cookies
- 1 cup white candy melts
- 24 candy eyeballs
- 12 mini chocolate chips
Instructions
- Melt the White Candy Melts: Begin by placing your white candy melts in a microwave-safe bowl. Heat in the microwave on high for about 30 seconds. Stir, then continue to heat in 10-second intervals until the melts are fully melted and smooth.
- Dip the Nutter Butters: Take a Nutter Butter cookie and hold it by the ends. Dip it into the melted candy until it’s completely covered. Allow any excess to drip off.
- Place on Baking Sheet: Lay the dipped cookies on a parchment-lined baking sheet.
- Add the Eyes: While the candy coating is still wet, gently press two candy eyeballs onto each ghost cookie.
- Freeze to Set: Pop the baking sheet into the freezer for about 10-15 minutes, or until the candy melts have completely hardened.
- Finish with Mini Chocolate Chips: If desired, place one mini chocolate chip under the eyes of each ghost before they set completely.
Notes
Store cookies in an airtight container at room temperature. They can also be frozen for up to 2 months.
Nutrition
- Serving Size: 1 cookie
- Calories: 120
- Sugar: 9g
- Sodium: 50mg
- Fat: 5g
- Saturated Fat: 3g
- Unsaturated Fat: 1g
- Trans Fat: 0g
- Carbohydrates: 17g
- Fiber: 1g
- Protein: 1g
- Cholesterol: 0mg
Keywords: Nutter Butter, ghost cookies, Halloween treats, peanut butter cookies, dessert