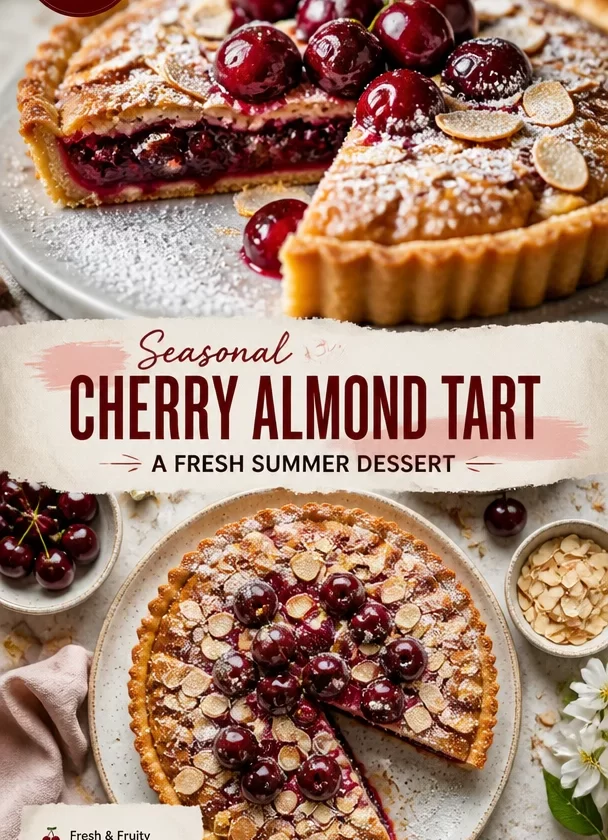
The Sweet Harmony of Cherry Almond Tart: A Cozy Kitchen Adventure
Welcome to Buttered Table! Today, I’m thrilled to share one of my all-time favorite desserts: the Cherry Almond Tart. Just the thought of this buttery, fruity delight brings a smile to my face and a warmth to my heart. Imagine slicing into a golden crust, revealing a luscious layer of almond-flavored filling studded with sweet, juicy cherries. Whether it’s for a family gathering or a simple weeknight treat, this tart encapsulates the joy of sharing good food with the people we love.
Cherry season is a magical time, don’t you think? There’s something endlessly satisfying about walking through a sun-drenched orchard, the air sweet with the scent of ripe cherries just waiting to be picked. I remember a sunny afternoon spent with my grandmother, gathering cherries straight from her backyard. We would munch on the fruits of our labor, deliciously ripe and full of flavor, and she would regale me with tales of her own childhood when she’d bake cherry tarts with her grandmother. The two of us often spent our Sundays in the kitchen, whipping up incredible desserts that filled the house with love and laughter. It is in these moments that I learned about the power of food to create connections and memories — and oh, how I cherish those times!
Now, let’s dive into this Cherry Almond Tart! With its simple ingredients and straightforward process, this recipe embodies everything we celebrate at Buttered Table. So, gather your ingredients and let’s make some delicious memories together!
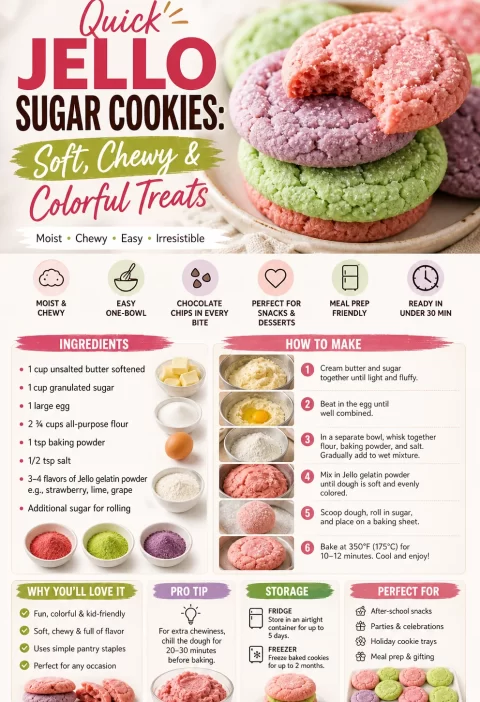
Ingredients
-
1 pre-made pie crust: Using a store-bought pie crust makes this tart quick and accessible, perfect for those bustling weeknights. If you prefer homemade, go for a classic flaky pie crust or a buttery shortcrust.
-
2 cups fresh cherries, pitted: Sweet, juicy cherries are the star of this dish! If cherries aren’t in season, feel free to swap in frozen cherries — just be sure to thaw and drain excess moisture.
-
1 cup almond flour: This brings a delightful nuttiness and a bit of moisture to the filling. If you want a gluten-free option, almond flour is perfect! You could also use all-purpose flour if you prefer.
-
1/2 cup sugar: The sweetness balances out the tartness of the cherries. For a lighter option, try using coconut sugar or Stevia.
-
3 eggs: These create a silky, custard-like filling. If you’re vegan, consider substituting with flax eggs (1 tablespoon flaxseed meal + 2.5 tablespoons water = 1 egg).
-
1/4 cup unsalted butter, melted: Adds richness and depth to the filling — plus, who can resist that buttery goodness? You can use coconut oil for a dairy-free alternative.
-
1 teaspoon vanilla extract: A splash of vanilla enhances the flavors beautifully. Homemade vanilla extract is extra special if you have it!
-
1 tablespoon lemon juice: A hint of acidity brightens the tart and complements the cherries. If you don’t have lemon juice, a splash of almond extract could be interesting here too!
-
1/4 teaspoon salt: Don’t skip this! A touch of salt balances the sweetness and brings out the flavors.
Step-by-Step Instructions
1. Preheat Your Oven
Let’s get that oven nice and toasty! Preheat it to 350°F (175°C). This ensures that your tart cooks evenly and comes out perfectly golden.
2. Prepare Your Pie Crust
If you’re using a pre-made pie crust, simply unroll it into a tart pan. Press it gently into the edges and trim any excess. If you’re feeling fancy, make a crimped edge! Bake the crust for 10 minutes until it’s just starting to set. This helps to prevent a soggy bottom later on. Trust me; we want all that buttery goodness to shine without any sogginess.
3. Pit Those Cherries
While the pie crust is baking, let’s tackle the cherries. Remove the pits using a cherry pitter or by slicing them in half. Once pitted, chop any larger cherries if necessary. You want generous pieces that will stand out in the filling, so don’t worry about being too uniform.
4. Mix the Filling
In a medium bowl, whisk together the almond flour, sugar, salt, and eggs until combined. Then, drizzle in the melted butter and vanilla extract. Finally, add the lemon juice. Stir until the mixture is smooth and has a lovely creamy consistency. This is where the magic happens! The almond flour leads to that luscious, custardy texture.
5. Assemble the Tart
Now the fun part! Place the pitted cherries evenly into the baked pie crust. Pour the almond filling over the cherries, making sure to cover them well. It’s okay if some cherries peek through; they add a charming rustic look.
6. Bake to Perfection
Pop the tart into the oven and bake for about 40-45 minutes, or until the top is lightly golden and a toothpick inserted in the center comes out clean. The aroma will fill your kitchen, bringing everyone running!
7. Cool and Serve
Once baked, remove the cherry almond tart from the oven and let it cool for at least 15 minutes before slicing. This helps the filling set up beautifully, so it’s easier to cut neat slices. It can be served warm, at room temperature, or even chilled — whatever suits your mood!
Serving Suggestions
When it comes to presenting your Cherry Almond Tart, less is more! A dusting of powdered sugar on top adds a lovely touch without overshadowing its natural beauty. Serve it with a dollop of freshly whipped cream or a scoop of vanilla ice cream for a delicious contrast to the tart cherries. You could even drizzle a bit of warm chocolate sauce over the slice if you’re feeling indulgent!
Recipe Variations
1. Berry Medley
Feel free to swap out the cherries for a mix of other berries! Raspberries, blueberries, or blackberries make for a delightful twist.
2. Citrus Zing
Try adding some orange or lemon zest to the almond filling for an extra burst of brightness and flavor.
3. Nutty Goodness
Add a handful of chopped nuts, such as pistachios or walnuts, to the filling for an added crunch and flavor elevate.
4. Chocolate Almond Tart
For a chocolatey delight, add a couple of tablespoons of unsweetened cocoa powder to the almond filling for a chocolaty twist — yum!
5. Dairy-Free Delight
Simply use coconut milk instead of butter, and replace dairy sugar with coconut sugar to make this tart entirely dairy-free without compromising on flavor!
Chef’s Notes
This Cherry Almond Tart has become a staple in my household. Over the years, I’ve played around with different flavor profiles and techniques. I remember one particularly adventurous Sunday when I decided to add a splash of amaretto liqueur to the filling. Let’s just say it elevated the tart to a whole new level of elegance! I’ve also tried making mini tarts using a muffin tin, which makes for adorable, individual servings.
Kitchen Tip
Keep an eye on the tart as it bakes! Depending on your oven, baking times may vary. It’s all about that perfect golden color and a set center. If the top is browning too quickly, cover it loosely with aluminum foil to avoid burning.
FAQs and Troubleshooting
How do I know if my tart is done?
Your tart is ready when the filling is set and a light golden hue appears on top. A toothpick inserted into the center should come out clean!
Why is my tart soggy?
If you experience a soggy bottom, it might be due to excess moisture in the cherries or not pre-baking the crust long enough. To avoid this, make sure to drain any excess liquid from thawed frozen cherries before adding them to the filling.
Can I make this tart ahead of time?
Absolutely! You can bake the tart a day in advance and store it in the refrigerator. Just warm it up before serving for the best experience.
What if I can’t find almond flour?
If almond flour isn’t available, you could use finely ground oats or a gluten-free all-purpose flour blend as substitutes. However, keep in mind that the flavor and texture will slightly differ.
Nutritional Info (optional)
This tart is not only delicious but can also be part of a balanced diet when enjoyed in moderation! Each slice packs in goodness from cherries, which offer antioxidants, and almond flour, bringing in vitamin E and healthy fats.
Thank you for joining me on this delicious journey as we dive into the wonderful world of Cherry Almond Tart! I hope you feel inspired to gather your ingredients, share stories, and create warm memories in your kitchen. Remember, cooking is all about love, heart, and, most importantly, fun! Happy baking!
PrintCherry Almond Tart
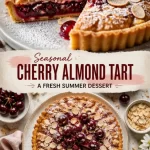
A delightful Cherry Almond Tart with a buttery crust and luscious almond-flavored filling studded with sweet, juicy cherries.
- Prep Time: 15 minutes
- Cook Time: 45 minutes
- Total Time: 60 minutes
- Yield: 8 servings 1x
- Category: Dessert
- Method: Baking
- Cuisine: American
- Diet: Vegetarian
Ingredients
- 1 pre-made pie crust
- 2 cups fresh cherries, pitted
- 1 cup almond flour
- 1/2 cup sugar
- 3 eggs
- 1/4 cup unsalted butter, melted
- 1 teaspoon vanilla extract
- 1 tablespoon lemon juice
- 1/4 teaspoon salt
Instructions
- Preheat your oven to 350°F (175°C).
- Prepare the pie crust by unrolling it into a tart pan and baking for 10 minutes.
- Pit the cherries and chop larger ones if necessary.
- Mix the almond flour, sugar, salt, and eggs in a bowl, then drizzle in melted butter and vanilla extract.
- Add the lemon juice and stir until smooth.
- Assemble the tart by placing cherries in the crust and pouring the almond filling over them.
- Bake for 40-45 minutes until golden and a toothpick comes out clean.
- Cool for 15 minutes before slicing and serving.
Notes
Dust with powdered sugar before serving. Can be enjoyed warm or chilled. Consider adding a scoop of ice cream for extra indulgence!
Nutrition
- Serving Size: 1 slice
- Calories: 350
- Sugar: 20g
- Sodium: 200mg
- Fat: 18g
- Saturated Fat: 7g
- Unsaturated Fat: 10g
- Trans Fat: 0g
- Carbohydrates: 40g
- Fiber: 2g
- Protein: 6g
- Cholesterol: 60mg
Keywords: Cherry Tart, Almond Tart, Dessert Recipe, Summer Desserts, Easy Recipes