The Irresistible Charm of Cherry Pie Bombs: A Sweet Treat for Every Occasion
Welcome to Buttered Table, dear friends! Today, we’re diving into a delightful recipe that’s dedicated to pure joy, nostalgia, and, of course, a good dose of buttery goodness: Cherry Pie Bombs! These little treats are the perfect blend of flaky pie crust, sweet cherry filling, and a sprinkle of sugar that makes them shine like gems on your dining table.
Now, you might wonder what a "pie bomb" is. Picture this: A burst of sweet cherry goodness wrapped in a comforting, tender crust, waiting to explode with flavor in every bite. They’re the ultimate handheld dessert—perfect for picnics, family gatherings, or just a cozy evening at home. I can practically hear the laughter and chatter around the table as everyone digs in!
Cooking Cherry Pie Bombs isn’t just about satisfying your sweet tooth; it’s about bringing people together. These fun-to-make bites are reminiscent of days spent in my grandmother’s kitchen, where the air was filled with the aromas of freshly baked pies. Her skill with crusts was legendary, and she always encouraged me to embrace the messiness of cooking—because that’s where the magic happens.
Whether you’re a seasoned pro or just starting out in the kitchen, I promise you’ll love making these Cherry Pie Bombs. They’re a fantastic way to practice your pie-making skills and create something that’s as beautiful as it is delicious. So, grab your apron, and let’s get started!
A Sweet Memory: The Heart of Cherry Pie Bombs
When I think of cherry pie, I can’t help but conjure the scent of my grandmother’s kitchen on a hot summer day. Every year, she would invite the whole family over to help pick cherries from her lush backyard tree. I can still hear the sound of laughter, the chatter of cousins, and the soft rustling of leaves as we filled our buckets to the brim with ripe, juicy cherries.
Once we had our bounty, we’d hustle back to the kitchen, where Grandma would roll out her famous pie crust—delicate, buttery, and utterly irresistible. I remember the way she taught me to avoid overworking the dough; she insisted our hands should be as gentle with it as a hug. As we mixed the sweet cherry filling and rolled out the dough, I realized cooking was more than just a chore; it was a celebration of family and tradition.
Inspired by those cherished moments, I decided to create a simpler, more approachable version of cherry pie that could be enjoyed anytime: Cherry Pie Bombs! They give you that same satisfying pie experience without the fuss of a full-sized pie. Plus, they encapsulate all the warmth and love that making food for others brings.
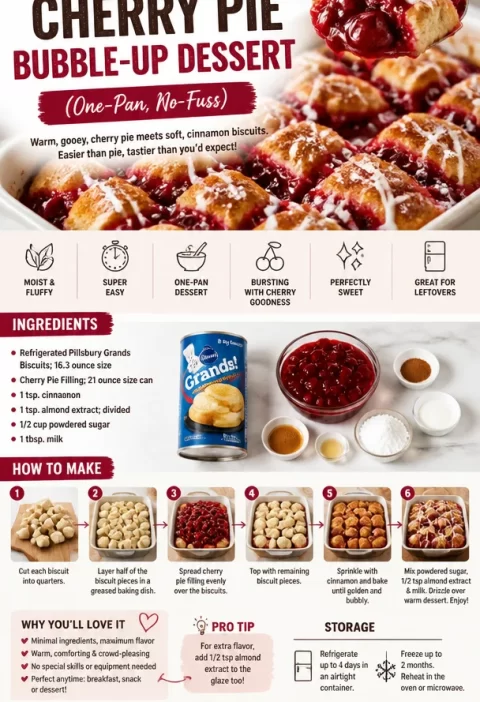
Ingredients
Before we jump into cooking, let’s gather our ingredients. Here’s what you’ll need:
-
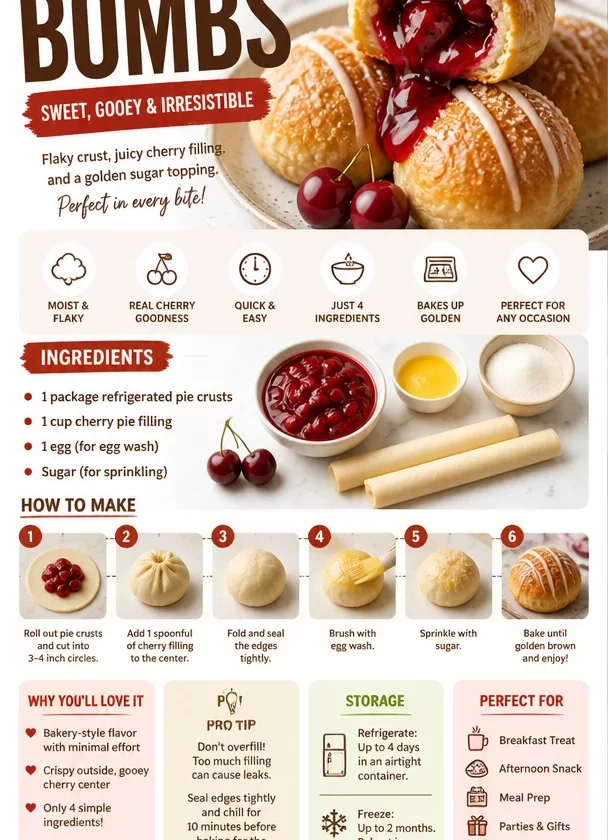
1 package refrigerated pie crusts
These ready-made crusts save time and effort while still delivering that flaky texture we all love. If you prefer homemade, you can use your favorite pie crust recipe. -
1 cup cherry pie filling
Store-bought filling is quick and convenient, but don’t hesitate to use fresh or frozen cherries instead! Simply pitting and cooking them with a little sugar and cornstarch gives you an excellent homemade filling. -
1 egg (for egg wash)
This will give your bombs a beautiful golden color when baked. Need a vegan option? Use a sprinkle of non-dairy milk instead! -
Sugar (for sprinkling)
A little sugar on top adds the perfect finishing touch, giving your bombs a glossy finish and a hint of sweetness. You can also experiment with different types of sugar, like turbinado or cinnamon sugar, for extra crunch and flavor.
Step-by-Step Instructions
Now that we have everything prepped, let’s get to the good part: making our Cherry Pie Bombs! Follow these steps, and feel free to sprinkle in your personal touch along the way.
-
Preheat Your Oven: Start by preheating your oven to 400°F (200°C). This step is essential for achieving that crispy, golden crust we all adore.
-
Prepare the Pie Crusts: Roll out the refrigerated pie crusts on a lightly floured surface. If you’ve chosen store-bought, they usually come ready to use—just unroll and smooth out any creases. Use a cookie cutter or a glass to cut out circles, about 4 inches in diameter. Feel free to be creative with shapes and sizes!
-
Fill with Cherry Goodness: Place a tablespoon of cherry pie filling in the center of each pie crust circle. Avoid overfilling—too much filling can cause the bombs to ooze, and we want to create beautiful pockets of flavor!
-
Create the Bombs: Fold the crust over the filling to create a half-moon shape. Pinch the edges to seal, and for extra security, you can use a fork to crimp the edges. This is an excellent opportunity to let those artistic skills shine!
-
Egg Wash Time: In a small bowl, beat the egg to create your egg wash. Brush the tops of your filled and sealed pie bombs with the egg wash. This step is crucial for that golden finish and extra shine in the oven.
-
Sprinkle with Sugar: Don’t skip this step! Sprinkle a light dusting of sugar over the tops of your pie bombs for that delightful crunch and sweetness.
-
Bake: Place your cherry pie bombs on a parchment-lined baking sheet and pop them in the preheated oven. Bake for about 15-20 minutes, or until the tops are golden brown and flaky. The aroma will be absolutely heavenly!
-
Cool and Serve: Once baked, let them cool on the baking sheet for a few minutes before transferring them to a wire rack. This helps maintain their crispness!
Serving Suggestions
To serve your Cherry Pie Bombs, arrange them on a large platter or in a charming basket, perfect for sharing. You can dust them with powdered sugar for a fairytale touch, and don’t forget to have a scoop of vanilla ice cream ready on the side! The cool creaminess and the warm, sweet cherry filling make an irresistible duo. Dive in, and watch them disappear!
Recipe Variations
Ready to switch things up? Here are some fun ideas to give your Cherry Pie Bombs a twist:
-
Berry Medley: Replace cherry filling with mixed berries—blueberries, raspberries, or strawberries— to create a delightful berry bomb.
-
Chocolate Drizzle: Once baked, drizzle melted chocolate over the top for a decadent chocolate cherry combo.
-
Almond Flavor: Add a splash of almond extract to your filling for a unique flavor twist that pairs beautifully with cherries.
-
Savory Version: Consider a savory filling like spinach and feta or mushrooms and goat cheese for a savory bomb option. Omit sugar entirely on top for a delicious appetizer.
-
Cinnamon Spice: Sprinkle some cinnamon in your filling for a warm, cozy flavor profile that might just remind you of your grandma’s holiday pies!
Chef’s Notes
As with any recipe, these Cherry Pie Bombs have a special place in my heart. The beauty lies in their simplicity and versatility. Over the years, I’ve perfected the technique through countless experiments in my kitchen—from flops with too much filling to delightful surprises when I added unexpected spices.
I remember one time, I tried to rush the cooling process by placing them in the fridge, only to have them turn limp and soggy. Lesson learned: patience truly is a virtue in baking! Embrace the process, cherish the moments, and don’t be afraid of a little mess—it’s all part of the adventure.
FAQs and Troubleshooting
1. What do I do if my pie bombs burst open while baking?
Don’t worry! It can happen if they’re overfilled. For future reference, ensure you’re using just enough filling to keep them contained.
2. How can I prevent the crust from getting soggy?
Ensure your cherry filling isn’t too wet before adding it to the dough. Using a thickener like cornstarch can also help absorb excess moisture.
3. Can I make the filling ahead of time?
Absolutely! You can prepare the filling a day in advance and store it in the fridge, allowing all those delicious flavors to meld together.
4. Can I freeze these pie bombs?
Yes! You can freeze them before baking. Simply place them on a baking sheet to freeze individually, then transfer to a freezer bag. When ready to bake, just add a few more minutes to the baking time!
Nutritional Info (Optional)
- Servings: 12
- Calories per serving: Approximately 180
- Total Fat: 8g
- Carbohydrates: 25g
- Sugar: 5g
- Protein: 2g
Thank you for joining me today and sharing this delightful journey through the world of Cherry Pie Bombs. May your kitchens overflow with warmth, laughter, and the irresistible scent of baked goods! So, gather your loved ones, pull up a chair, and let’s create something special together!
PrintCherry Pie Bombs
Delightful cherry-filled bites wrapped in flaky pie crust, perfect for any occasion.
- Prep Time: 20 minutes
- Cook Time: 20 minutes
- Total Time: 40 minutes
- Yield: 12 servings 1x
- Category: Dessert
- Method: Baking
- Cuisine: American
- Diet: Vegetarian
Ingredients
- 1 package refrigerated pie crusts
- 1 cup cherry pie filling
- 1 egg (for egg wash)
- Sugar (for sprinkling)
Instructions
- Preheat your oven to 400°F (200°C).
- Prepare the refrigerated pie crusts on a lightly floured surface, and roll out as needed.
- Cut out circles, about 4 inches in diameter, using a cookie cutter or glass.
- Place a tablespoon of cherry pie filling in the center of each pie crust circle.
- Fold the crust over the filling to create a half-moon shape and pinch the edges to seal.
- Beat the egg to create an egg wash, and brush it over the tops of each pie bomb.
- Sprinkle a light dusting of sugar on top for added sweetness.
- Bake for 15-20 minutes, or until golden brown and flaky.
- Cool on a wire rack before serving.
Notes
Serve with powdered sugar and vanilla ice cream for a delightful pairing.
Nutrition
- Serving Size: 1 serving
- Calories: 180
- Sugar: 5g
- Sodium: 200mg
- Fat: 8g
- Saturated Fat: 2g
- Unsaturated Fat: 4g
- Trans Fat: 0g
- Carbohydrates: 25g
- Fiber: 1g
- Protein: 2g
- Cholesterol: 30mg
Keywords: cherry pie, dessert, baking, handheld treats, family recipe