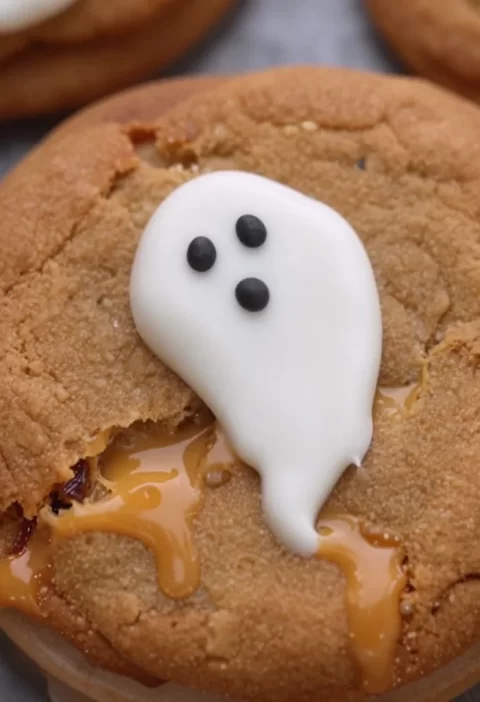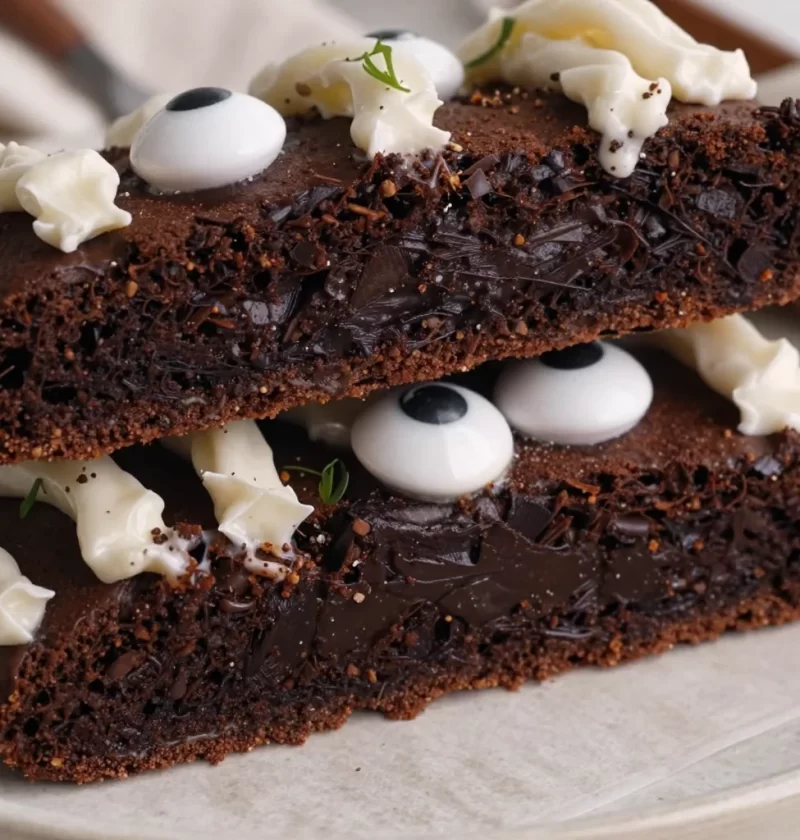
Halloween Mummy Cookies: A Spooktacular Treat
As the golden leaves begin to fall and the air turns crisp, there’s a certain magic in the atmosphere that means Halloween is just around the corner! This festive season brings a delightful excuse for a bit of whimsy, and what better way to celebrate than by baking up a batch of Halloween Mummy Cookies? These soft, rich, and decadent cookies are not only irresistibly delicious but also incredibly fun to decorate. Picture this: warm cookies fresh out of the oven, a swirly mess of vanilla buttercream frosting draped over like a cozy mummy’s wraps, and a pair of candy eyes peeking through. These treats are sure to bring joy and smiles to your family, friends, or any ghouls that may come knocking on your door.
But, let me take you on a little journey back to my childhood. I remember vividly the excitement bubbling in my stomach as Halloween approached. My mom and I would spend afternoons whipping up spooky treats in a whirlwind of flour and sugar, our kitchen spilling over with the scent of scrumptious baking. One year, we decided to make mummy cookies, and I can still hear her giggle as we slathered frosting over the cookies, creating the perfect “bandages” for our sweet mummies. The sheer joy of decorating them, and the laughter we shared while preparing, made those cookies more than just a treat; they became part of our family tradition.
So, grab your apron and let’s conjure up some Halloween magic together with these delightful Mummy Cookies that are bound to leave haunting memories.
Ingredients
To make these delicious Halloween Mummy Cookies, gather the following ingredients:
-
1 cup unsalted butter, softened
This is the star of our cookie batter, providing that rich, delicious flavor. If you’re in a pinch, you can substitute it with margarine or coconut oil, but the taste will differ slightly. -
1 cup granulated sugar
This adds sweetness and helps create that chewy texture. You could use a sugar substitute, like coconut sugar, but keep in mind that it might change the color and flavor a bit! -
1 cup packed brown sugar
Brown sugar gives these cookies a lovely depth of flavor and moisture. If you’re out, you can mix white sugar with a little molasses (1 tablespoon per cup). -
2 large eggs
Eggs help with binding and moisture. If you’re looking for a vegan alternative, substitute with flax eggs (1 tablespoon ground flaxseed combined with 2.5 tablespoons water per egg, let sit until thickened). -
2 teaspoons vanilla extract
Vanilla brings a warm aromatic flavor that elevates our cookie base. Pure vanilla extract is best; otherwise, imitation vanilla can be used. -
2 cups all-purpose flour
This is the foundation of our cookies. For a gluten-free version, try using a 1:1 gluten-free flour blend. -
3/4 cup unsweetened cocoa powder
Cocoa powder gives our cookies a rich chocolate flavor. You can use Dutch-processed cocoa for a smoother taste, or even carob powder for a caffeine-free alternative. -
1 teaspoon baking powder
Baking powder helps our cookies rise and makes them nice and fluffy. If you’re out of this, you can substitute with 2 teaspoons of baking soda, but keep in mind that this might alter the taste a bit. -
1/2 teaspoon baking soda
A little extra lift is always welcome! Again, if you need to substitute, using a little extra baking powder can help. -
1/2 teaspoon salt
Just a pinch of salt enhances all the other flavors! It’s crucial for balancing sweetness. -
1 cup vanilla buttercream frosting
The gooey wrap for our cookie mummies. You can buy store-bought frosting, or make your own with butter, powdered sugar, vanilla extract, and a splash of milk. -
Candy eyes for decoration
These little guys bring our mummies to life! If you can’t find candy eyes, you can use mini chocolate chips or even small pieces of dried fruit for a quirky touch.
Step-by-Step Instructions
Let’s dive into the cookie-making process! Here’s how to create these delicious Halloween Mummy Cookies:
-
Preheat the Oven
Preheat your oven to 350°F (175°C). This is a crucial step that ensures even baking. While the oven warms up, you can start preparing your cookie dough. -
Cream the Butter and Sugars
In a large mixing bowl, cream together the softened butter, granulated sugar, and brown sugar until it’s light and fluffy, typically about 3-5 minutes with an electric mixer on medium speed. This step incorporates air into the mix for a light texture. Don’t rush this; fluffiness is your friend! -
Add Eggs and Vanilla
Beat in the eggs one at a time, ensuring each is thoroughly mixed in before adding the next. Then add the vanilla extract. This helps build that irresistible flavor and adds moisture. -
Sift the Dry Ingredients
In a separate bowl, sift together the flour, cocoa powder, baking powder, baking soda, and salt. Sifting not only combines the ingredients but also aerates them, ensuring a nice soft cookie. -
Combine Wet and Dry Ingredients
Gradually mix the dry ingredients into the wet mixture until well combined. Be careful not to over-mix; you want to keep that airy texture! A soft dough will form, and that’s just what we want. -
Scoop and Shape
Using a cookie scoop or a spoon, drop rounded tablespoons of dough onto a baking sheet lined with parchment paper, leaving plenty of space between each one. Remember, these cookies will spread a little during baking, so give them breathing room! -
Bake the Cookies
Bake in your preheated oven for 10-12 minutes. The cookies are done when they’re slightly puffed and a little set in the center but still soft to the touch. They’ll firm up as they cool, so don’t be tempted to bake them too long—nobody likes a dry cookie! -
Cool Time
Once out of the oven, let them cool on the baking sheet for around 5 minutes before transferring to a wire rack. The cooling process helps them firm up so they don’t fall apart when you decorate! -
Decorate with Frosting
Once the cookies are completely cool, it’s time for the fun part: decorating! Using a piping bag or a knife, drizzle the vanilla buttercream frosting over the cookies in a swirly pattern to create the mummy’s wraps. -
Add Candy Eyes
Place two candy eyes on each cookie before the frosting sets, so they stick well. And voilà, your mummy cookies are ready to haunt your Halloween party!
Serving Suggestions
These Mummy Cookies are perfect for any Halloween gathering! For a delightful presentation, arrange them on a festive platter with some faux spider webs or little plastic spiders strewn about. You could even pair them with a warm glass of milk or a spooky punch to create a lovely balance of treats! Your guests will be enchanted by both the appearance and the delightful taste.
Recipe Variations
Want to switch things up? Here are a few fun variations to consider:
-
Chocolate Chip Mummies
Fold in some semi-sweet chocolate chips to the cookie dough for added richness and gooeyness. -
Spice Mummies
Add a teaspoon of cinnamon and a pinch of nutmeg to the dough for a warm, spiced flavor that’s perfect for fall. -
Nutty Mummies
Toss in some chopped walnuts or pecans for a bit of crunch in your cookies. -
Cut-Out Mummy Cookies
Roll out the dough and use Halloween-themed cookie cutters before decorating them as mummies! -
Vegan Mummies
Swap the eggs for flax eggs and use plant-based butter to create a vegan version that’s just as delicious!
Chef’s Notes
While these Halloween Mummy Cookies are a festive tradition for many, they’ve also evolved over time. I love experimenting with different flavors and textures, and I often find inspiration from the memories I hold dear. One of my favorite moments in the kitchen was when my niece came over, and we declared it ‘Cookie Decorating Day.’ We turned these mummies into a whole family of spooky creatures, each decorated with unique candy features that reflected our personalities. The joy and laughter that day reminded me that cooking is not just about the food; it’s also about sharing love and joy during the process.
FAQs and Troubleshooting
-
Why are my cookies flat?
If your cookies spread too much, it might be due to warm dough or not enough flour. Ensure your butter is softened, not melted, and consider chilling the dough for about 30 minutes before baking. -
Can I freeze these cookies?
Absolutely! You can freeze the dough in balls and bake them directly from the freezer. Just extend the baking time by a couple of minutes. Alternatively, freeze already baked cookies in an airtight container for up to 3 months. -
What if I don’t have cocoa powder?
You could substitute an equal amount of carob powder or simply make vanilla mummies by omitting the cocoa. Just add a little extra flour to compensate. -
How do I avoid overmixing?
Mix just until there are no flour streaks visible in your dough. This slight caution ensures your cookies remain soft and tender rather than tough.
Nutritional Info: (per cookie, approx.)
- Calories: 180
- Fat: 8g
- Carbohydrates: 25g
- Protein: 2g
Creating Halloween Mummy Cookies is not just about the end result—it’s about the journey and the cherished memories made along the way. So, this Halloween, gather your loved ones, mix up a little magic in the kitchen, and enjoy the delightful process of baking! Happy haunting!
PrintHalloween Mummy Cookies
Delightfully spooky cookies decorated to look like mummies, perfect for Halloween festivities.
- Prep Time: 15 minutes
- Cook Time: 12 minutes
- Total Time: 27 minutes
- Yield: 24 servings 1x
- Category: Dessert
- Method: Baking
- Cuisine: American
- Diet: Vegetarian
Ingredients
- 1 cup unsalted butter, softened
- 1 cup granulated sugar
- 1 cup packed brown sugar
- 2 large eggs
- 2 teaspoons vanilla extract
- 2 cups all-purpose flour
- 3/4 cup unsweetened cocoa powder
- 1 teaspoon baking powder
- 1/2 teaspoon baking soda
- 1/2 teaspoon salt
- 1 cup vanilla buttercream frosting
- Candy eyes for decoration
Instructions
- Preheat the Oven: Preheat your oven to 350°F (175°C).
- Cream the Butter and Sugars: In a large mixing bowl, cream together the softened butter, granulated sugar, and brown sugar until light and fluffy.
- Add Eggs and Vanilla: Beat in the eggs one at a time, then add the vanilla extract.
- Sift the Dry Ingredients: In a separate bowl, sift together the flour, cocoa powder, baking powder, baking soda, and salt.
- Combine Wet and Dry Ingredients: Gradually mix the dry ingredients into the wet mixture until well combined.
- Scoop and Shape: Drop rounded tablespoons of dough onto a baking sheet lined with parchment paper.
- Bake the Cookies: Bake in your preheated oven for 10-12 minutes.
- Cool Time: Let them cool on the baking sheet for around 5 minutes before transferring to a wire rack.
- Decorate with Frosting: Drizzle the vanilla buttercream frosting over the cookies in a swirly pattern.
- Add Candy Eyes: Place two candy eyes on each cookie before the frosting sets.
Notes
For variations, consider adding chocolate chips, spices like cinnamon, nuts, or making a vegan version with flax eggs.
Nutrition
- Serving Size: 1 cookie
- Calories: 180
- Sugar: 10g
- Sodium: 150mg
- Fat: 8g
- Saturated Fat: 5g
- Unsaturated Fat: 3g
- Trans Fat: 0g
- Carbohydrates: 25g
- Fiber: 1g
- Protein: 2g
- Cholesterol: 30mg
Keywords: Halloween cookies, Mummy cookies, spooky treats, dessert, family baking