Cherry Crisp: A Sweet Taste of Nostalgia
Welcome to Buttered Table, where comfort cooking meets warm memories! Today, we’re diving into a dish that’s not only a stellar crowd-pleaser but also a nostalgic favorite: Cherry Crisp. Picture the scene: your friends and family gathered around your kitchen, laughter chiming like silver bells, as the aroma of freshly baked cherries fills the air. It’s a sweet reminder that the best moments in life often happen over shared meals, and I can’t wait to guide you through creating this delightful dessert.
Cherry Crisp is the perfect blend of juicy fruit and crispy topping; it’s like a hug in a bowl! Whether it’s a summer barbecue, a cozy family dinner, or just a moment for yourself with a warm dessert, this recipe is flexible, forgiving, and downright delicious. So slip on your apron, preheat your oven, and let’s stroll down memory lane while whipping up this irresistible treat!
A Walk Down Memory Lane
As I whisk these memories into the mixing bowl, I can’t help but recall the summers of my childhood, spent at my grandmother’s house in the countryside. We would race each other to the cherry trees in her backyard, giggling and scrabbling around, trying to pick the ripest, juiciest cherries. I can still hear her saying, “Make sure to leave some for the pie!”
Once our baskets were filled, we’d head to her kitchen, where she’d guide me through making her famous Cherry Crisp. I remember how she’d show me the precise way to pit the cherries—making it a fun challenge rather than a chore. Her crispy topping was never the same twice, depending on what we had in the pantry; that creative spirit has definitely influenced my cooking style!
Baking with her turned into a ritual, a dance of joy and laughter, with flour clouds in the air and mumbled song lyrics as we stirred together. The cherry crisp was always the centerpiece of our feasts, topped with a generous scoop of vanilla ice cream. Those were moments of simple bliss, and that’s what I want to encapsulate in today’s recipe: joy, shared meals, and an appreciation for the beauty of food.
Ingredients
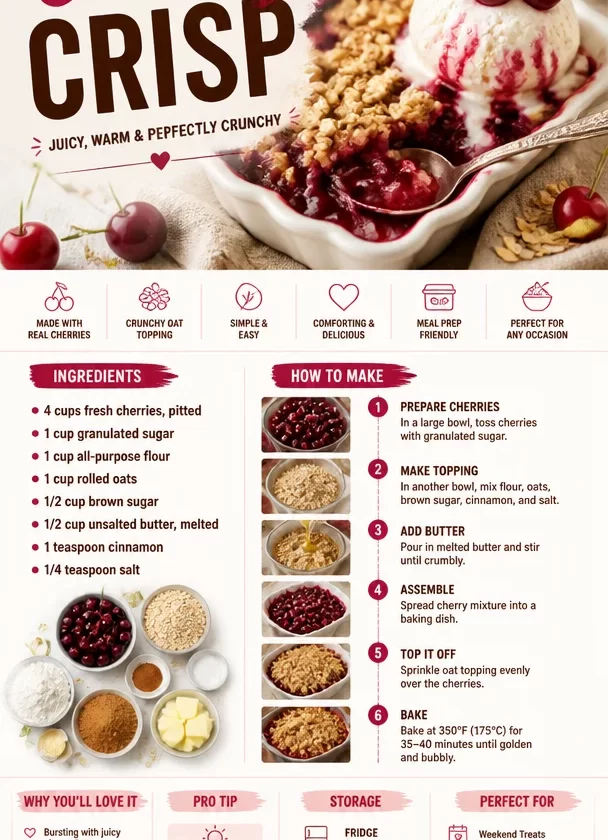
To make this Cherry Crisp, here’s what you’ll need:
-
4 cups fresh cherries, pitted
- Fresh cherries are key for that juicy pop. If cherries aren’t in season, feel free to use frozen—but ensure they are thoroughly thawed and drained to avoid excess moisture.
-
1 cup granulated sugar
- This sweetener balances the tartness of the cherries. You can swap it out with coconut sugar for a hint of caramel flavor or use honey for a natural sweetness.
-
1 cup all-purpose flour
- All-purpose flour provides the backbone for the topping. If you prefer a gluten-free version, almond flour or gluten-free all-purpose blends work well, although texture may vary slightly.
-
1 cup rolled oats
- Oats add the perfect crunch to our topping. For a nutty twist, try swapping in some ground flaxseed, or use quick oats in a pinch—they’ll bake up nicely, too!
-
1/2 cup brown sugar
- Brown sugar deepens the flavor with its molasses undertones. If you’re in a bind, use white sugar but consider adding a teaspoon of molasses for that rich flavor.
-
1/2 cup unsalted butter, melted
- Unsalted butter adds richness. For a vegan option, coconut oil or a dairy-free margarine does the trick just as well!
-
1 teaspoon cinnamon
- A hint of cinnamon elevates the dessert with warm spice. You can substitute it with nutmeg or even pumpkin spice for a different flair.
-
1/4 teaspoon salt
- A touch of salt balances sweetness. If you’d like, try sea salt for a sophisticated touch.
Step-by-Step Instructions
Now, let’s get cozy in the kitchen! Follow these steps, and I’ll sprinkle in a few tips along the way to ensure your Cherry Crisp turns out perfectly.
-
Preheat Your Oven:
Begin by preheating your oven to 350°F (175°C). This ensures that your crisp bakes evenly and turns golden. -
Prepare Your Cherries:
Place the pitted cherries in a mixing bowl. Sprinkle 1/2 cup of granulated sugar over them. If you want a tad more tartness, feel free to reduce the sugar! Toss the cherries gently to coat them evenly and let them sit for about 10-15 minutes. This allows their natural juices to release—so divine! -
Make the Topping:
In a separate large bowl, combine 1 cup of flour, 1 cup of rolled oats, 1/2 cup brown sugar, 1 teaspoon cinnamon, and 1/4 teaspoon salt. Mix them well with a fork or whisk for a lovely, even blend. -
Add the Melting Butter:
Pour the melted butter over the dry mixture. Mix it until crumbly—don’t worry if some clumps remain; they’ll bake up scrumptiously crispy. -
Assemble the Dish:
Spread the cherries evenly at the bottom of a greased 9×13-inch baking dish. Gently sprinkle the crumbly topping over the cherries, ensuring all areas are covered. -
Bake to Perfection:
Slide your baking dish into the preheated oven. Let the Cherry Crisp bake for about 35-40 minutes, or until the topping is golden brown and the cherries are bubbling. Keep an eye on it—the aroma will be hard to resist! -
Cool and Serve:
Once baked, take it out and let it cool for about 10 minutes before serving. This allows the filling to set slightly, making it easier to scoop. Serve it warm, and don’t forget that heaping scoop of vanilla ice cream or a dollop of whipped cream on top!
Serving Suggestions
When it comes to serving your Cherry Crisp, the presentation can be just as delightful as the taste. For a casual gathering, scoop generous portions into rustic bowls. If you’re feeling fancy, bake individual crisps in ramekins for a personal touch. Drizzle a bit of warm caramel sauce over the top for extra indulgence, and voilà—your dessert is now an eye-catching centerpiece!
Recipe Variations
While the classic Cherry Crisp is perfectly delicious, don’t shy away from injecting your personality into the dish! Here are some fun variations to spark your creativity:
-
Mixed Berry Crisp:
Combine cherries with blueberries, raspberries, and blackberries for a colorful berry medley that brings a burst of flavor. -
Almond Cherry Crisp:
Add sliced almonds to the topping for a delightful crunch and a lovely nutty flavor. -
Spiced Cherry Variation:
For a fall-inspired twist, incorporate pumpkin pie spice into the topping for that warm autumnal feel. -
Chocolate Chip Cherry Crisp:
Mix in mini chocolate chips with your cherry filling for a sweet surprise! -
Coconut Cherry Crisp:
Substitute a portion of the flour and oats with shredded coconut for a tropical twist!
Chef’s Notes
One of my favorite things about cooking is how recipes evolve over time, and Cherry Crisp has certainly been no exception. Initially, I followed my grandmother’s recipe to the letter, but with each attempt, I realized I could add my own flair. There were delicious accidents—like the time I accidentally used cayenne pepper instead of cinnamon—the heat added a peculiar yet intriguing warmth!
Cooking is not just about following rules; it’s about embracing the process, experimenting, and creating a narrative that aligns with your taste buds. Chefs and home cooks alike thrive on creativity, so never shy away from bending the rules!
FAQs and Troubleshooting
-
Q: My cherry filling is too runny; what should I do?
- A: If your filling ends up watery, try adding a bit of cornstarch or flour to thicken it! Alternatively, let it cool slightly before serving, as it’ll set as it cools.
-
Q: Can I use frozen cherries?
- A: Absolutely! Just make sure to thaw and drain them to remove excess moisture for the best results.
-
Q: How can I keep the topping crispy?
- A: If you’re worried about soggy toppings, bake it a little longer and allow it to cool for a few minutes before serving. Crispiness often comes with patience!
-
Q: Can I prepare this in advance?
- A: While it’s always best served fresh, you can prep the cherry filling and topping separately a day ahead. Just assemble and bake when you’re ready!
Nutritional Info (If Applicable)
While I believe in enjoying food without worry, I’ve included a general nutritional breakdown for a clearer picture:
- Serving Size: 1/8 of the dish
- Calories: Approximately 350
- Fat: 14g
- Carbohydrates: 52g
- Protein: 3g
- Fiber: 3g
Remember that these values will vary based on ingredient choices and portion sizes!
I hope this Cherry Crisp brings as much joy to your table as it has to mine! Pull up a chair, bring your loved ones together, and celebrate the warmth of good food and cherished memories. Don’t forget to share your own Cherry Crisp stories and variations with me before you dig in! Happy baking and enjoy every bite!
PrintCherry Crisp
A nostalgic dessert featuring juicy cherries topped with a crispy, buttery oat mixture.
- Prep Time: 15 minutes
- Cook Time: 40 minutes
- Total Time: 55 minutes
- Yield: 8 servings 1x
- Category: Dessert
- Method: Baking
- Cuisine: American
- Diet: Vegetarian
Ingredients
- 4 cups fresh cherries, pitted
- 1 cup granulated sugar
- 1 cup all-purpose flour
- 1 cup rolled oats
- 1/2 cup brown sugar
- 1/2 cup unsalted butter, melted
- 1 teaspoon cinnamon
- 1/4 teaspoon salt
Instructions
- Preheat your oven to 350°F (175°C).
- Place the pitted cherries in a mixing bowl. Sprinkle 1/2 cup sugar and toss gently to coat. Let them sit for about 10-15 minutes.
- Combine flour, oats, brown sugar, cinnamon, and salt in a separate bowl.
- Pour the melted butter over the dry mixture, mixing until crumbly.
- Spread cherries in a greased 9×13-inch baking dish. Sprinkle the topping evenly over the cherries.
- Bake for 35-40 minutes, until the topping is golden and the cherries are bubbling.
- Cool for 10 minutes before serving with vanilla ice cream or whipped cream.
Notes
For a vegan option, substitute coconut oil for butter. You can also personalize the crisp with various fruit or nut toppings.
Nutrition
- Serving Size: 1/8 of the dish
- Calories: 350
- Sugar: 25g
- Sodium: 180mg
- Fat: 14g
- Saturated Fat: 8g
- Unsaturated Fat: 4g
- Trans Fat: 0g
- Carbohydrates: 52g
- Fiber: 3g
- Protein: 3g
- Cholesterol: 30mg
Keywords: cherry crisp, dessert, nostalgic, baking, summer recipe