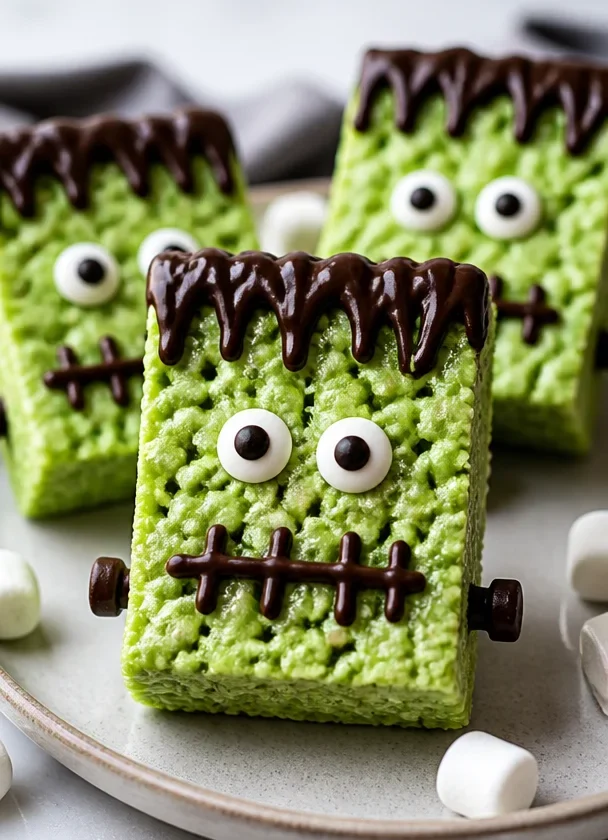
Welcome to my kitchen, where simple ingredients transform into delightful culinary adventures! Today, I’m excited to share a playful twist on a classic treat that will not only ignite your creativity but also bring a smile to your face: Frankenstein Rice Krispie Treats! These spooky snacks are perfect for Halloween gatherings, kids’ parties, or just a fun afternoon in the kitchen.
Growing up, I was always mesmerized by the magic of cooking. My mother would whip up traditional recipes that filled our home with aromatic spices and warm flavors. But it was my first encounter with Rice Krispie treats that sparked a deep joy in me. The gooey marshmallows melting into crunchy cereal were beyond comforting. Today, we are taking this nostalgic treat and giving it a playful Halloween makeover, inspired by the Frankenstein monster himself!
In this blog post, I’ll guide you through making these deliciously green, Marshmallow-infused treats that will have everyone talking. You’ll learn how to achieve the perfect texture, the right balance of sweetness, and tips to decorate them like a frenzied scientist in her laboratory! So, grab your apron, and let’s embark on this tasty adventure together!
Personal Story
The first time I made Rice Krispie treats, I was probably around eight years old, filled with boundless energy and a sticky fascination for marshmallows. My mother had just finished a long day, and I wanted to surprise her. I whisked together melted butter and marshmallows, feeling like a mini-Breakthrough Chef. The kitchen was a delightful mess, with fluff and cereal scattered everywhere. When I finally shaped the gooey creation into squares, the look of surprise on my mother’s face was priceless!
Years later, as I learned more about cooking, I began to appreciate the simplicity of ingredients. It reminded me that cooking is not just about following instructions; it’s about making moments, like surprising someone you love with a delicious sweet treat. This Halloween, I want to capture that spirit of surprise and creativity by transforming the classic Rice Krispie treat into something uniquely festive and fun: Frankenstein Rice Krispie Treats.
Ingredients
Here’s what you’ll need for these spooky treats:
-
6 cups Rice Krispies cereal
This cereal is the backbone of our treats—crisp and light. You could substitute it with any puffed cereal if you’re looking for gluten-free options. -
1/4 cup unsalted butter (1/2 stick)
Butter adds richness. If you want a dairy-free alternative, coconut oil works just as well and adds a hint of tropical flavor. -
4 cups mini marshmallows
The star of our recipe! Mini marshmallows melt evenly, making them perfect for binding the cereal. If you can’t find mini ones, you can use regular marshmallows; just chop them into smaller pieces. -
Green food coloring
This is what brings our Frankenstein theme to life! You can use gel food coloring for a more vibrant hue or natural dye from spinach if you prefer a healthier option. -
Chocolate chips or melting chocolate
For the facial features of Frankenstein (eyes and mouth), use semi-sweet or white chocolate chips. You can also use melted white chocolate for easier piping. -
Candy eyes
These will help create an adorable yet spooky look. They can be found in most grocery stores or cake decoration shops. If you can’t find them, you can use mini chocolate chips! -
Edible eyes or sprinkles for decoration
Let your creativity flow! Use edible decorations to give your treats personality. You can also try crushed candies or nuts for an added crunch.
With this list of ingredients, you’re ready to start creating treats that will be the highlight of your season!
Step-by-Step Instructions
Now for the fun part—making these Frankenstein Rice Krispie Treats! Let’s dive in:
-
Prep Your Space: Begin by greasing a 9×13-inch baking pan with butter or cooking spray. This will prevent the gooey treats from sticking. Line the pan with parchment paper for an easier removal later.
-
Melt the Butter: In a large saucepan over medium heat, melt the butter slowly. As it begins to melt, take in that sweet, buttery aroma!
-
Add the Marshmallows: Once the butter is melted, add your mini marshmallows. Stir continuously with a spatula or wooden spoon until they are fully melted and smooth, about 2-3 minutes. Be patient; this is where the magic happens!
-
Color the Mixture: Once your marshmallows are a smooth, glossy puddle, add several drops of green food coloring. Mix until you have an even color throughout. If you want to deepen the green, add more coloring to achieve the desired hue.
-
Combine with Rice Krispies: Remove the saucepan from heat, and immediately stir in the Rice Krispies cereal. Make sure to coat them evenly with the marshmallow mixture. This step is crucial! Use a spatula to fold the mixture rather than stir; you want to keep that crispy texture.
-
Transfer to the Pan: Pour the mixture into your prepared baking pan. With your lightly greased hands or a spatula, press the mixture firmly into an even layer. Make sure you don’t compact it too much—light and fluffy is the goal!
-
Let Cool: Allow the treats to cool at room temperature for at least 30 minutes. This will help them set properly.
-
Cut and Decorate: Once cooled, cut them into pieces of your desired size (squares or rectangles work beautifully). Now, it’s time to add Frankenstein’s features—melt chocolate or use chocolate chips for eyes and a mouth. Pipe or place them carefully on each treat.
-
Store Your Treats: Place them on a serving plate and keep leftover treats in an airtight container at room temperature. Enjoy munching on these fantastical creations!
Chef Tips
- If you want your treats to have a super smooth finish, spray your hands with non-stick spray before pressing the mixture into the pan.
- You can even draw monster eyebrows using melted chocolate—have some fun with it!
- To avoid getting sticky fingers, consider using a large spoon or spatula when mixing the marshmallows and cereal.
Serving Suggestions
Presentation matters, especially for themed treats like these! Here are a few ways to serve your Frankenstein Rice Krispie Treats:
-
On a Decorative Platter: Arrange the treats on a Halloween-themed platter. Add some spooky decorations like plastic spiders or little pumpkins for flair.
-
Individual Wrapping: Wrap each treat in clear cellophane and tie with a black or orange ribbon. This makes for a cute party favor!
-
Monster Assembly: Create a fun ‘monster’ station where guests can decorate their treats as they like with additional candy and sprinkles. Set up bowls with candy eyes, chocolate chips, and other candies for a creative touch.
-
Themed Cupcake Stand: Stack the treats on a tiered cupcake stand to elevate your dessert table, adding an eye-catching display for your guests.
Recipe Variations
Here are some fun twists on the classic Frankenstein Rice Krispie Treats:
-
Pumpkin Spice Variants: Add pumpkin spice to your butter and marshmallow mixture for a seasonal flavor that screams fall.
-
Chocolate Drizzle: Drizzle melted chocolate over the end product for added richness. You could use dark, milk, or white chocolate drizzles for a delicious contrast.
-
Swap the Cereal: Try using Fruity Pebbles or Cocoa Puffs instead of Rice Krispies for a colorful or chocolatey version of your treats.
-
Vegan Option: Substitute vegan marshmallows and coconut oil for a dairy-free delight while still making it spooky!
-
Add Nuts: Mix in chopped nuts or pretzels for an added crunch in your treats, giving it a fun texture contrast.
Chef’s Notes
Cooking is ever-evolving, and this recipe is no exception! When I first started making Rice Krispies Treats, I never thought about adding twists to flavor or decoration. Over the years, I’ve experimented, and it’s been a joy to witness how simple treats can become culinary art with just a few tweaks. I remember a Halloween party where I turned my treats into spooky monsters; the kids loved it! It reminded me that sometimes, the simplest recipes evoke the most joy and creativity.
FAQs and Troubleshooting
1. My Rice Krispie treats are too hard! What did I do wrong?
If your treats have become hard, it’s likely that you overcooked the marshmallows or pressed them too firmly into the pan. Reduce the heat while melting marshmallows and make sure to handle them lightly when packing into the pan.
2. How can I store my treats?
Store them in an airtight container at room temperature. They should stay fresh for about 3 days. You can also individually wrap them for longer shelf life.
3. Can I make these in advance?
Absolutely! You can make them one or two days ahead of your event. Just keep them sealed well to maintain their freshness.
4. My mixture is too sticky; what can I do?
If you find the mixture overly sticky, try greasing your hands a bit before pressing them into the pan. Alternatively, allowing it to cool for a few minutes before handling can also help with the stickiness.
Nutritional Info
While treats like these are a tasty indulgence, it’s good to be aware of their nutritional breakdown:
- Serving Size: 1 treat (approx. 40g)
- Calories: 160
- Fat: 7g
- Carbohydrates: 20g
- Fiber: 0g
- Protein: 1g
- Sugars: 13g
Keep in mind that these numbers can vary depending on your specific ingredients and portion sizes. Treats like these should be enjoyed in moderation, especially around the holidays!
Final Thoughts
Creating Frankenstein Rice Krispie Treats is not just about following a recipe; it’s about rekindling the joy of cooking! As you whip up these delightful snacks, remember that the kitchen is a space for creativity and fun. Whether you’re making them for a Halloween party, a spooky movie night, or simply to indulge your sweet tooth, let your imagination run wild with decorations and variations!
I hope you feel inspired to get into the kitchen, roll up your sleeves, and have some fun crafting these delicious treats. Share them with friends, family, or keep them all to yourself—it’s entirely up to you! Happy cooking, and may your treats be ever delicious!
PrintFrankenstein Rice Krispie Treats

A fun Halloween twist on classic Rice Krispie treats, perfect for parties and gatherings.
- Prep Time: 15 minutes
- Cook Time: 10 minutes
- Total Time: 45 minutes
- Yield: 12 servings 1x
- Category: Dessert
- Method: No-Bake
- Cuisine: American
- Diet: Vegetarian
Ingredients
- 6 cups Rice Krispies cereal
- 1/4 cup unsalted butter (1/2 stick)
- 4 cups mini marshmallows
- Green food coloring
- Chocolate chips or melting chocolate
- Candy eyes
- Edible eyes or sprinkles for decoration
Instructions
- Prep your space: Begin by greasing a 9×13-inch baking pan with butter or cooking spray.
- Melt the butter: In a large saucepan over medium heat, melt the butter slowly.
- Add the marshmallows: Stir continuously with a spatula until they are fully melted and smooth, about 2-3 minutes.
- Color the mixture: Once melted, mix in several drops of green food coloring until even.
- Combine with Rice Krispies: Remove from heat and stir in the Rice Krispies cereal.
- Transfer to the pan: Pour the mixture into your prepared baking pan and press firmly.
- Let cool: Allow the treats to cool at room temperature for at least 30 minutes.
- Cut and decorate: Cut them and add chocolate chips for facial features.
- Store your treats: Place them in an airtight container to maintain freshness.
Notes
Greasing your hands with non-stick spray makes it easier to press the mixture into the pan.
Nutrition
- Serving Size: 1 treat
- Calories: 160
- Sugar: 13g
- Sodium: 50mg
- Fat: 7g
- Saturated Fat: 4g
- Unsaturated Fat: 2g
- Trans Fat: 0g
- Carbohydrates: 20g
- Fiber: 0g
- Protein: 1g
- Cholesterol: 15mg
Keywords: Rice Krispie Treats, Halloween treats, spooky snacks, dessert recipes


