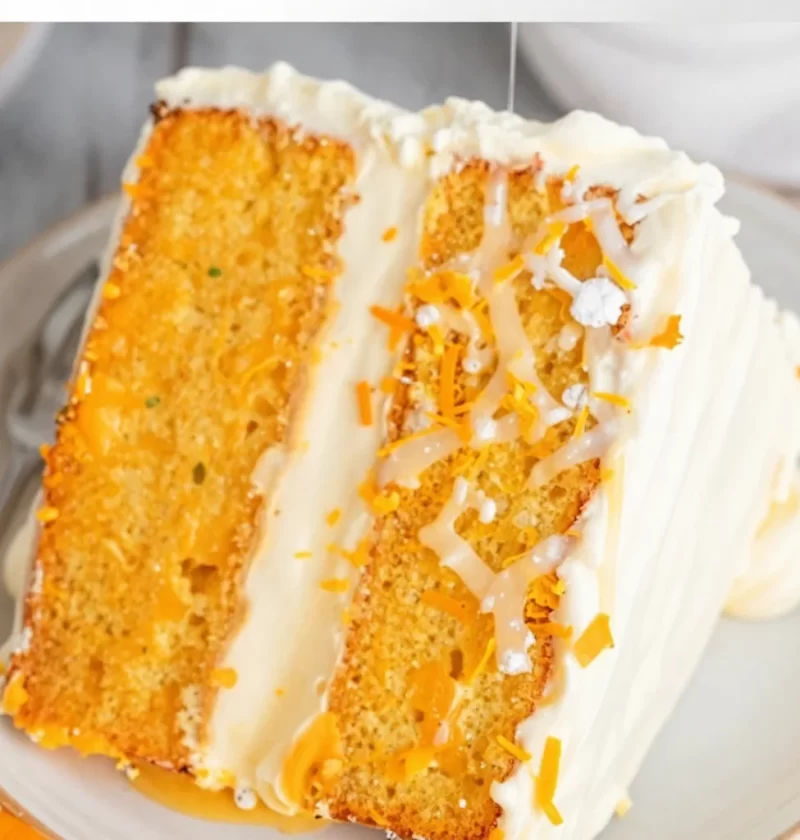
Orange Creamsicle Cake: A Slice of Nostalgia
Hello, fellow food lovers! It’s Clara, and I can’t wait to share one of my all-time favorite recipes with you today. We’re diving into a dish that combines the scrumptiousness of a sunny summer day with the comforting taste of nostalgia: the Orange Creamsicle Cake. Picture this: a moist yellow cake infused with the bright flavors of orange, topped with a heavenly vanilla whipped cream frosting. It’s like biting into a slice of the classic creamsicle ice cream bar we cherished as kids, but it’s in cake form!
This cake is perfect for birthdays, celebrations, or just because you want a piece of something that brings joy and sunshine into your day. Trust me; it’s as delightful to make as it is to eat. So, if you’re ready to roll up your sleeves and turn your kitchen into a warm and inviting bakery, let’s get started!
A Flavorful Memory
Growing up, summers in my house always meant one thing: the arrival of orange creamsicles. My siblings and I would race each other to the freezer, eagerly fighting for that first dreamy bite of creamy orange goodness. I’ll never forget the laughter and messy faces as we dug into our favorite frozen treat, their smooth sweet flavor cooling us off on those hot afternoons.
This Orange Creamsicle Cake came to life one summer when a family gathering had us reminiscing about those sweet, blissful days. Inspired by those memories, I decided to recreate the flavors in cake form. As soon as the cake was out of the oven, the aroma filled the kitchen, and I could almost hear the ice cream truck jingling in my mind. The citrus notes danced around the room, and before I knew it, everyone was gathered around to taste it—my heart was as full as my kitchen.
So grab your apron, and let’s whip up a cake that’s sure to bring back those warm memories, combined with a little modern twist!
Ingredients
Here’s what you’ll need for this delicious Orange Creamsicle Cake:
-
1 box of yellow cake mix
This serves as the base of our cake. You can use any brand you love; just make sure it’s a standard 15.25-ounce box. If you’re feeling adventurous, homemade cake mix is also an option—just be sure to use a recipe that yields an equivalent amount! -
3 large eggs
Eggs are essential for binding the cake and providing moisture. If you’re looking for a vegan option, substitutions such as unsweetened applesauce (1/4 cup per egg) or flaxseed meal (1 tablespoon flaxseed meal with 3 tablespoons water per egg, let sit until gel-like) can work wonders! -
1/2 cup of vegetable oil
This adds richness and moisture to the cake. Feel free to swap it with melted coconut oil for a more tropical twist or unsweetened applesauce for a lighter, healthier option. -
1 cup of orange juice
Freshly squeezed orange juice is ideal for maximum flavor, but store-bought works just as well. If you want a little zing, try adding in some fresh lemon juice! -
1 tablespoon of orange zest
This brightens the flavor and adds a vibrant orange aroma. Zesting requires a microplane or grater, and be careful not to include any of the white pith, as it can taste bitter. -
1 teaspoon of vanilla extract
Vanilla pairs beautifully with orange and enhances the overall flavor profile. Make sure to use pure vanilla extract if possible—it’s worth it! -
1 cup of heavy cream
This is the key to our luscious frosting. You can substitute half of it with whipping cream for a lighter texture, but I promise the richness is totally worth it. -
1/4 cup of powdered sugar
Just the right amount of sweetness for our whipped cream frosting; feel free to adjust based on your taste. For a sugar-free alternative, powdered erythritol can work if you’re cutting back on sugar. -
1 teaspoon of vanilla extract (for frosting)
Yes, we’ll use it again! It adds a layer of flavor to the frosting that simply cannot be ignored. -
Additional orange zest (for garnish)
A little zest goes a long way! It makes the cake visually stunning and gives that extra burst of citrus flavor right before you dive in.
Step-by-Step Instructions
Ready to bring that delightful cake to life? Let’s get baking with these steps.
-
Preheat Your Oven
Start by preheating your oven to 350°F (175°C). Getting your oven nice and toasty is essential for a perfectly baked cake. -
Mix the Cake Batter
In a large mixing bowl, combine the yellow cake mix, eggs, vegetable oil, orange juice, orange zest, and vanilla extract. Use an electric mixer (or a good old-fashioned whisk if you prefer) to blend everything together on medium speed for about 2 minutes. You want a lovely, lump-free batter. If you notice some lumps, don’t worry too much; a little texture is okay! -
Prepare the Cake Pans
Grease and flour two 9-inch round cake pans. This prevents the cake from sticking and makes flipping them easy. Pro tip: using parchment paper at the bottom can add an extra layer of security! -
Pour the Batter
Evenly divide the batter between the prepared cake pans. Give it a gentle tap on the counter to remove any air bubbles—they can cause your cake to bake unevenly. -
Bake
Place the pans in your preheated oven and bake for 25-30 minutes, or until a toothpick inserted in the center comes out clean. Keep an eye on them; every oven is a bit different, and you want to avoid overbaking. -
Cool the Cakes
Once baked, allow the cakes to cool in their pans for about 10 minutes before transferring them to a wire rack to cool completely. This is integral for frosting later, as icing a warm cake can lead to a melted mess. -
Prepare the Frosting
While your cakes are cooling, whip up the frosting! In a separate bowl, use an electric mixer to beat the heavy cream on medium-high speed until it starts to thicken. Gradually add in the powdered sugar and vanilla extract, then continue to whip until stiff peaks form. This means when you lift the beaters, the whipped cream should stand strong and not droop—this is the perfect texture for frosting! -
Assemble Your Layer Cake
Once the cakes are completely cool, place one layer on a serving plate or cake stand. Spread a generous layer of whipped cream frosting on top. Place the second cake layer on top and smoothly frost the top and sides of the entire cake. Don’t worry about making it too perfect; an organic, rustic look is part of its charm! -
Garnish with Zest
Finish by sprinkling a bit more orange zest on top for that beautiful pop of color and a burst of citrus aroma. -
Slice and Serve
Let the cake chill for a bit in the fridge if you have time—this will help the frosting set up a little more. Then slice, serve, and watch everyone go back for seconds!
Serving Suggestions
For a lovely presentation, you can place slices of Orange Creamsicle Cake on plates alongside a scoop of vanilla ice cream or some fresh berries. A drizzle of orange-infused syrup or a sprinkle of powdered sugar also adds a nice touch. Don’t forget to offer extra whipped cream on the side—who could resist?
Recipe Variations
-
Citrus Medley:
Add lemon or lime juice and zest to the batter for a refreshing citrus blend. It’s a fantastic way to give a unique twist to the classic flavor. -
Creamsicle Roll:
Make a Swiss roll version by using the batter in a jelly roll pan and rolling it with the whipped cream filling—just make sure to adjust the baking time! -
Gluten-Free Delight:
Substitute the yellow cake mix with a gluten-free blend and check out if any adjustments are necessary according to the package instructions. -
Layered Delight:
Create a triple-layer cake by splitting the batter among three pans, adding more levels to your creamy dream. -
Healthier Swap:
Use whole wheat cake mix and Greek yogurt instead of oil for a healthier cake that doesn’t skimp on flavor.
Chef’s Notes
Every time I make this Orange Creamsicle Cake, I’m taken back to those carefree summer days spent munching on a popsicle by the pool. It’s a recipe that has evolved in my kitchen—sometimes I’ll add a dash of almond extract, or even fold in some sliced peaches for a fruity twist. Baking is all about experimentation, and I encourage you to play around with flavors! Just like my family gathering that day, every dish tells a story, and I love that this one creates an opportunity for connection.
FAQs and Troubleshooting
1. My cake is sinking in the middle. What went wrong?
Overmixing the batter or adding too much liquid can cause it to sink. Make sure to mix just until combined!
2. How do I fix a dry cake?
If your cake turned out dry, next time try adding an extra egg or a bit more oil. You could also drizzle a sweet orange syrup over it while still warm to soak in some moisture.
3. Can I freeze the cake?
Absolutely! Wrap it tightly in plastic wrap and then foil before freezing. Thaw it overnight in the fridge when you are ready to enjoy it again!
4. What can I substitute if I don’t have heavy cream?
You can use a combination of milk and cornstarch, or coconut cream for a dairy-free option. Just remember that the texture might differ slightly.
Nutritional Info
While we’re all about enjoying our delicious creations mindfully, here’s a rough estimate of what a slice of Orange Creamsicle Cake consists of:
- Calories: ~380 per slice
- Total Fat: 21g
- Saturated Fat: 10g
- Carbohydrates: 43g
- Protein: 4g
- Sugars: 20g
Of course, this can vary based on portion sizes and specific ingredient choices!
And there you have it, the beautiful Orange Creamsicle Cake—delicious, dreamy, and so full of flavor! I hope this recipe brings you as much joy to make as it does to eat. Let’s gather around the table, pass the butter, and indulge in something special—a cake that embodies the warmth of sharing memories and the happiness of good food. Happy baking, friends!
PrintOrange Creamsicle Cake
A delightful and nostalgic cake that brings the flavors of orange creamsicles into a moist yellow cake topped with vanilla whipped cream frosting.
- Prep Time: 15 minutes
- Cook Time: 30 minutes
- Total Time: 45 minutes
- Yield: 12 servings 1x
- Category: Dessert
- Method: Baking
- Cuisine: American
- Diet: Vegetarian
Ingredients
- 1 box of yellow cake mix (15.25 ounces)
- 3 large eggs
- 1/2 cup of vegetable oil
- 1 cup of orange juice
- 1 tablespoon of orange zest
- 1 teaspoon of vanilla extract
- 1 cup of heavy cream
- 1/4 cup of powdered sugar
- 1 teaspoon of vanilla extract (for frosting)
- Additional orange zest (for garnish)
Instructions
- Preheat your oven to 350°F (175°C).
- Mix the cake batter: In a large mixing bowl, combine the yellow cake mix, eggs, vegetable oil, orange juice, orange zest, and vanilla extract. Blend on medium speed for about 2 minutes.
- Prepare the cake pans by greasing and flouring two 9-inch round cake pans.
- Pour the batter evenly between the prepared cake pans.
- Bake for 25-30 minutes or until a toothpick inserted in the center comes out clean.
- Cool the cakes in their pans for about 10 minutes before transferring them to a wire rack to cool completely.
- Prepare the frosting by whipping the heavy cream until thick and then adding powdered sugar and vanilla extract until stiff peaks form.
- Assemble the cake by placing one layer on a plate, frosting the top, and adding the second layer with frosting on top and the sides.
- Garnish with additional orange zest before serving.
- Slice and serve with optional vanilla ice cream or fresh berries.
Notes
For healthier swaps, consider using whole wheat cake mix and Greek yogurt instead of oil.
Nutrition
- Serving Size: 1 slice
- Calories: 380
- Sugar: 20g
- Sodium: 200mg
- Fat: 21g
- Saturated Fat: 10g
- Unsaturated Fat: 10g
- Trans Fat: 0g
- Carbohydrates: 43g
- Fiber: 1g
- Protein: 4g
- Cholesterol: 100mg
Keywords: cake, orange, creamsicle, dessert, summer, nostalgia