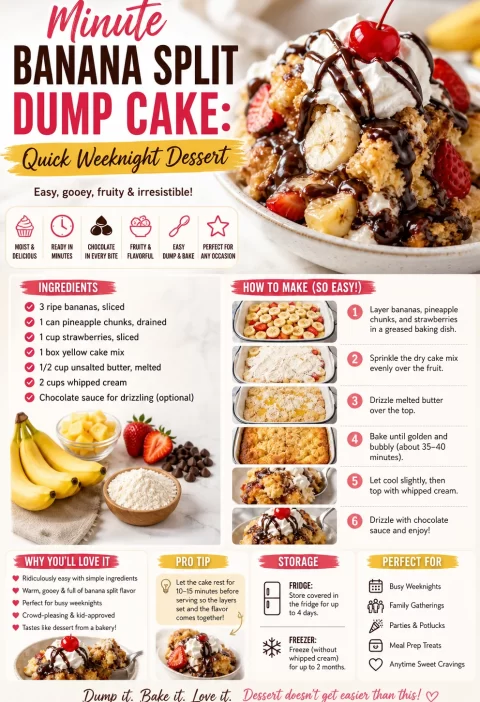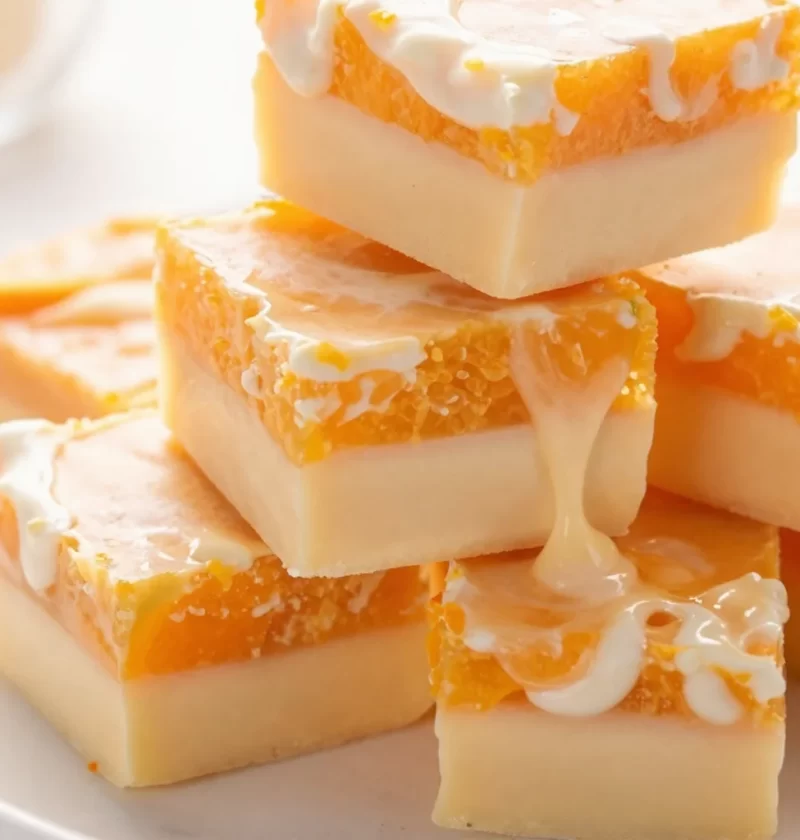
Creamy Orange Dreamsicle Fudge: A Sweet Slice of Nostalgia
Ah, the nostalgia that wafts through the kitchen when you think of the dreamy flavors of an orange creamsicle! There’s something utterly enchanting about that combination of bright citrus and sweet, creamy goodness. Each bite stimulates the taste buds and evokes warm memories—whether it’s a summer day spent at the pool or a childhood treat enjoyed on a lazy afternoon. Today, I’m thrilled to share with you my recipe for Creamy Orange Dreamsicle Fudge, which captures all those delightful flavors bundled neatly into a heavenly, melt-in-your-mouth fudge.
What I love about this fudge is how simple it is to whip up, yet it feels special enough to serve at gatherings or gift to friends. With minimal fuss, you can create a dessert that transports everyone back to those carefree summer days. And let’s face it—who wouldn’t want a little piece of nostalgia on their dessert plate? So gather your aprons and get ready; I’m here to guide you through this fabulous fudge-making adventure!
A Sweet Memory from My Childhood
As a child, my summers were filled with laughter, sunshine, and the delightful treat of ice cream trucks rolling through my neighborhood. The ringing tune would pull my siblings and me from our play, racing toward the curb with penny-filled hands and eager grins. But my favorite treat wasn’t a classic ice cream cone. No, it was the creamy, dreamy orange creamsicle popsicle, a treat that encapsulated the essence of summer.
I can still remember the excitement of biting through the icy, vibrant orange shell to find that luscious, dreamy vanilla center. It was bliss! Many summer evenings ended with my sister and me sitting on the porch, orange-stained fingers and sticky smiles on our faces. When I created this fudge, memories of those moments flooded back—bringing that same pure joy of summertime back into focus.
Ingredients
Let’s dive into the ingredients you’ll need to create this luscious fudge. Each component plays a key role in capturing that iconic orange dreamsicle flavor:
-
1 cup of white chocolate chips
These chips are the star of the show! The creamy, sweet flavor serves as the base for our fudge. If you’re looking for a cheaper alternative, you can use vanilla chips in a pinch, but they won’t have quite the same richness. -
1/2 cup of sweetened condensed milk
This ingredient adds a velvety texture and sweetness that makes the fudge irresistibly indulgent. If you need a dairy-free option, coconut milk condensed milk can do the trick! -
1/4 cup of unsalted butter
Butter provides that buttery richness (obviously!). Be sure not to skip the unsalted kind so you can control the saltiness of your fudge. -
1/4 cup of heavy cream
The heavy cream contributes to the creamy texture we all adore in fudge. You could use half-and-half for a lighter version but be careful; it may change the texture slightly! -
1 tablespoon of orange zest
Fresh orange zest will give your fudge that vibrant, zesty flavor that jogs memories of sun-kissed oranges. If fresh isn’t available, feel free to use store-bought zest, but fresh is always better! -
1 teaspoon of orange extract
This ingredient amplifies the orange flavor. If you can’t find orange extract, consider using vanilla extract—though the flavor profile will shift. -
A few drops of orange food coloring (optional)
If you want that bright, cheerful appearance reminiscent of the classic creamsicle, a touch of food coloring will help reel it in. -
Pinch of salt
Just a dash of salt enhances the sweet flavors, balancing everything out beautifully.
Step-by-Step Instructions
Now that you have all your ingredients ready, it’s time to create some kitchen magic! Follow these steps to whip up your Creamy Orange Dreamsicle Fudge:
-
Melt the White Chocolate Chips
In a microwave-safe bowl, combine the white chocolate chips and butter. Microwave them in 30-second intervals, stirring in between, until melted and smooth. This should only take about 1–2 minutes. Be cautious not to overheat; burnt chocolate can ruin the fudge.Chef Tip: If you prefer the stovetop method, use a double boiler to melt the chocolate and butter. This gentle heat prevents burning while providing even melting.
-
Stir In the Sweetened Condensed Milk and Heavy Cream
Once your chocolate mixture is silky smooth, stir in the sweetened condensed milk and heavy cream. Mix until well incorporated.Kitchen Hack: To make the mixing process easier, you can warm the condensed milk slightly. It’ll blend right in!
-
Add Flavorings
Now it’s time to infuse the fudge with flavor! Stir in the orange zest, orange extract, and a pinch of salt. If you want to add food coloring, this is the moment—start with just a few drops and mix until you reach your desired color. -
Pour into a Pan
Line a square baking dish (8×8 inches works great!) with parchment paper for easy removal later. Pour the fudge mixture into the dish and spread it evenly. Smooth the top with a spatula.Pro Tip: Lightly spraying the parchment paper with non-stick spray can help prevent the fudge from sticking.
-
Chill Until Set
Now comes the hard part: waiting! Place the fudge in the fridge to set for at least 2 hours, or until firm. If you’re in a hurry, the freezer will do the job in about 30-60 minutes. -
Cut and Serve
Once set, lift the fudge out of the pan using the parchment paper. Cut it into bite-sized squares. Feel free to enjoy a piece or two (I won’t judge!).
Serving Suggestions
This fudge deserves to shine! Serve it beautifully on a platter, perhaps dusted with a little powdered sugar for elegance. Don’t forget to pair it with fresh orange slices or a scoop of vanilla ice cream to really bring out that delightful orange flavor. You could even package some in cute boxes for friends or family, adding a ribbon for that extra special touch.
Recipe Variations
While I adore the classic Creamy Orange Dreamsicle Fudge, here are some exciting twists to try:
- Chocolate Orange Fudge: Replace half of the white chocolate with semi-sweet chocolate chips for a delightful chocolate-orange combination.
- Nutty Addition: Fold in chopped nuts such as pecans or walnuts for added texture.
- Citrus Medley: Add zest from lemon or lime to the orange zest for a bright citrus punch.
- Infused Fudge: Replace the orange extract with almond or coconut extract for an interesting flavor twist!
- Vegan Version: Use dairy-free white chocolate chips and coconut cream instead of heavy cream.
Chef’s Notes
This fudge recipe has a joyful spirit about it—a little like my laugh during a kitchen mishap! I once dropped half a batch of fudge when moving the pan to the fridge, and let’s say the floor got a delicious makeover. Sometimes, when things don’t go as planned, it simply gives you an opportunity to create something new. Now, my kitchen is covered with a sticky sweetness, and I’m convinced that the floor fairy loves it just as much as I do!
Over the years, I’ve adjusted this recipe—swapping out ingredients based on seasonality and availability. Each time, it has evolved while always keeping that cherished orange creamsicle flavor at its core!
FAQs and Troubleshooting
1. My fudge didn’t set properly; what went wrong?
It’s essential to let the fudge cool completely. If it’s too warm when poured into the fridge, it may not set well. Ensure you have the proper white chocolate-to-condensed milk ratio too—it’s crucial for consistency!
2. Can I store this fudge? How long does it last?
Absolutely! Store it in an airtight container at room temperature for up to a week or refrigerate for longer freshness (around two weeks). It may not last that long, though, given its deliciousness!
3. What do I do if my fudge is too soft?
If your fudge ends up too soft, try placing it back in the fridge for a little longer. If it’s still not firm, you can melt it down and reintroduce some additional melted white chocolate, then re-set.
4. Can I use something other than white chocolate for this recipe?
Certainly! You can experiment with different types of chocolate or even try making it with carob, keeping in mind that flavors and sweetness will vary.
Nutritional Info (If Applicable)
While I love to indulge in sweet treats, keep in mind that fudge should be enjoyed in moderation. Here’s a rough nutritional breakdown per piece, depending on how many you cut it into:
- Calories: 100
- Fat: 6g
- Carbohydrates: 10g
- Sugars: 8g
- Protein: 1g
Remember, these values will vary based on ingredient brands and portion sizes.
And there you have it, my treasured Creamy Orange Dreamsicle Fudge recipe, complete with stories, flavor, and a few giggles along the way. I hope this fudge not only fills your kitchen with warmth and joy but also evokes a sweet sense of nostalgia just like it does for me. Now grab your ingredients, put on your favorite apron, and let’s make something delicious together! Enjoy every sticky, sweet moment!
PrintCreamy Orange Dreamsicle Fudge
A nostalgic fudge that combines bright citrus and sweet creamy flavors, capturing the essence of orange creamsicles in a delightful treat.
- Prep Time: 15 minutes
- Cook Time: 2 minutes
- Total Time: 120 minutes
- Yield: 16 servings 1x
- Category: Dessert
- Method: Chilling
- Cuisine: American
- Diet: Vegetarian
Ingredients
- 1 cup of white chocolate chips
- 1/2 cup of sweetened condensed milk
- 1/4 cup of unsalted butter
- 1/4 cup of heavy cream
- 1 tablespoon of orange zest
- 1 teaspoon of orange extract
- A few drops of orange food coloring (optional)
- A pinch of salt
Instructions
- Melt the white chocolate chips and butter in a microwave-safe bowl, stirring every 30 seconds until smooth, about 1–2 minutes.
- Stir in the sweetened condensed milk and heavy cream until well incorporated.
- Add the orange zest, orange extract, and a pinch of salt. If using, add food coloring to achieve desired color.
- Pour the mixture into a lined 8×8 inch baking dish, smoothing the top with a spatula.
- Chill in the fridge for at least 2 hours or until firm.
- Cut into bite-sized squares and serve.
Notes
For variations, try adding nuts, different extracts, or making a chocolate orange version!
Nutrition
- Serving Size: 1 square
- Calories: 100
- Sugar: 8g
- Sodium: 50mg
- Fat: 6g
- Saturated Fat: 4g
- Unsaturated Fat: 2g
- Trans Fat: 0g
- Carbohydrates: 10g
- Fiber: 0g
- Protein: 1g
- Cholesterol: 15mg
Keywords: orange, fudge, dessert, creamy, nostalgic, sweet, summer treat