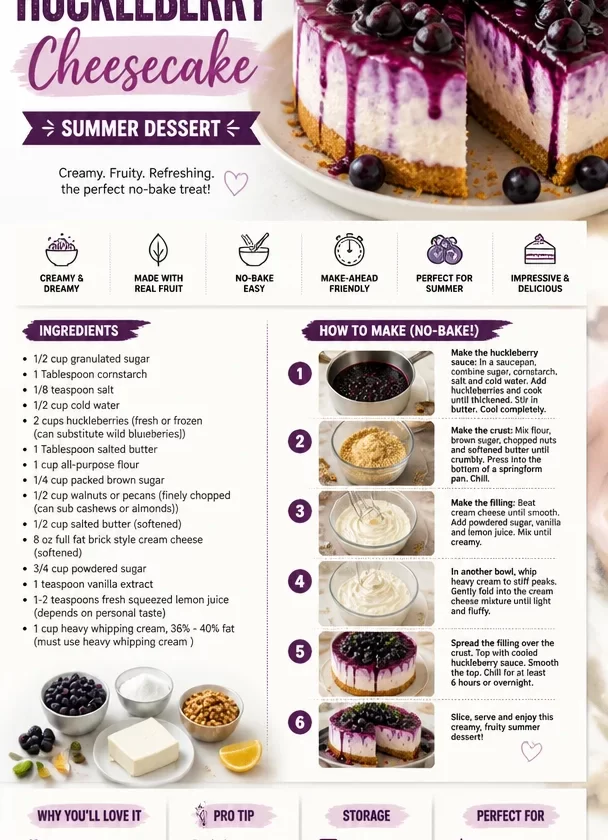
No Bake Huckleberry Cheesecake: A Slice of Summer Bliss
Ah, the joys of summer! Long, sunny days, the gentle hum of bees, and the delightful sight of huckleberries glistening in the sun. There’s something magical about these little berries—each one bursting with sweet-tart flavors that are just begging to be turned into something delicious. Today, I’m excited to share my favorite No Bake Huckleberry Cheesecake recipe! It’s the perfect way to celebrate those summer flavors and impress your friends without even turning on the oven.
As a home cook and self-proclaimed huckleberry enthusiast, I’ve always loved incorporating these luscious berries into my desserts. Growing up, my family would often go on berry-picking adventures—armed with buckets and a sense of adventure. We’d wander through the woods, carefully picking these tiny, wild treasures, and my mom would transform them into various treats. But the real star of our family gatherings was always her creamy cheesecake, chilled to perfection. She had this magical ability to turn something simple into a showstopper.
Now, this No Bake Huckleberry Cheesecake pays homage to those sweet memories while also allowing for some modern flair. It’s creamy, dreamy, and packed with huckleberry goodness. And the best part? You don’t need to bake anything! Just a little bit of mixing, some chilling, and you’ll have a stunning dessert that’s sure to be a hit at any gathering. So, grab your huckleberries (or blueberries if you can’t find them), and let’s dive into this delightful recipe together.
Personal Story: A Berry Sweet Adventure
I’ll never forget one summer afternoon. The sun was high, and the sweet scent of wildflowers danced through the air as my family trekked into the woods, excitement bubbling like our picnic drinks. Armed with buckets and a bit of childhood determination, we set off to find the huckleberries that we could spot from the trail. My dad, always the jokester, pretended to be the king of huckleberry hunting, making us giggle as he dramatically checked each bush.
After hours of fun, we emerged with our buckets brimming with plump, juicy huckleberries. Back at home, my mom transformed our haul into the most luscious huckleberry cheesecake. Oh, how I longed for a slice of that creamy goodness topped with a rich huckleberry sauce! It was a family tradition we looked forward to year after year. Fast forward to today, and I’ve taken those same flavors and created my No Bake Huckleberry Cheesecake. It’s a little nod to my childhood but with my personal twist!
Ingredients
To make this scrumptious No Bake Huckleberry Cheesecake, here’s what you’ll need:
-
1/2 cup granulated sugar
Adds sweetness to your cheesecake filling. You can substitute with coconut sugar for a more caramel-like flavor. -
1 Tablespoon cornstarch
This helps thicken the huckleberry sauce. If you’re avoiding corn, you can use arrowroot powder instead! -
1/8 teaspoon salt
A pinch of salt enhances all the flavors. I always recommend adding this to desserts; it makes the sweetness pop! -
1/2 cup cold water
Needed for mixing with the cornstarch to create a thick sauce for the huckleberries. -
2 cups huckleberries (fresh or frozen)
The star of the dish! If you can’t find huckleberries, wild blueberries or even regular blueberries work just as well. -
1 Tablespoon salted butter
Adds richness to the huckleberry sauce. Unsalted butter can be used if you want to control the saltiness more. -
1 cup all-purpose flour
Used for the crust. You could swap it for almond flour if you’re looking for a gluten-free option. -
1/4 cup packed brown sugar
Sweetens the crust with a hint of molasses. If you prefer, coconut sugar will work here too! -
1/2 cup walnuts or pecans (finely chopped)
They give the crust a nice crunch! If nuts aren’t your thing, try using rolled oats or a seed mix. -
1/2 cup salted butter (softened)
This holds the crust together and adds flavor. If you prefer, use coconut oil for a dairy-free version. -
8 oz full-fat brick style cream cheese (softened)
The base of your cheesecake, it gives that rich, creamy texture. Always opt for brick style as whipped varieties won’t deliver the same results. -
3/4 cup powdered sugar
To sweeten the cheesecake filling. You could make your own powdered sugar by blending granulated sugar in a blender until fine! -
1 teaspoon vanilla extract
A must for that warm, aromatic flavor in desserts. -
1-2 teaspoons fresh squeezed lemon juice
It brightens up the cheesecake. The amount depends on how tangy you like it! I recommend starting with a teaspoon and adjusting from there. -
1 cup heavy whipping cream (36% – 40% fat)
This is key for achieving that light and airy cheesecake texture. Make sure to use heavy cream for the best results.
Step-by-Step Instructions
Now that you have all your ingredients, let’s get down to the fun part: making this cheesecake!
-
Make the Huckleberry Sauce
In a small saucepan, combine the granulated sugar, cornstarch, salt, and cold water. Whisk until smooth and bring the mixture to a gentle boil over medium heat. Once it starts bubbling, add the huckleberries and the tablespoon of butter. Cook for about 5–7 minutes until the huckleberries have burst and the sauce thickens slightly. Remove from heat, and let it cool to room temperature.Chef’s Tip: If you want a smoother sauce, use an immersion blender after it cools a bit!
-
Prepare the Crust
In a mixing bowl, combine the flour, brown sugar, and finely chopped nuts. Then, add the softened butter and mix until crumbly. Press this mixture into the bottom of a 9-inch springform pan. It should be compact but not too hard. Bake in a preheated oven at 350°F (175°C) for about 10 minutes to set it slightly, then let it cool. [9-inch pans usually come with a removable bottom for easy cheesecake removal, a must-have!]Chef’s Hack: If you’d like to skip the baking step, simply refrigerate the crust for about an hour to allow it to firm up.
-
Make the Cheesecake Filling
In a large mixing bowl, use a hand mixer to whip the softened cream cheese until it’s creamy and smooth. Gradually add the powdered sugar, vanilla extract, and lemon juice. Beat until combined and fluffy.Tip: Taste as you go! You might want a touch more lemon juice depending on your preference for tanginess.
-
Whip the Cream
In another bowl, whip the heavy cream until soft peaks form. Gently fold the whipped cream into the cream cheese mixture, being careful not to deflate it too much. This is where your cheesecake gets its light and airy texture!Chef Tip: For a little flair, fold in some of the huckleberry sauce for swirls.
-
Assemble the Cheesecake
Pour the cheesecake filling over the cooled crust, smoothing the top with a spatula. Drizzle the cooled huckleberry sauce over the cheesecake; you can create swirls or just leave it as a topping. Cover with plastic wrap and refrigerate for at least 4 hours, or overnight if possible.Hint: The longer it chills, the better the flavors meld together!
-
Serve
When you’re ready to serve, carefully release the sides of the springform pan. Slice it up and enjoy a piece of summer bliss!
Serving Suggestions
To plate your No Bake Huckleberry Cheesecake, consider garnishing each slice with fresh huckleberries (or blueberries), a dollop of whipped cream, and a sprinkle of zest from a lemon for that extra pop of color. Place it on a beautiful platter and let everyone dig in! You might even serve it up with a side of homemade graham cracker crumbs for that delightful crunch.
Recipe Variations
Looking to switch things up? Here are some fun variations you might like:
- Chocolate Drizzle: Add a chocolate ganache drizzle on top for a rich twist!
- Lemon Blueberry Swirl: Substitute huckleberries with blueberries and add more lemon for a refreshing citrus flavor.
- Nut-Free Option: Use graham cracker crumbs for the crust instead of nuts for a nut-free version.
- Coffee Lovers’ Delight: Mix in a tablespoon of espresso powder into the cheesecake filling for a mocha flavor!
- Mini Cheesecakes: Use a muffin tin to create mini cheesecake bites for easy sharing!
Chef’s Notes
As I’ve played around with this No Bake Huckleberry Cheesecake recipe over the years, I’ve learned the importance of quality ingredients. Using fresh or high-quality frozen huckleberries makes all the difference in achieving that delightful, fruity flavor. I’ve even experimented with adding mascarpone cheese to the filling for an even creamier texture. No matter how you tweak it, one thing remains constant: it’s about bringing people together and savoring the little moments around the table. Who can resist that creamy delight just waiting to be shared?
FAQs and Troubleshooting
-
My cheesecake doesn’t seem to be setting! What did I do wrong?
Make sure you chilled the cheesecake for long enough; sometimes overnight is best! If it’s still soft, it might need more time to firm up in the fridge. -
Can I use low-fat cream cheese?
You can, but it won’t have the same rich, creamy consistency. Full-fat cream cheese is key for that indulgent texture that’s characteristic of cheesecakes. -
What if I can’t find huckleberries?
No problem! Blueberries are a fantastic substitute, or you can even try blackberries or raspberries if you’re feeling fruity! -
Can I freeze this cheesecake?
Absolutely! Just be sure to wrap it tightly in plastic wrap and foil to prevent freezer burn. Thaw in the fridge before serving for the best texture.
Nutritional Info
While this cheesecake is a treat, moderation is key! A slice has approximately:
- Calories: 350
- Total Fat: 25g
- Saturated Fat: 15g
- Carbohydrates: 30g
- Sugars: 18g
- Protein: 4g
Enjoy this delightful No Bake Huckleberry Cheesecake that brings the taste of summer right to your table. Each bite is a reminder of joyous family gatherings, laughter, and the magic that happens when we gather around food made with love. Remember, the best dishes are those that tell a story, and I can’t wait for this cheesecake to become part of yours! Happy baking (or rather, chilling)!
PrintNo Bake Huckleberry Cheesecake
A creamy, dreamy No Bake Huckleberry Cheesecake that captures the essence of summer with its sweet-tart flavors, perfect for any gathering.
- Prep Time: 30 minutes
- Cook Time: 10 minutes
- Total Time: 240 minutes
- Yield: 8 servings 1x
- Category: Dessert
- Method: No Bake
- Cuisine: American
- Diet: Vegetarian
Ingredients
- 1/2 cup granulated sugar
- 1 Tablespoon cornstarch
- 1/8 teaspoon salt
- 1/2 cup cold water
- 2 cups huckleberries (fresh or frozen)
- 1 Tablespoon salted butter
- 1 cup all-purpose flour
- 1/4 cup packed brown sugar
- 1/2 cup walnuts or pecans (finely chopped)
- 1/2 cup salted butter (softened)
- 8 oz full-fat brick style cream cheese (softened)
- 3/4 cup powdered sugar
- 1 teaspoon vanilla extract
- 1–2 teaspoons fresh squeezed lemon juice
- 1 cup heavy whipping cream (36% – 40% fat)
Instructions
- Make the Huckleberry Sauce: In a small saucepan, combine the granulated sugar, cornstarch, salt, and cold water. Whisk until smooth and bring to a gentle boil over medium heat. Once bubbling, add huckleberries and butter. Cook for 5–7 minutes until thickened, then cool to room temperature.
- Prepare the Crust: In a mixing bowl, combine flour, brown sugar, and chopped nuts. Add softened butter and mix until crumbly. Press into a 9-inch springform pan and let cool.
- Make the Cheesecake Filling: Whip softened cream cheese until creamy. Gradually add powdered sugar, vanilla extract, and lemon juice. Beat until fluffy.
- Whip the Cream: In another bowl, whip heavy cream until soft peaks form. Gently fold into the cream cheese mixture.
- Assemble the Cheesecake: Pour filling over cooled crust, drizzle the huckleberry sauce on top, and refrigerate for at least 4 hours or overnight.
- Serve: Release the springform pan, slice, and enjoy!
Notes
For a smoother huckleberry sauce, use an immersion blender. Consider garnishing with fresh huckleberries and lemon zest.
Nutrition
- Serving Size: 1 slice
- Calories: 350
- Sugar: 18g
- Sodium: 350mg
- Fat: 25g
- Saturated Fat: 15g
- Unsaturated Fat: 7g
- Trans Fat: 0g
- Carbohydrates: 30g
- Fiber: 1g
- Protein: 4g
- Cholesterol: 75mg
Keywords: cheesecake, huckleberry, no bake dessert, summer desserts, easy cheesecake