Easy No-Bake Homemade Protein Bars: A Guide to Wholesome Snacking
Introduction
Hello, my fellow food lovers! Clara here from Buttered Table, and today, I’m thrilled to share a recipe that’s quick, healthy, and super satisfying: Easy No-Bake Homemade Protein Bars. Whether you need a convenient post-workout snack, a midday pick-me-up, or a sweet treat that won’t send you on a sugar rollercoaster, these protein bars have your back.
I don’t know about you, but I’ve always had a love affair with snacks. As a kid, I used to raid the pantry after school, looking for something that felt like a little celebration at the end of the day. Fast forward to now, as a home cook, I enjoy crafting snacks that are both nutritious and delicious. And what better way to celebrate those mid-afternoon cravings than by whipping up some protein bars that don’t require any baking?
These bars come together in just a few steps and with minimal equipment. Plus, they’re customizable! You can mix and match ingredients to suit your preferences. Picture this: the sweet nuttiness of peanut butter, the lovely chewiness from Medjool dates, and the wholesome goodness of oats, all packed into a portable snack that you can enjoy anytime. Just grab a bar, toss it in your bag, and you’re good to go.
So, pull up a chair, and let’s dive into this delightful recipe that’ll have you reaching for these bars time and time again!
Personal Story
I still remember the first time I tried making protein bars at home. A friend had recently introduced me to a cute little health food shop in town, and they sold the most amazing, chewy protein bars. I was blown away by how delicious they were! But, as I looked at the label, I was shocked at how much sugar was in them!
Being the naturally inquisitive cook that I am, I decided to try my hand at making my own version. And let me tell you, the first batch was, well, an experiment best kept in the annals of kitchen history. I had gone a little overboard with the nut butter and underwhelming with the sweetness. They were more like nut crumbles than bars!
But after a couple of tweaks, I found my rhythm. It turned out that Medjool dates were the secret weapon I didn’t know I needed. Not only do they add natural sweetness, but they also bind everything together beautifully. Fast forward to today, and these bars have become a staple in my kitchen, a go-to snack that I share with friends and family. Their joy in snacking on something homemade gives me an immense sense of satisfaction!
Ingredients
Let’s gather our ingredients! Here’s what you’ll need for these Easy No-Bake Homemade Protein Bars:
-
5 Medjool dates (pitted and softened)
These beauties provide natural sweetness and act as a binding agent. If you can’t find them, try using dried figs or prunes—but Medjool dates are truly the best for that buttery flavor and texture! -
1 cup All-natural, drippy peanut butter
Look for a peanut butter without added sugars or oils. You can also swap this for almond butter or sunflower seed butter if you want a nut-free option. -
1.5 cups Ground oat flour
Oat flour is wonderful for adding fiber and a nutty taste. You can grind your own oats in a blender or food processor if you prefer! Just be careful not to over-process them into oat milk. -
1/3 cup Honey (or maple syrup)
Honey lends a delightful sweetness and caramel-like flavor, while maple syrup is a great vegan alternative. You can also adjust this based on your sweetness preference. -
1 teaspoon Vanilla extract
A dash of pure vanilla extract brightens up the flavor profile. Feel free to experiment with other extracts like almond or coconut! -
1/2 cup Vanilla protein powder (whey or vegan)
The protein powder boosts the nutritional content. Choose one that aligns with your dietary preferences—there are tons of flavours and options out there now! -
Salt (pinch)
Just a pinch enhances all those delicious flavors. You could also use sea salt for a touch of sophistication. -
1/4 cup Water (or as needed)
This helps bring the mixture together if it’s too dry. Just add a tablespoon at a time until you reach the right consistency. -
3/4 cup Dark chocolate chips (optional topping)
Chocolate always wins in my book. Use semi-sweet or dark chocolate—vegan versions are available too! -
2 teaspoons Coconut oil (optional topping)
This will help to melt the chocolate smoothly and adds a delightful tropical flavor. -
Coarse sea salt (for sprinkling, optional topping)
A touch of flaky sea salt can take your bars to the next level—sweet and salty perfection!
Step-by-Step Instructions
Alright, let’s get our hands dirty and whip up these protein bars! Follow along with these detailed steps:
-
Prepare Your Dates: Start by pitting and soaking your Medjool dates in warm water for about 10 minutes if they’re firm. This step makes them easier to blend. Trust me, you want your dates to be soft and pliable!
-
Blend the Ingredients: In a food processor, combine the softened dates, peanut butter, honey (or maple syrup), and vanilla extract. Give it a good blend until it forms a creamy paste. If your mixture seems too thick, add a splash of water. You’re looking for a consistency that’s smooth but still thick enough to hold its shape.
-
Add Dry Ingredients: Next, to your date and peanut butter mixture, toss in the ground oat flour, protein powder, and a pinch of salt. Pulse a few times to mix everything together. You want to create a dough-like consistency, so don’t hesitate to get in there and scrape down the sides if needed!
-
Taste and Adjust: Here’s a fun chef hack: taste your mixture at this point! You can adjust the sweetness or add more peanut butter for extra nuttiness. Remember, you can always tweak it to match your taste buds!
-
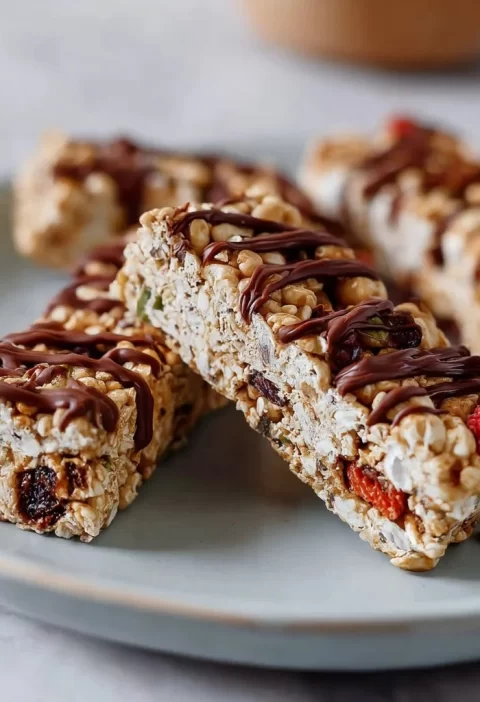
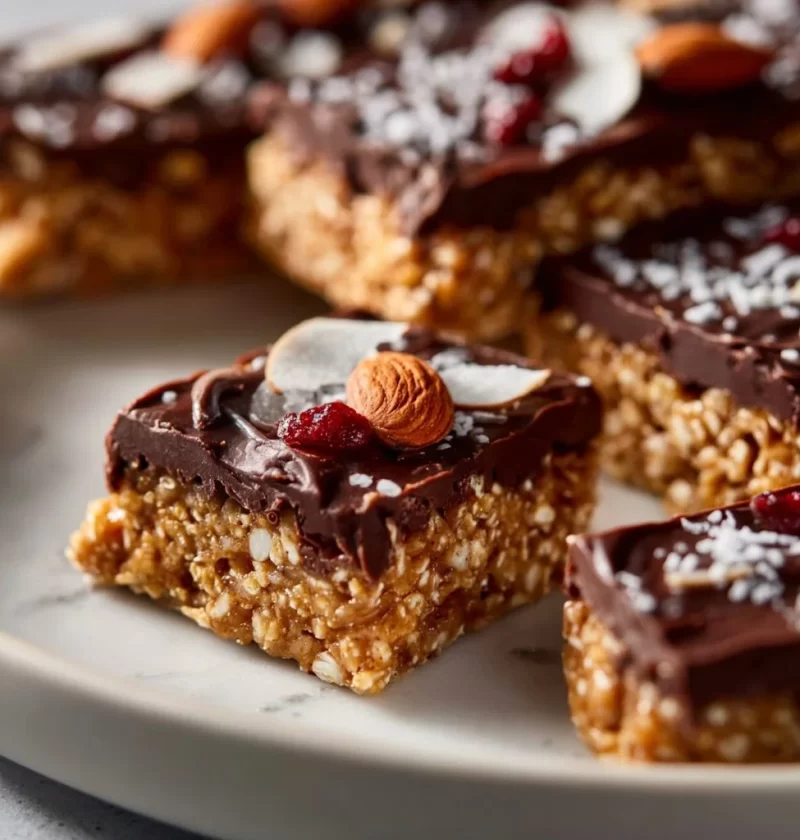
Shape the Dough: Transfer the mixture into an 8×8 inch baking dish lined with parchment paper. Use a spatula or your hands to firmly press it into an even layer. Make it nice and compact—this helps the bars hold together beautifully when you slice them.
-
Chill in the Fridge: Pop the baking dish in the refrigerator for about 30 minutes. This resting time allows the bars to firm up and makes slicing easier later.
-
Melt Your Chocolate: If you’re adding chocolate on top, melt the dark chocolate chips and coconut oil in a microwave-safe bowl. Microwaving in 20-second bursts works best—stir in between until smooth!
-
Drizzle and Sprinkle: Once your bars are chilled, take them out, drizzle the melted chocolate over the top, and sprinkle with a touch of coarse sea salt if you’re feeling fancy. It elevates the flavor and adds that gourmet touch!
-
Slice and Store: Allow the chocolate to set for about 10 minutes. Once it’s firm, slice the bars into squares or rectangles, whichever you prefer. Store these delightful bars in an airtight container in the fridge for up to two weeks—or freeze for longer-lasting enjoyment!
Serving Suggestions
When it’s time to serve, you can present these bars on a lovely platter or simply grab a bar from the fridge whenever the craving strikes! Pair them with a cup of tea or coffee for a cozy snack time. I love pairing these bars with fresh fruit or Greek yogurt for a little extra protein boost.
Recipe Variations
Now, let’s get creative! Here are some tasty variations to consider:
-
Nutty Explosion: Add a mix of chopped nuts—like almonds, walnuts, or pecans—into the dough for extra crunch and flavor.
-
Coconut Craze: Toss in some unsweetened shredded coconut for a tropical twist. You could even use coconut flour in place of some of the oat flour for a different texture.
-
Fruity Fusion: Fold in some dried cranberries, raisins, or even chopped dried apricots for a fruity flavor and added texture.
-
Chocolate Peanut Butter Bliss: Swap some of the protein powder with cacao powder for a chocolaty goodness explosion. Think of it as a decadent treat without the guilt!
-
Spicy Kick: Add a dash of cinnamon or cayenne pepper for a warming spice that pairs surprisingly well with the sweetness.
Chef’s Notes
As I’ve made these protein bars over the years, I’ve learned to embrace flexibility in my cooking. I once hosted a gathering and made a double batch—only to realize I had forgotten to add honey. Oops! With a sprinkle of powdered sugar and some extra chocolate drizzle, they transformed into a different (but delicious) treat altogether!
Whether you eat them as a quick grab-and-go breakfast or as a post-workout snack, I can assure you these bars have earned a permanent place in my recipe repertoire. They’re so simple to make, and it’s always gratifying to create something nourishing at home.
FAQs and Troubleshooting
-
Why are my bars falling apart?
If your bars feel crumbly, it might be due to not enough binding ingredients. Ensure your dates are soft enough, or add a bit more peanut butter or honey to help hold them together. -
Can I use a different flour?
Absolutely! If you don’t have oat flour, almond flour or a gluten-free blend can work. Just keep in mind that each type may alter the texture slightly. -
What if my mix is too sticky?
If you find your protein mixture to be stickier than expected, simply add a little more oat flour until you reach the desired consistency. It should be moldable but not overly tacky. -
How do I store these bars?
Keep them in an airtight container in the fridge for up to two weeks. You can also freeze individual bars wrapped in parchment for a quick snack anytime! Just let them thaw for a few minutes at room temperature before enjoying.
Nutritional Info
While nutritional info can vary based on the specific brands and variations you use, a general estimate for each bar (based on 12 servings) is:
- Calories: Approximately 175 calories
- Protein: 7 grams
- Carbohydrates: 20 grams
- Fiber: 3 grams
- Sugar: 6 grams
- Fats: 8 grams
Conclusion
And there you have it—your own batch of Easy No-Bake Homemade Protein Bars! I hope you enjoy making and sharing them as much as I have over the years. They’re not just bars; they’re a little something to fuel your day and bring a smile to your face. So, let’s fire up that food processor and get cookin’! Remember, food is about joy and connection, so share your creations and stories with those around you. Happy cooking!
PrintEasy No-Bake Homemade Protein Bars
Quick, healthy, and customizable no-bake protein bars perfect for snacks anytime.
- Prep Time: 15 minutes
- Cook Time: 0 minutes
- Total Time: 45 minutes
- Yield: 12 servings 1x
- Category: Snack
- Method: No-Bake
- Cuisine: American
- Diet: Vegetarian
Ingredients
- 5 Medjool dates (pitted and softened)
- 1 cup all-natural, drippy peanut butter
- 1.5 cups ground oat flour
- 1/3 cup honey (or maple syrup)
- 1 teaspoon vanilla extract
- 1/2 cup vanilla protein powder (whey or vegan)
- Salt (pinch)
- 1/4 cup water (or as needed)
- 3/4 cup dark chocolate chips (optional topping)
- 2 teaspoons coconut oil (optional topping)
- Coarse sea salt (for sprinkling, optional topping)
Instructions
- Prepare your dates: Start by pitting and soaking your Medjool dates in warm water for about 10 minutes if they’re firm.
- Blend the ingredients: In a food processor, combine softened dates, peanut butter, honey (or maple syrup), and vanilla extract until creamy.
- Add dry ingredients: Toss in the ground oat flour, protein powder, and a pinch of salt; pulse to combine.
- Taste and adjust: Sample the mixture to tweak sweetness or nuttiness as desired.
- Shape the dough: Transfer the mixture to an 8×8 inch baking dish lined with parchment paper and press it into an even layer.
- Chill in the fridge: Refrigerate for about 30 minutes to firm up.
- Melt your chocolate: In a microwave-safe bowl, melt dark chocolate chips and coconut oil until smooth.
- Drizzle and sprinkle: Once bars cool, drizzle melted chocolate on top and sprinkle with coarse sea salt.
- Slice and store: After setting, slice into squares and store in an airtight container.
Notes
These bars can be customized with nuts, dried fruits, or spices for added flavor.
Nutrition
- Serving Size: 1 bar
- Calories: 175
- Sugar: 6g
- Sodium: 50mg
- Fat: 8g
- Saturated Fat: 2g
- Unsaturated Fat: 6g
- Trans Fat: 0g
- Carbohydrates: 20g
- Fiber: 3g
- Protein: 7g
- Cholesterol: 0mg
Keywords: protein bars, healthy snacks, no-bake, homemade snacks, energy bars