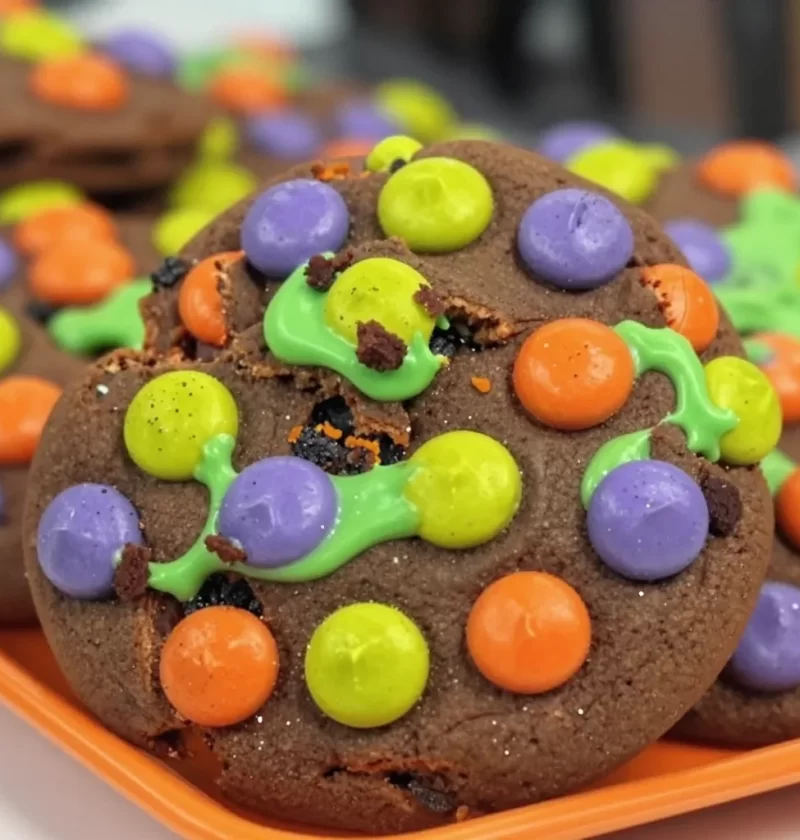
Hocus Pocus Halloween Cookies: A Bewitching Treat for Your Spooky Celebrations
Halloween is right around the corner, and if you’re anything like me, you have a soft spot for the fun, the quirky, and the incredibly delicious treats that come out during this spooky season. Today, I’m excited to share a recipe that’s as enchanting as it is tasty—Hocus Pocus Halloween Cookies! With their vivid colors and delightful flavors, these cookies are perfect for gatherings, trick-or-treaters, or just indulging yourself in some seasonal magic.
Picture this: a chilly October evening, the leaves have turned to shades of gold and crimson, and the air is crisp with the promise of Halloween festivities. The scent of sugar and spice wafts through the kitchen as I mix up a batch of these cookies, remembering all the fun I had as a little chef in my grandmother’s kitchen. She had a way of making baking feel like an adventure, mixing in flavors and colors with a pinch of magic.
As I whisk flour and butter, I close my eyes and can almost hear her laughter—the excitement for something delicious bubbling just beneath the surface. It was in those moments, covered in flour and giggles, that I learned the true joy of creating something that brings people together. Hocus Pocus Halloween Cookies embody that spirit—colorful, whimsical, and utterly delightful.
Are you ready to stir up some Halloween joy and create lasting memories? Let’s fly into the kitchen and make these enchanting treats!
Personal Story
Growing up, Halloween was a magical time in our household. Each year, we would transform our home into a haunted hideaway, complete with cobwebs, glowing jack-o’-lanterns, and a cauldron or two. My favorite part, however, was always in the kitchen, where my grandmother and I would whip up our famous Halloween treats. One particular year stands out: we decided to bake a batch of cookies shaped like witches and spellbooks.
As we delicately rolled out the dough, my grandmother told me stories of spooky spells and magical potions. While we decorated our cookies with green frosting and sparkling sprinkles, I felt like a true witch in training, casting sweet spells with every swirl of icing. That day, covered in flour and frosting, I learned that cooking wasn’t just about following a recipe— it was about creating joy, memories, and traditions that would last a lifetime.
Now, I carry that spirit into my own kitchen as I share the recipe for these Hocus Pocus Halloween Cookies. They are a little nod to the magic and memories from my childhood, and I can’t wait for you to create your own enchanting moments.
Ingredients
Before we conjure up these delightful cookies, let’s gather our ingredients. Here’s what you’ll need to brew up your batch:
-
2 1/2 cups all-purpose flour: The foundation of our cookies. For a gluten-free version, consider substituting with a 1:1 gluten-free baking flour; just be sure to check the blend includes xanthan gum.
-
1 tsp baking soda: This little magic ingredient will help our cookies rise to perfection, giving them that soft, chewy texture we love.
-
1/2 tsp salt: Balances out the sweetness and enhances the overall flavor of the cookies.
-
1/2 cup unsalted butter, softened: The star of our show! Using unsalted butter allows you to control the salt content. If you need a dairy-free option, coconut oil or a vegan butter substitute will work well.
-
1 cup granulated sugar: Sweetness is key! For a deeper flavor, you can replace half of this with brown sugar.
-
1/2 cup brown sugar: Adds moisture and a hint of caramel flavor. If you’re out of brown sugar, you can create a substitute by mixing granulated sugar with a bit of molasses.
-
1 large egg: Binds our ingredients together and gives the cookies their lovely texture. For a vegan twist, you can use a flax egg (1 tablespoon ground flaxseed + 2.5 tablespoons water).
-
1 tsp vanilla extract: The flavor enhancer that brings everything together! Pure vanilla is best, but imitation will work in a pinch.
-
Witches brew frosting (green frosting): This will be our decorative touch to bring our cookies to life. You can make your own by mixing powdered sugar with a bit of milk and green food coloring, or grab a pre-made tube at the store.
-
Edible glitter: Because what’s Halloween without a little extra magic? Add it for sparkle and a spellbinding finish!
Step-by-Step Instructions
Alright, let’s dive into the enchanting process of making your Hocus Pocus Halloween Cookies! Don your apron and let’s get started with some kid-friendly magic.
Step 1: Preheat Your Cauldron (Oven)
Preheat your oven to 350°F (175°C). This ensures that our cookies will bake evenly. Seriously, there’s something wonderfully nostalgic about the smell of cookies wafting through the air as they bake, isn’t there?
Step 2: Mix the Dry Ingredients
In a large bowl, whisk together the all-purpose flour, baking soda, and salt. This step is crucial—mixing the baking soda with the flour helps ensure it gets distributed evenly throughout the batter. It’s like adding a sprinkle of baking magic to your concoction!
Step 3: Cream the Butters and Sugars
In another bowl, beat the softened unsalted butter, granulated sugar, and brown sugar together until the mixture is creamy and light. This usually takes about 2-3 minutes. Trust me, this is the part where your cookies start to take on personality!
Step 4: Add the Wet Ingredients
Next, crack in the egg and add the vanilla extract. Beat until well combined. This might make a little mess, but a happy kitchen always comes with a bit of flour on your shirt!
Step 5: Combine Wet and Dry Mixtures
Gradually add the dry mixture to the wet ingredients, mixing until combined. It’s okay if the dough looks a little crumbly; that’s just the magic of cookie dough waiting to come together!
Step 6: Form the Cookies
Scoop tablespoon-sized amounts of the dough and roll them into balls. Place them on parchment-lined baking sheets, leaving enough space between each dough ball (about 2 inches, please!) for spreading. You can use your fingers (or a fork) to gently flatten them if you prefer a cookie that’s less rounded.
Step 7: Bake to Perfection
Place the baking sheets in the preheated oven and bake for 10-12 minutes, or until the edges start to turn a golden-brown color. Pull them out when they’re slightly underbaked—they will continue to cook on the baking sheet. This way, you ensure they stay soft and chewy in the center!
Step 8: Cool and Decorate
Allow the cookies to cool on the baking sheets for a few minutes, then transfer them to a wire rack to cool completely. Once cool, it’s time to unleash your creativity! Decorate with the witches brew frosting, using a piping bag or a knife. Don’t forget to sprinkle them with edible glitter for that extra touch of Halloween magic!
Serving Suggestions
Serve your Hocus Pocus Halloween Cookies on a festive platter, adorned with decorative cobwebs and spooky props. These cookies are perfect for sharing at Halloween parties, family gatherings, or simply as a sweet treat during your movie marathons. For a touch of elegance, pair them with a warm cup of apple cider or a glass of spooky-themed punch!
Recipe Variations
Feeling a little adventurous? Here are some creative twists to make your Hocus Pocus Halloween Cookies even more magical:
-
Pumpkin Spice Add-In: For a fall twist, add 1 teaspoon of pumpkin pie spice to the dry ingredients for that warm autumn flavor.
-
Chocolate Chip Surprise: Stir in 1 cup of semi-sweet chocolate chips for a delightful surprise in every bite. Chocolate and Halloween go hand in hand, don’t they?
-
Nutty Crunch: Fold in 1/2 cup of chopped nuts—walnuts or pecans would be fantastic. Adding texture takes your cookies to another level.
-
Vegan Version: Use a flax egg and plant-based butter to make them completely vegan. They’ll be just as scrumptious!
-
Gourmet Frosting: Switch up your icing by using colored chocolate melts instead of frosting for a smooth, shiny finish. Just melt, dip, and let set for a decadent treat!
Chef’s Notes
These Hocus Pocus Halloween Cookies are not only a delightful treat, but they also embody the spirit of fun and imagination. I first started making these cookies at home as a way to get creative in the kitchen with my family. Each year, we added our own decorations, transforming even the simplest of cookies into imaginative masterpieces.
One time, I accidentally spilled a whole jar of sprinkles on a batch, but rather than feeling frustrated, I laughed and dubbed them "Mystic Sprinkle Cookies." That’s the beauty of cooking—sometimes the best memories come from the unexpected!
As the years have passed, I’ve tweaked this recipe to perfection, playing with flavors and decorations. And I can’t wait for you to add your unique touch to these cookies. Let the spirit of Halloween guide your creativity!
FAQs and Troubleshooting
1. My cookies spread too much. What did I do wrong?
Cookies can spread for a few reasons—your butter might be too warm, or you might have added too much sugar. Make sure your butter is softened but still cool, and stick to the measurements for the best results!
2. Can I freeze these cookies?
Absolutely! Once cooled, you can freeze the cookies for up to three months. Just be sure to seal them tightly in an airtight container or freezer bag. When you’re ready to enjoy, let them thaw and frost as desired!
3. How do I get my frosting to stay put?
If your frosting is too runny, you can thicken it by adding a little more powdered sugar until it reaches your desired consistency. For a thicker base, you can also try using cream cheese frosting for a festive twist!
4. What if I don’t have all the ingredients?
No worries! Many of these ingredients have substitutes, such as using coconut oil instead of butter or a flax egg instead of a regular egg. Just remember to be mindful of your ingredient choices for the best flavor!
Nutritional Info
Each cookie (without frosting) contains approximately:
- Calories: 150
- Total Fat: 7g
- Saturated Fat: 4g
- Carbohydrates: 20g
- Sugar: 8g
- Protein: 2g
- Fiber: <1g
Remember, you can increase or decrease the nutritional values based on the variations or substitutions you choose!
So there you have it—your guide to creating scrumptious Hocus Pocus Halloween Cookies! I hope you find joy and magic in your kitchen as you whip up these delightful treats. Let’s keep the spirit of Halloween alive with food that brings us together. Happy baking, and may your October be filled with enchantment, flavor, and wonderful memories!
PrintHocus Pocus Halloween Cookies

Enchanting cookies perfect for Halloween celebrations, featuring vibrant colors and delightful flavors.
- Prep Time: 15 minutes
- Cook Time: 12 minutes
- Total Time: 27 minutes
- Yield: 24 servings 1x
- Category: Dessert
- Method: Baking
- Cuisine: American
- Diet: Vegetarian
Ingredients
- 2 1/2 cups all-purpose flour
- 1 tsp baking soda
- 1/2 tsp salt
- 1/2 cup unsalted butter, softened
- 1 cup granulated sugar
- 1/2 cup brown sugar
- 1 large egg
- 1 tsp vanilla extract
- Witches brew frosting (green frosting)
- Edible glitter
Instructions
- Preheat your oven to 350°F (175°C).
- Mix together the all-purpose flour, baking soda, and salt in a large bowl.
- Cream the softened unsalted butter, granulated sugar, and brown sugar until light and fluffy.
- Add the egg and vanilla extract, beating until well combined.
- Combine the dry mixture with the wet ingredients until mixed.
- Form tablespoon-sized balls of dough and place them on parchment-lined baking sheets.
- Bake for 10-12 minutes until edges are golden-brown.
- Cool on wire racks and decorate with witches brew frosting and edible glitter.
Notes
Feel free to experiment with different add-ins like chocolate chips, nuts, or pumpkin spice for added flavors.
Nutrition
- Serving Size: 1 cookie
- Calories: 150
- Sugar: 8g
- Sodium: 100mg
- Fat: 7g
- Saturated Fat: 4g
- Unsaturated Fat: 2g
- Trans Fat: 0g
- Carbohydrates: 20g
- Fiber: 1g
- Protein: 2g
- Cholesterol: 30mg
Keywords: Halloween, cookies, festive treats, desserts, baking