Brown Butter Ice Cream: A Flavor Revolution in Your Kitchen
There’s something magical about ice cream, isn’t there? Whether it’s the creamy texture melting on your tongue or the anticipation as the scooper meets the bowl, ice cream has an undeniable way of making any day better. Today, I want to share with you a special dessert that not only elevates the classic treat we all know and love but also infuses it with the nutty richness of brown butter. Yes, my friends, we’re diving into the world of Brown Butter Ice Cream!
Imagine this: it’s a hot summer day, and you’re enjoying a leisurely afternoon in the backyard with family and friends. The kids are splashing around in the pool, laughter fills the air, and the scent of something delightful lingers as you make your way into the kitchen. You decide to treat everyone to a homemade ice cream that they won’t soon forget—the kind that transforms that steamy afternoon into a sweet, joyous memory. That’s exactly what this Brown Butter Ice Cream delivers!
This creamy, decadent delight pays homage to the classic flavors we treasure while providing a unique twist that makes it utterly unforgettable. Brown butter—unexpected yet cozy—adds depth and a nutty aroma that will have everyone guessing your secret ingredient. Plus, the process of making it is just as enjoyable as devouring it; you’ll be captivated by the sizzling sounds in the kitchen and the enticing aroma that wafts through the air. So, pull up a chair, grab your favorite scoop, and let’s make some Brown Butter Ice Cream together!
A Personal Connection: A Scoop of Nostalgia
I remember the first time I came across brown butter ice cream. It was a breezy fall day, and I had decided to treat myself to an afternoon at a local artisanal ice cream shop. As I browsed the flavors, I stumbled upon brown butter ice cream. Curious, I ordered a scoop, and with that first taste, everything changed. The flavors danced on my palate, the nutty aroma wrapping me in warmth and comfort. I couldn’t help but feel a rush of nostalgia for the buttery desserts my grandmother used to make.
Her kitchen always felt like home—filled with sweet fragrances, laughter, and the occasional chaos of family gathered around. Inspired by her legendary butter cookies and rich buttercream frostings, I knew I had to recreate that nostalgic experience at home. And thus began my journey into crafting my version of brown butter ice cream! It’s not just a recipe; it’s a tribute to my grandmother and all the cozy moments spent in her kitchen. This ice cream is all about embracing those warm memories while enjoying the delightful transformation of simple ingredients into something truly magical.
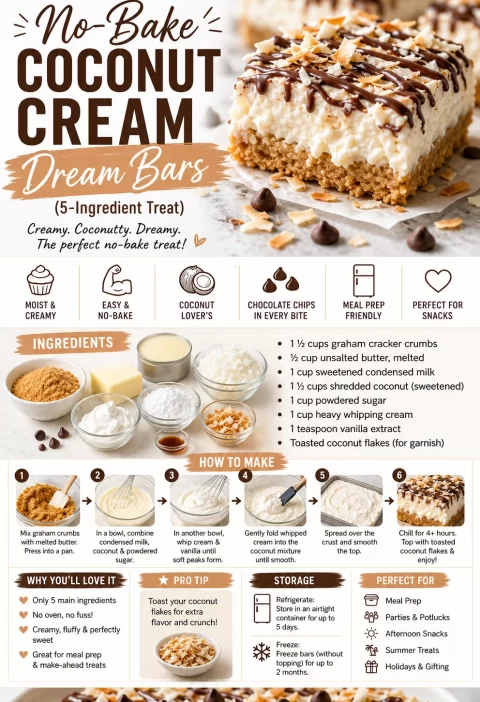
Ingredients
Now, let’s talk about the essentials that will make our Brown Butter Ice Cream shine! Here’s what you’ll need:
-
1 cup unsalted butter: The star of the show! Unsalted butter allows you to control the level of saltiness in your ice cream while helping to create that nutty flavor we love. If you’re in a pinch, you can use salted butter; just remember to adjust the added salt in the recipe.
-
1 cup granulated sugar: This is the sweet boost that balances the richness of the butter. You can also experiment with alternatives like brown sugar for a deeper flavor or coconut sugar for a more caramel-like taste.
-
2 cups heavy cream: The base for our creamy texture! Heavy cream gives the ice cream its luxurious mouthfeel. If you’re looking for a lighter option, you can substitute part of it with half-and-half, but the texture might be less creamy.
-
1 cup whole milk: Helps to lighten the mixture while still maintaining creaminess. For a non-dairy version, consider almond or coconut milk, but be mindful that it may change the flavor profile.
-
6 egg yolks: These impart richness and help emulsify the mixture for a smoother, softer ice cream. If you’re avoiding eggs, try using an egg substitute or a recipe designed specifically for egg-free ice creams.
-
2 tsp pure vanilla extract: Adds a lovely depth to the ice cream that complements the brown butter perfectly. Real vanilla is always best! If you’re in a pinch, vanilla bean paste can work beautifully too.
-
1/4 tsp salt: A dash of salt enhances the flavors we’ve got going on. It balances the sweetness and brings out the nutty notes of the brown butter.
Each of these ingredients plays a crucial role in crafting that dreamy, buttery decadence.
Step-by-Step Instructions
Alright, it’s time to get down to business! Here’s how to whip up your very own Brown Butter Ice Cream:
-
Brown the Butter: Start by placing your unsalted butter in a medium saucepan over medium heat. Keep an eye on it as it melts; you want to stir it occasionally to ensure it doesn’t burn. As it begins to foam and bubble, that’s when the magic happens! You’ll notice the color change to a beautiful golden brown—this is when the nutty aroma fills the air, and you’ll know you’re on the right track. Once you see tiny brown bits forming at the bottom and the smell deepens, remove it from the heat. Let it cool slightly before moving on.
-
Whisk the Sugar and Egg Yolks: In a mixing bowl, combine the granulated sugar and egg yolks. Using a handheld or stand mixer, whisk together until the mixture turns pale and slightly thickened. This step is crucial and helps incorporate air into the ice cream, making it lighter.
-
Combine the Ingredients: Gradually pour the warm brown butter into the egg mixture while continuously whisking to temper the yolks—this prevents them from scrambling. Next, whisk in the heavy cream, whole milk, pure vanilla extract, and salt until everything is well combined.
-
Cook the Mixture: Pour the mixture back into the saucepan and place over medium heat. Cook gently, stirring constantly, until it thickens slightly and coats the back of a wooden spoon—this usually takes about 5-10 minutes. Make sure not to let it boil; we want that creamy, rich texture!
-
Cool and Chill: Once thickened, remove from heat and allow it to cool completely at room temperature. After cooling, transfer your mixture to a bowl, cover it, and refrigerate for at least 4 hours or overnight. This step is key for developing flavors!
-
Churn the Ice Cream: After chilling, pour the mixture into your ice cream maker and churn it according to the manufacturer’s instructions. Usually, this takes about 20-30 minutes.
-
Freeze: Once churned, transfer the ice cream to an airtight container and freeze for at least 4 hours, or until firm. I recommend letting it sit at room temperature for about 5-10 minutes before serving to soften it a bit.
Serving Suggestions
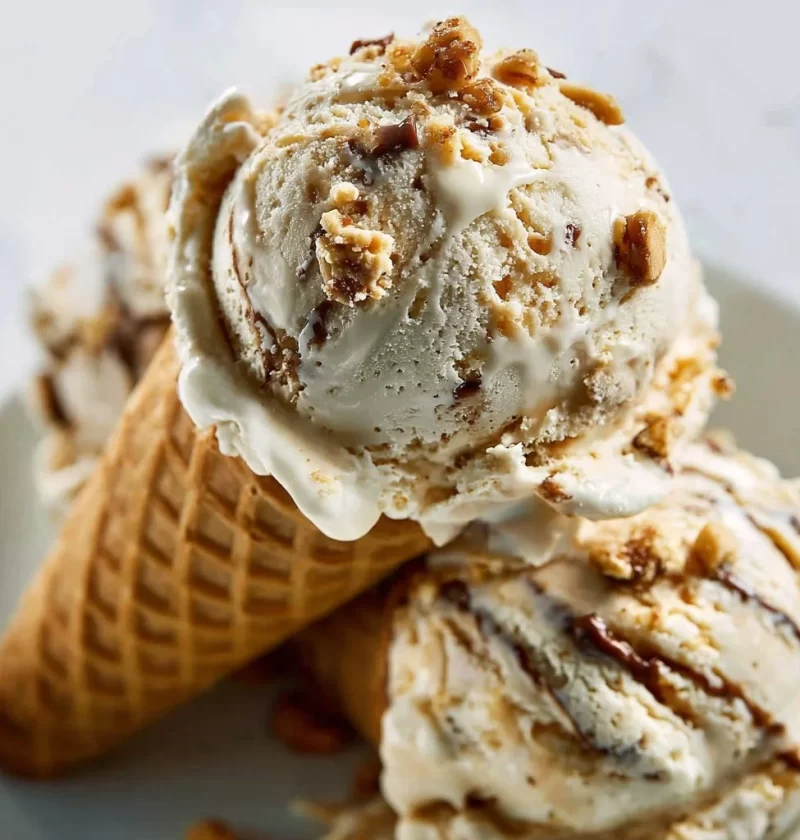
There’s nothing quite like serving up scoops of this creamy Brown Butter Ice Cream! For a delightful presentation, scoop generous portions into chilled bowls or elegant dessert glasses. Drizzle with a bit of warm caramel sauce for an indulgent touch, or sprinkle with sea salt for that sweet-and-salty contrast. Feeling extra fancy? Top it off with some crushed cookies, fresh berries, or a sprig of mint. You can’t go wrong!
Recipe Variations
Feel free to get creative with this basic recipe! Here are some fun ideas to switch things up:
-
Add Flavor Swirls: Mix in a swirl of your favorite fruit puree or chocolate sauce just before transferring the ice cream to the freezer.
-
Nutty Crunch: Fold in some toasted nuts like pecans, walnuts, or almonds after churning for extra texture.
-
Spice It Up: Incorporate a pinch of cinnamon or nutmeg for a warm spiced flavor profile.
-
Coffee Lover’s Delight: Add a tablespoon of instant coffee granules to the mixture before cooking for a delicious coffee-infused version.
-
Dairy-Free Option: Experiment with coconut or almond milk and coconut cream for a dairy-free brown butter ice cream that still delivers on flavor!
Chef’s Notes
This Brown Butter Ice Cream recipe has seen its fair share of experimentation over the years! When I first started making it, I remember getting all sorts of wrong measurements. One time, I completely forgot the eggs and ended up with a frozen block instead of the creamy goodness I was looking for. The good news? Ice cream disasters often lead to new inventions! That batch turned into the base for a brown butter granita that we had poolside one summer day—sometimes the kitchen mishaps bring the best memories.
FAQs and Troubleshooting
Here are some common questions you might have while making your Brown Butter Ice Cream, along with solutions for potential mishaps:
-
Why is my ice cream too icy? This usually happens if it hasn’t been churned enough or if there’s too much air in the mixture. Make sure you churn until it’s just about doubled in size and has a soft-serve consistency before freezing.
-
Can I use a blender instead of an ice cream maker? Yes, you can! Blend the chilled mixture in batches until creamy, then transfer it to a container and freeze it. Stir every 30-60 minutes for the first few hours to break up any ice crystals.
-
Is it normal for the ice cream to harden too much in the freezer? Yes! Homemade ice cream generally becomes more solid in the freezer than store-bought varieties because it lacks preservatives. Let it sit out at room temperature for 5-10 minutes before scooping.
-
How long can I store this ice cream? This Brown Butter Ice Cream can be enjoyed for about 2-3 weeks in the freezer. Just be sure to keep it in an airtight container to maintain its creamy texture.
Nutritional Info (optional)
For those curious about the nutritional content, a serving (about 1/2 cup) of this Brown Butter Ice Cream contains approximately:
- Calories: 320
- Total Fat: 24g
- Saturated Fat: 14g
- Cholesterol: 160mg
- Sodium: 50mg
- Total Carbohydrates: 25g
- Sugars: 20g
- Protein: 3g
And there you have it—a warm, comforting bowl of Brown Butter Ice Cream, perfect for creating delightful memories. With each scoop, you’ll not only experience a unique flavor but also a piece of my own kitchen journey. I can’t wait to hear how yours turns out—so gather your ingredients, and let’s get cooking!
PrintBrown Butter Ice Cream
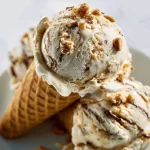
A delightful twist on a classic favorite, this Brown Butter Ice Cream combines the nutty richness of brown butter with a creamy texture for a creamy summer treat.
- Prep Time: 15 minutes
- Cook Time: 15 minutes
- Total Time: 4 hours 30 minutes
- Yield: 4 servings 1x
- Category: Dessert
- Method: Churning
- Cuisine: American
- Diet: Vegetarian
Ingredients
- 1 cup unsalted butter
- 1 cup granulated sugar
- 2 cups heavy cream
- 1 cup whole milk
- 6 egg yolks
- 2 tsp pure vanilla extract
- 1/4 tsp salt
Instructions
- Brown the butter by melting it in a medium saucepan over medium heat until it turns golden brown.
- Whisk together the sugar and egg yolks in a mixing bowl until pale and thick.
- Combine the warm brown butter with the egg mixture by whisking it in gradually.
- Cook the mixture over medium heat until it thickens and coats the back of a spoon.
- Cool the mixture completely at room temperature, then refrigerate for at least 4 hours.
- Churn the mixture in an ice cream maker according to the manufacturer’s instructions.
- Freeze the churned ice cream in an airtight container for at least 4 hours until firm.
Notes
For best flavor, let the ice cream sit at room temperature for 5-10 minutes before serving.
Nutrition
- Serving Size: 1/2 cup
- Calories: 320
- Sugar: 20g
- Sodium: 50mg
- Fat: 24g
- Saturated Fat: 14g
- Unsaturated Fat: 8g
- Trans Fat: 0g
- Carbohydrates: 25g
- Fiber: 0g
- Protein: 3g
- Cholesterol: 160mg
Keywords: ice cream, brown butter, dessert, summer treat, creamy