Haunted House Cookies and Sugar Cookies with Icing
Introduction
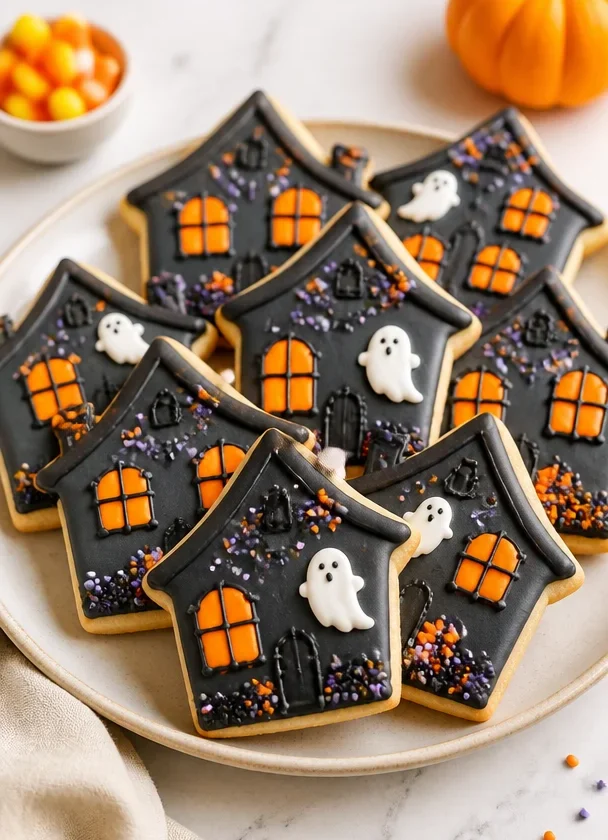
Welcome to my culinary haven! Today, we’re diving into the whimsical world of cookie decorating, perfect for the spooky season. As the air turns crisp and leaves begin to fall, it’s time to embrace the haunting vibes with some delightfully eerie haunted house cookies and classic sugar cookies adorned with vibrant icing. Whether you’re planning a Halloween gathering or simply looking to add a festive touch to your baking repertoire, these cookies are sure to bring joy and a touch of fright to your holiday festivities.
My passion for baking cookies stems from childhood memories spent in the kitchen with my family. I recall the delightful chaos as flour dusted the countertops, and laughter echoed through our home. My grandmother, a master of cookie artistry, would transform ordinary dough into enchanting treats, filling our house with the tantalizing scent of vanilla and sugar. Her famous sugar cookies were a staple, and every year during Halloween, we’d gather to create our own spooky masterpieces. These moments inspired me to share my own cookie recipes with you — and to help you create some sweet memories in your own kitchen.
So, roll up your sleeves and let’s embark on a fun and slightly spooky baking adventure! Together, we’ll whip up delicious sugar cookies and transform them into haunted houses, perfect for any Halloween celebration.
Personal Story
One of my fondest memories is from a Halloween celebration at my childhood home. My grandmother decided that we should create a grand haunted house made entirely of cookies. It started with her famous sugar cookie dough, perfectly rolled out and shaped into walls, roofs, and all the whimsical details. As we assembled, she told ghost stories to keep the air filled with excitement and a hint of suspense.
We faced trials — the icing wasn’t sticking, the candy decorations kept slipping off, and a mischievous cat tried to swipe a cookie for himself! But amidst the laughter and occasional chaos, we crafted a magnificent cookie house, decorated with every possible candy and icing design you could imagine. As we presented our creation to friends and family, pride swelled in my heart. It was more than just a dessert; it was a reflection of love, creativity, and the joy of being together. Today, I carry on that tradition, encouraging you to fill your home with the same love and festivity as we create these magical cookies together.
Ingredients
-
Sugar Cookie Dough: The foundation for your cookies! Look for a basic sugar cookie recipe that includes flour, sugar, butter, eggs, and vanilla. If you’re short on time, feel free to opt for pre-made dough from your local bakery.
-
All-Purpose Flour: Essential for the dough’s structure, a good quality flour will give your cookies that perfect texture. If you’re looking for a gluten-free option, almond or coconut flour can work as alternatives, though they may alter the flavor slightly.
-
Granulated Sugar: This is what gives your cookies their sweetness. For a deeper flavor, try brown sugar; just remember, it may affect the texture and color of your cookies.
-
Butter: Use unsalted butter for the best control over flavor. It should be at room temperature for easier creaming with the sugar. If you prefer a dairy-free version, coconut oil or vegan butter can be good substitutes.
-
Eggs: These bind the ingredients together and add richness. If you’re vegan, consider using flaxseed or a commercial egg replacer.
-
Vanilla Extract: A splash of vanilla enhances the flavor, making your cookies taste even more delectable. If you’re out, almond extract can add a unique twist.
-
Royal Icing: This is a mixture of egg whites (or meringue powder), powdered sugar, and water. It hardens quickly, making it perfect for cookie decoration. If you want a quick icing choice, a simple glaze of lemon juice and powdered sugar also works well.
-
Candies for Decoration: Get creative! Use a mix of gummy candies, chocolate, and edible glitter to give those haunted houses their spooky charm.
Step-by-Step Instructions
-
Prepare the Dough: In a mixing bowl, combine your flour, baking powder, and salt. In another bowl, cream together your softened butter and granulated sugar until light and fluffy, about 3-5 minutes. Then, add in your eggs and vanilla extract, mixing until well-integrated. Gradually add the dry ingredients, mixing until a soft dough forms.
-
Chill the Dough: Once your dough is mixed, wrap it in plastic wrap and chill it in the refrigerator for at least one hour. This step is crucial as it helps the cookies hold their shape when baking. Trust me, it’s worth the wait!
-
Roll Out the Dough: Preheat your oven to 350°F (175°C). On a well-floured surface, roll out the chilled dough to about 1/4 inch thick. Use cookie cutters to create your desired shapes — rounds for sugar cookies and more intricate shapes for the haunted houses.
-
Bake the Cookies: Place the shaped cookies on a parchment-lined baking sheet. Bake in the preheated oven for about 8-10 minutes, or until the edges are lightly golden. Be careful not to overbake; you want them to have a soft center!
-
Cool the Cookies: Once baked, remove the cookies from the oven and allow them to cool on the baking sheet for a few minutes before transferring them to a wire rack. Ensure they are completely cooled before decorating.
-
Make the Royal Icing: While the cookies cool, whip up the royal icing. Combine egg whites and powdered sugar in a bowl, whisking until smooth. If using meringue powder, follow the package instructions. Adjust the consistency with more sugar or water as needed — you’ll want a thick but spreadable icing.
-
Decorate Your Cookies: Use piping bags or small spatulas to apply icing to the cookies. Get creative! Pipe outlines and fill in the centers for a smooth look. For haunted houses, stick candy pieces on to simulate windows and doors. Let the icing set completely; this might take an hour or more depending on the humidity in your kitchen.
Serving Suggestions
Now that you have beautifully decorated haunted house cookies and sugar cookies, it’s time to present your spooky treats! Arrange your cookies on a large platter surrounded by faux cobwebs, mini pumpkins, or a sprinkle of edible glitter for that extra festive touch. For a fun twist, consider creating a “cookie tower” by stacking your cookies in different layers, showcasing all the intricate designs. If you’re feeling extra creative, pair your cookies with hot apple cider or a dark chocolate drink to enhance the flavors and truly immerse your guests in the Halloween spirit!
Recipe Variations
-
Spiced Sugar Cookies: Add a pinch of cinnamon, nutmeg, or pumpkin spice to the dough for a warm, fall-inspired flavor.
-
Gluten-Free Option: Substitute regular flour with a gluten-free baking mix to cater to gluten-sensitive friends.
-
Choco-licious Twist: Mix in chocolate chips or chunks into your sugar cookie dough for a delicious chocolatey surprise.
-
Citrus Zing: Add the zest of oranges or lemons to the dough for a refreshing twist on your cookies.
-
Royal Icing Colors: Use food coloring to dye your royal icing in spooky shades like green, purple, or black. This can help enhance your haunted theme and make your cookies pop!
Chef’s Notes
Creating cookies is an experience that goes beyond just the end product. I remember one year when I ran out of icing sugar halfway through decorating. So, in true improvisational spirit, I decided to use melted chocolate instead, which turned out to be a delightful surprise! It taught me that sometimes missteps can lead to the best culinary adventures.
Over the years, I have refined my techniques, but the essence of loving cooking and the joy of sharing always remains at the heart of my recipes. I encourage you to make each cookie your own — there are no strict rules in creativity!
FAQs and Troubleshooting
-
My dough is too sticky! What do I do?: If your dough is too sticky, try adding a little more flour, one tablespoon at a time until you reach the right consistency.
-
How can I get my icing to harden?: Ensure you’ve used enough powdered sugar in your royal icing. If it’s too runny, add more sugar until it reaches a thick but manageable consistency.
-
My cookies are spreading too much while baking. What’s wrong?: You may need to chill your dough longer before baking, as warm dough can cause cookies to spread.
-
Can I freeze my cookies?: Absolutely! Once cooled, you can freeze your baked cookies for up to three months. Just ensure they are in an airtight container!
Nutritional Info
General Nutritional Breakdown (per cookie):
- Calories: 90
- Total Fat: 4g
- Saturated Fat: 2g
- Cholesterol: 15mg
- Sodium: 30mg
- Total Carbohydrates: 12g
- Dietary Fiber: <1g
- Sugars: 5g
- Protein: 1g
This is a general estimate; for precise nutritional information based on your specific ingredients and serving sizes, please consider using a nutritional calculator.
Final Thoughts
Baking haunted house cookies and sugar cookies is not just about the flavors but also the memories you create. I hope you feel inspired to gather your friends and family, embrace your creativity, and spark laughter in the kitchen. These cookies will not only satisfy your sweet tooth, but they’ll also become cherished memories you share over the years.
So grab your ingredients, put on your favorite playlist, and get ready to craft some spooky delights that will awe your guests and create lasting memories. Remember — the best ingredient in any recipe is love! Happy baking!
PrintHaunted House Cookies and Sugar Cookies with Icing

Delightfully eerie haunted house cookies and classic sugar cookies adorned with vibrant icing, perfect for Halloween celebrations.
- Prep Time: 60 minutes
- Cook Time: 10 minutes
- Total Time: 70 minutes
- Yield: 24 cookies 1x
- Category: Dessert
- Method: Baking
- Cuisine: American
- Diet: Vegetarian
Ingredients
- 2 3/4 cups All-Purpose Flour
- 1 cup Granulated Sugar
- 1 cup Unsalted Butter, at room temperature
- 2 Eggs
- 2 tsp Vanilla Extract
- 3/4 tsp Baking Powder
- 1/4 tsp Salt
- Royal Icing (egg whites or meringue powder, powdered sugar, water)
- Candies for Decoration (gummy candies, chocolate, edible glitter)
Instructions
- Prepare the Dough: In a mixing bowl, combine your flour, baking powder, and salt. In another bowl, cream together your softened butter and granulated sugar until light and fluffy, about 3-5 minutes. Then, add in your eggs and vanilla extract, mixing until well-integrated. Gradually add the dry ingredients, mixing until a soft dough forms.
- Chill the Dough: Wrap it in plastic wrap and chill it in the refrigerator for at least one hour to help the cookies hold their shape when baking.
- Roll Out the Dough: Preheat your oven to 350°F (175°C). On a well-floured surface, roll out the chilled dough to about 1/4 inch thick. Use cookie cutters to create your desired shapes.
- Bake the Cookies: Place the shaped cookies on a parchment-lined baking sheet. Bake for about 8-10 minutes, or until the edges are lightly golden.
- Cool the Cookies: Allow them to cool on the baking sheet for a few minutes before transferring them to a wire rack. Ensure they are completely cooled before decorating.
- Make the Royal Icing: Combine egg whites and powdered sugar in a bowl, whisking until smooth. Adjust consistency with more sugar or water as needed.
- Decorate Your Cookies: Use piping bags or small spatulas to apply icing. Pipe outlines and fill in the centers, adding candy pieces for decoration. Let the icing set completely.
Notes
Experiment with different flavors and decorations to make the cookies uniquely yours!
Nutrition
- Serving Size: 1 cookie
- Calories: 90
- Sugar: 5g
- Sodium: 30mg
- Fat: 4g
- Saturated Fat: 2g
- Unsaturated Fat: 2g
- Trans Fat: 0g
- Carbohydrates: 12g
- Fiber: <1g
- Protein: 1g
- Cholesterol: 15mg
Keywords: Halloween cookies, sugar cookies, cookie decorating, haunted house cookies