Spooky Halloween Dirt Cups: A Festive Treat for Little Ghouls and Goblins
Ah, Halloween! A time when the air is filled with excitement, leaves crunch beneath our feet, and homes are haunted with delightful decorations. As a home cook, Halloween captures my heart not just for the costumes and trick-or-treating but for the opportunity to dabble in food that’s just a smidge spooky and immensely fun. And what better way to celebrate than with Spooky Halloween Dirt Cups?
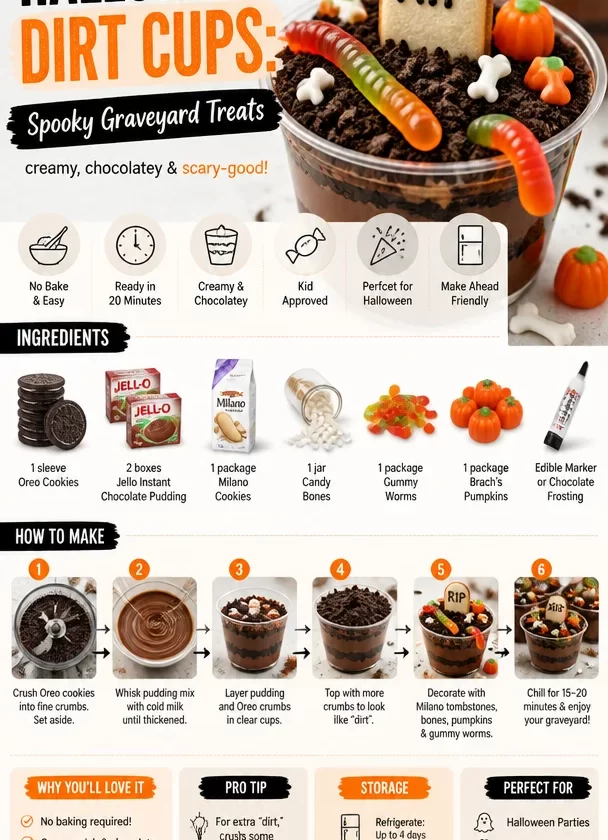
These individual dessert cups are perfectly themed for the holiday, rich with a creamy chocolate pudding filling, crushed Oreo “dirt,” and adorned with spooky candy bones and gummy worms—every bite is a mixture of flavors and textures that delights both young and old. This recipe is not only simple to whip up but also allows you to unleash your inner artist, crafting ghoulish masterpieces that bring joy to any Halloween gathering.
In my kitchen, these dirt cups have become tradition over the years. I remember the first time I made them for my niece’s Halloween party. I wanted to create something festive yet easy, where the kids could be involved. There was laughter, flour-smeared faces, and a slightly panicked chase to retrieve runaway gummy worms! We put on our funkiest Halloween aprons and created a mess worthy of confession in the kitchen. By the end of the night, we were all covered with chocolate pudding and giggles, and the dirt cups turned out to be a hit!
So pour yourself a Halloween-themed beverage, gather your spooky ingredients, and let’s jump into making these Dirt Cups that will enchant your guests!
Ingredients
-
1 sleeve Oreos
These delightful chocolate cookies provide the “dirt” in our cups! They’re crunchy and have that classic chocolate flavor. If you need a gluten-free option, look for gluten-free chocolate sandwich cookies that will work just as well. -
2 boxes Jello instant chocolate pudding
Rich, creamy, and oh-so-chocolatey! Instant pudding is fast and easy, making it perfect for this dessert. If you prefer homemade, you can make a chocolate custard instead, though it may take longer. -
1 package Milano cookies
These cookies serve as the perfect “tombstones” in our graveyard dessert scene. They’re buttery and slightly sweet. For a fun twist, you could use shortbread cookies and create your own tombstone shapes! -
1 jar candy bones
The spooky little candy bones add an extra layer of frightfully fun. You can find these at most stores around Halloween. If not, little candy skulls or gummy eyeballs work too! -
1 package gummy worms
No graveyard would be complete without some slimy, squirmy gummy worms! They add a playful twist. If gummy isn’t your jam, consider using chocolate-covered pretzel sticks as a fun, crunchy alternative. -
1 package Brach’s pumpkins
These candy pumpkins add a festive touch. They’re sweet and chewy. You could replace them with autumn-themed candy corn for an extra burst of color! -
Edible marker or chocolate frosting
These will help you create spooky inscriptions on the Milanos. If you’re feeling particularly crafty, try using melted chocolate as your adhesive for decorations!
Step-by-Step Instructions
Step 1: Prepare the Pudding
Start by making your Jello chocolate pudding according to the package instructions. Usually, you’ll whisk together the pudding mix and milk. Give it a good mix until there are no lumps, and let it rest for about 5 minutes until it thickens. While you wait, it’s a great time to take a sneak taste!
Chef’s Tip: For an added depth of flavor, consider substituting half the milk with heavy cream. This gives the pudding a luxurious texture and taste that might just put you in the Halloween spirit!
Step 2: Crush the Oreos
Now for the fun part—crushing the Oreos! You can place them in a large zip-top bag and crush them with a rolling pin, or use a food processor for ease. Crush them finely but leave some larger chunks for texture!
Chef’s Insight: Reserve some of the crushed Oreos for topping at the end. It creates a beautiful finish and gives an extra “dirt” look to your cups.
Step 3: Assemble the Layers
In clear cups (to show off those spooky layers), start with a layer of chocolate pudding at the bottom. Spoon in your desired amount, but don’t be shy; these cups should be generous! Follow with a heaping layer of crushed Oreos.
Chef Hack: Alternate the layers for a striking appearance—pudding, dirt, pudding, dirt. It’s all about those spooky vibes!
Step 4: Get Creative with Toppings
Now comes the show-stopping assembly! Decorate the top layer with a generous sprinkle of crushed Oreos. Place the Milano cookie tombstones upright in the dirt, using a dab of chocolate frosting to secure them if necessary.
Then, artfully place your candy bones alongside and toss in some gummy worms for that extra creepy factor. And don’t forget a few Brach’s pumpkins nestled in the dirt for a pop of fall color!
Chef’s Note: Feel free to let the kids go wild here! The more spooky decorations, the better. You can even have a competition to see who can create the craziest dirt cup!
Step 5: Chill and Serve!
Once your cups are assembled, pop them in the refrigerator for at least an hour to chill. This helps meld those flavors and gives the pudding a luscious texture. When you’re ready to serve, grab your hungry guests and present your ghastly creations!
Serving Suggestions
To elevate the presentation, display your dirt cups on a spooky-themed platter. You could even surround them with cobwebs made from spun sugar or Halloween confetti. Add a few funky straws to each cup, and watch your guests dive in with excitement—you’ll have the perfect setting to gather around and share stories of ghoulish adventures!
Recipe Variations
-
Vegan Variation: Swap the chocolate pudding for a vegan chocolate pudding mix and use coconut milk for a creamy base. Instead of Oreos, you can find vegan chocolate sandwich cookies.
-
Nutty Twist: Add a layer of crushed nuts—pecans or walnuts, for those who like a crunch! Just be sure to warn your guests in case of nut allergies.
-
Fruity Fun: Add a layer of crushed fruit—like raspberries or strawberries—between the pudding and Oreos for a fruity surprise!
-
Minty Delight: Use mint Oreos for a fun minty flavor boost that complements the chocolate perfectly!
-
Pumpkin Spice: For those who love pumpkin-flavored treats, add a layer of pumpkin puree mixed with a bit of whipped cream before the pudding layer. A Halloween twist on a classic!
Chef’s Notes
Creating these spooky dirt cups has brought so much joy into my kitchen and home. Each Halloween, I find new ways to adapt this recipe based on the whims of my little helpers. One year, a particularly creative niece decided our dirt cups needed those edible glitter “spiderwebs” that she saw on a cooking show. Who knew glitter could be edible?
Every time we whip them up, they spark giggles and create memories, reminding me that it’s not just about the food but the laughter we share in the kitchen. Over the years, we’ve customized our dirt cups with whatever candies we have on hand, making them a delightful way to use up leftover Halloween treats. The flexibility of this recipe allows you to connect with your family—or simply indulge in a bit of spooky fun on your own.
FAQs and Troubleshooting
1. What can I do if the pudding isn’t thick enough?
If your pudding doesn’t seem to set, try using less milk the next time or check the expiration date on your pudding mix; sometimes, older mixes can underperform.
2. The Oreos are too chunky—what do I do?
If your Oreos are not crushed finely enough, just give them a quick pulse in the food processor or a few extra whacks with a rolling pin. You want a dirt-like texture!
3. Can I make these ahead of time?
Absolutely! You can make these dirt cups a day in advance, which actually helps the flavors meld together beautifully. Just cover them with plastic wrap before storing them in the fridge.
4. My gummy worms melted in the pudding—help!
To prevent gummy worms from melting, add them on top just before serving rather than letting them sit in the pudding for too long!
Nutritional Info (optional)
These delightful Spooky Halloween Dirt Cups offer a rich, sweet treat that, while indulgent, can be part of a balanced Halloween celebration. With all treats, moderation is key, but who says you can’t enjoy some spooky fun?
So gather your ingredients, channel your spooky creativity, and dive into creating these unforgettable Halloween Dirt Cups! Whether you’re hosting a party or simply treating yourself and your family, these are sure to evoke smiles and maybe a few squeals of delight. Let’s make Halloween a little sweeter, one bite at a time! Pull up a chair, pass the (candy) butter, and let’s dig into the fun!
PrintSpooky Halloween Dirt Cups

Delightful dessert cups filled with creamy chocolate pudding, crushed Oreos, and spooky decorations like candy bones and gummy worms, perfect for Halloween festivities.
- Prep Time: 15 minutes
- Cook Time: 0 minutes
- Total Time: 60 minutes
- Yield: 4 servings 1x
- Category: Dessert
- Method: No-Cook
- Cuisine: American
- Diet: Vegetarian
Ingredients
- 1 sleeve Oreos
- 2 boxes Jello instant chocolate pudding
- 1 package Milano cookies
- 1 jar candy bones
- 1 package gummy worms
- 1 package Brach’s pumpkins
- Edible marker or chocolate frosting
Instructions
- Prepare the pudding by mixing the Jello chocolate pudding and milk according to the package instructions. Let it rest until thickened.
- Crush the Oreos in a zip-top bag or food processor until finely crushed.
- Assemble the layers in clear cups, starting with chocolate pudding, then crushed Oreos.
- Get creative with toppings by adding crushed Oreos, Milano cookies, candy bones, gummy worms, and Brach’s pumpkins.
- Chill in the refrigerator for at least 60 minutes to meld flavors before serving.
Notes
Feel free to let kids add their own spooky decorations for a fun touch!
Nutrition
- Serving Size: 1 cup
- Calories: 350
- Sugar: 25g
- Sodium: 200mg
- Fat: 15g
- Saturated Fat: 6g
- Unsaturated Fat: 8g
- Trans Fat: 0g
- Carbohydrates: 50g
- Fiber: 2g
- Protein: 5g
- Cholesterol: 30mg
Keywords: Halloween, dessert, spooky treats, chocolate pudding, kids