Golden, Crispy Cheeseburger Pockets: A Comfort Food Delight
Ah, the cheeseburger—an all-time classic that brings a smile to countless faces. But what happens when you take that beloved burger and transform it into a hand-held pocket of joy? You get Cheeseburger Pockets, crispy on the outside, oozing with cheesy goodness on the inside. This dish is not only a game-changer in the kitchen but also a fabulous way to make sure everyone’s taste buds are singing. Whether it’s a casual weeknight dinner or a fun gathering with friends, these pockets have a way of turning ordinary moments into something extra special.
Let’s be real; life can get a bit hectic, and sometimes all you want is a comforting meal that doesn’t require a culinary degree to whip up. And guess what? I’m here to tell you that these Cheeseburger Pockets are just the ticket! Picture golden crescent rolls enveloping a savory beef filling—this dish embraces all the cozy vibes, takes minimal time to prepare, and is perfect for sharing (or keeping all to yourself—you do you!).
So grab your favorite apron, roll up your sleeves, and get ready for a delightful culinary adventure. We’re going to make a fantastic dish that will have everyone gathering around the table, just like the good old days. But before we dive into the recipe, let’s take a stroll down memory lane.
A Memory Wrapped in Dough
Growing up, cooking was more than just a necessity; it was a way for my family to bond. One particular summer, my cousins and I eagerly awaited our time at Grandma’s house. She had a knack for turning simple ingredients into the most mouthwatering meals. I remember one afternoon when she decided to make “pocket” sandwiches—it was her version of a cheeseburger.
The kitchen was filled with laughter as we rolled out the dough and stuffed it with a blend of seasoned beef and cheese. The moment those pockets came out of the oven, golden and fragrant, we could hardly contain our excitement! I can still hear Grandma’s voice, guiding me with patience and love, as I nervously used the pizza cutter to seal the edges.
These moments shaped my love for cooking, and I’m thrilled to share my take on that nostalgic dish, transformed into these Cheeseburger Pockets. Let’s keep the memories alive through cooking, sharing delicious bites filled with warmth and joy.
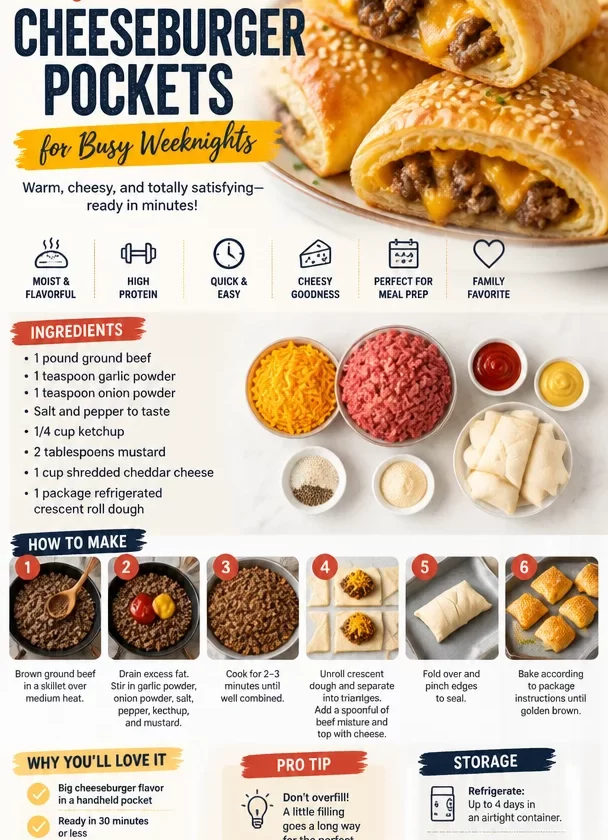
Ingredients
Here’s what you’ll need to make your Cheeseburger Pockets spectacular:
-
1 pound ground beef
A classic choice, this is the protein that gives the pockets their hearty flavor. For a leaner option, you could use ground turkey or chicken. But if you’re feeling adventurous, try ground lamb for a unique twist! -
1 teaspoon garlic powder
Garlic adds a depth of flavor that elevates the dish. If you’re out of garlic powder, feel free to use minced fresh garlic—just adjust the amount to taste! -
1 teaspoon onion powder
This ingredient adds a subtle sweetness and rich flavor. Using fresh onions instead? Sauté them first until they’re soft and aromatic, then throw them into the mix! -
Salt and pepper to taste
Sometimes, simple is best! Adjust the seasoning according to your preference. A sprinkle of smoked paprika can add a nice kick! -
1/4 cup ketchup
Ketchup brings a tangy sweetness to our filling that balances the savory beef. You could swap it for BBQ sauce for a smoky flavor. -
2 tablespoons mustard
A classic condiment that adds a zing to the mix. Use Dijon for a bit of sophistication, or yellow mustard for that nostalgic taste. -
1 cup shredded cheddar cheese
Cheddar gives that glorious melty texture we all crave. Want to switch it up? Try Monterey Jack or pepper jack cheese for a bit of heat! -
1 package refrigerated crescent roll dough
The star of the show! This dough makes everything easier and flakier. If you’re gluten-free, look for a gluten-free crescent roll dough—your pockets will still be a hit!
Step-by-Step Instructions
Now that you have all your ingredients ready, let’s jump into the cooking process! Follow these steps to create your Cheeseburger Pockets with love.
-
Preheat the Oven
Preheat your oven to 375°F (190°C). This will ensure your pockets have the perfect crispy exterior! -
Cook the Ground Beef
In a skillet over medium heat, brown your ground beef. Break it up with a spatula, letting it cook evenly. This should take about 5-7 minutes. As it cooks, sprinkle in the garlic powder, onion powder, salt, and pepper, stirring well to combine. Once the beef is browned and fully cooked, drain off any excess grease. -
Add the Goodies
Stir in the ketchup and mustard into the beef mixture, ensuring all the ingredients are well combined. Remove from heat and add the shredded cheese, mixing until it’s beautifully melty and cohesive. This step is crucial—don’t rush through it; you want every bite to be cheesy goodness! -
Prepare the Crescent Roll Dough
Open your package of refrigerated crescent roll dough. Carefully unroll the dough onto a clean surface. You’ll see the perforations—be gentle, and don’t forget: those are going to be the seals for your pockets! -
Assemble the Pockets
You’ll want to separate the dough into triangles. Place a generous spoonful of the cheeseburger mixture at the wide end of each triangle. Fold the pointed end over the filling and pinch the edges to seal. It’s important to make sure there aren’t any leaks—this keeps all that cheesy goodness inside! -
Bake to Perfection
Arrange your filled pockets on a baking sheet lined with parchment paper. Bake in your preheated oven for about 12-15 minutes, or until golden brown and flaky. Keep an eye on them—they’re going to smell amazing! -
Cool and Serve
Once baked, remove the pockets from the oven. Let them rest for a few minutes (if you can resist!). They will be super hot, and a little patience goes a long way.
Serving Suggestions
When it comes to serving these Cheeseburger Pockets, simplicity works best! Serve them as-is in a rustic wooden basket, or place them on a beautiful platter. You can add a side of your favorite dipping sauces like ranch, extra ketchup, or even a spicy sriracha mayo for those looking for a kick. Garnishing with fresh herbs, like parsley or chives, adds a pop of color and freshness that everyone will appreciate!
Recipe Variations
Feeling adventurous? Here are some creative twists you can try with your Cheeseburger Pockets:
-
BBQ Bacon Pockets: Add crispy bacon bits to your filling and use BBQ sauce instead of ketchup for a smoky flavor!
-
Veggie Delight: Swap the beef for sautéed mushrooms, zucchini, and peppers for a delicious vegetarian option.
-
Spicy Kick: Mix in diced jalapeños or pepper jack cheese for those who enjoy a bit of heat.
-
Southwestern Flair: Add black beans and corn to the filling, and serve with salsa for a Tex-Mex inspired twist.
-
Breakfast Pockets: Use scrambled eggs, crumbled sausage, and a sprinkle of cheese for a breakfast version that’s perfect for morning gatherings.
Chef’s Notes
Cooking is not just about the end result; it’s also about the journey! I still remember the first time I tried making these Cheeseburger Pockets. I was so excited, but I made the rookie mistake of overstuffing them. My pockets exploded in the oven! Fortunately, the flavor was still on point. Now, I always remind my friends (and you!) to be mindful of portion sizes when filling those delightful pockets. Each time I make this recipe, it reminds me of those fun, sizzling summer days with my family, and I hope it brings you as much joy in your kitchen as it does in mine!
FAQs and Troubleshooting
-
Why are my pockets not sealing properly?
Make sure to press the edges firmly to seal them. If they still won’t seal, try wetting your fingers slightly and running them along the edges before pinching. -
Can I use leftover cooked beef for this recipe?
Absolutely! Just skip the initial browning step and mix in the leftover beef with the cheese, ketchup, and mustard. -
What should I do if the dough is hard to work with?
If the dough feels too soft, refrigerate it for about 10 minutes. This will make it easier to handle. -
How do I store leftovers?
Once cooled, store any leftover pockets in an airtight container in the fridge for up to 3 days. To reheat, pop them in the oven or air fryer to restore that crispy texture!
Nutritional Info
While I believe every meal should be enjoyed, if you’re interested, here’s a rough breakdown per cheeseburger pocket:
- Calories: ~280
- Protein: ~15g
- Carbohydrates: ~25g
- Fat: ~15g
Feel free to tweak the ingredients to suit any dietary needs or goals!
Now that you’ve taken this journey with me, I’m excited for you to create your own Cheeseburger Pockets that will fill your home with warmth and love. Remember, cooking is about the experience, so take your time, enjoy each step, and don’t forget to pass the butter (and the smiles)! Happy cooking!
PrintGolden, Crispy Cheeseburger Pockets
A hand-held version of the classic cheeseburger, these crispy pockets are filled with savory beef and melty cheese, perfect for casual dining or gatherings.
- Prep Time: 15 minutes
- Cook Time: 15 minutes
- Total Time: 30 minutes
- Yield: 4 servings 1x
- Category: Main Course
- Method: Baking
- Cuisine: American
- Diet: None
Ingredients
- 1 pound ground beef
- 1 teaspoon garlic powder
- 1 teaspoon onion powder
- Salt and pepper to taste
- 1/4 cup ketchup
- 2 tablespoons mustard
- 1 cup shredded cheddar cheese
- 1 package refrigerated crescent roll dough
Instructions
- Preheat your oven to 375°F (190°C).
- Cook the ground beef in a skillet over medium heat, breaking it up and cooking for 5-7 minutes.
- Add the garlic powder, onion powder, salt, and pepper, stirring well.
- Drain off excess grease once the beef is cooked.
- Stir in ketchup and mustard into the beef mixture.
- Remove from heat and mix in shredded cheese until melted.
- Open and unroll the crescent roll dough onto a clean surface.
- Assemble the pockets by placing a spoonful of beef mixture on each triangle of dough and sealing the edges.
- Arrange filled pockets on a baking sheet and bake for 12-15 minutes until golden brown.
- Cool for a few minutes before serving.
Notes
Ensure to press edges firmly to seal the pockets. Adjust seasoning to your taste with smoked paprika if desired.
Nutrition
- Serving Size: 1 pocket
- Calories: 280
- Sugar: 5g
- Sodium: 500mg
- Fat: 15g
- Saturated Fat: 7g
- Unsaturated Fat: 5g
- Trans Fat: 0g
- Carbohydrates: 25g
- Fiber: 1g
- Protein: 15g
- Cholesterol: 50mg
Keywords: cheeseburger, pockets, crispy, comfort food, easy recipe