Cherry Pie Filling: A Sweet Slice of Nostalgia
Ah, cherry pie filling—the luscious, jewel-toned concoction that transforms any dessert from ordinary to extraordinary. There’s something undeniably special about the combination of sweet and tart cherries enveloped in a syrupy embrace, just waiting to be tucked into a flaky crust or spooned over a scoop of vanilla ice cream. When I think of cherry pie filling, I’m transported back to summer days spent in my grandmother’s backyard, where cherry trees drooped with ripe, luscious fruit, their branches whispering secrets in the breeze.
In those days, my grandma would invite me into her cozy kitchen, where the aromas of baking wafted through the air like a warm hug. We would carefully pick the cherries, laughing as the juice stained our fingers and our aprons. She would show me the magic of turning these vibrant little gems into sweet fillings, pouring love (and often a little too much powdered sugar) into each batch. Making cherry pie filling became our timeless ritual, a beautiful way to celebrate the season and share sweetness with family and friends.
Today, I’m excited to share with you my cherished recipe for cherry pie filling. It’s simple, inviting, and packed with flavor, just like those joyful afternoons spent with my grandma. So grab your apron, and let’s dive into this delightful treat that’s bound to bring a smile to your face and a sprinkle of joy to your table!
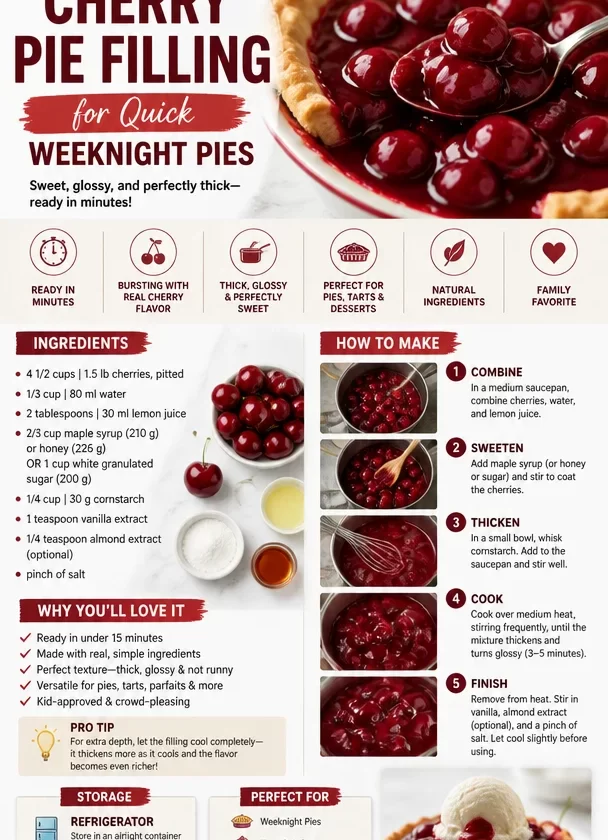
Ingredients
Here’s what you’ll need to create your very own cherry pie filling, along with a bit of chef wisdom to elevate your dish:
-
4 ½ cups (1.5 lb) cherries, pitted
Fresh cherries are the star of the show! Sweet Bing or tart Montmorency cherries both work beautifully. Feel free to mix and match or even swap in frozen cherries; just let them thaw and drain excess moisture before use. -
⅓ cup (80 ml) water
This helps to create that syrupy goodness. If you prefer a thicker filling, you can reduce the water by a tablespoon or two. -
2 tablespoons (30 ml) lemon juice
A dash of acidity enhances the cherries’ natural flavors and keeps the filling vibrant. If you’re in a pinch, bottled lemon juice will do just fine. -
⅔ cup maple syrup (210 g) or honey (226 g) or 1 cup white granulated sugar (200 g)
Here’s where you can customize the sweetness! Maple syrup gives a lovely depth of flavor, while honey brings its unique floral notes. Granulated sugar is the classic choice if you want a straightforward fruity sweetness. -
¼ cup (30 g) cornstarch
This is our thickening agent, ensuring your filling isn’t runny when baked. If you’re in a gluten-free kitchen, cornstarch is a perfect alternative to flour. -
1 teaspoon vanilla extract
The essence of vanilla amplifies the cherry flavor, creating a mouthwatering harmony. Always use pure vanilla for the best results. -
¼ teaspoon almond extract (optional)
A drizzle of almond extract adds a lovely nutty undertone that pairs beautifully with cherries. If you aren’t a fan, feel free to skip this. -
Pinch of salt
Just a smidgen helps to balance the sweetness and enhance all the flavors in your filling!
Step-by-Step Instructions
Let’s get cooking! Follow these steps closely, and you’ll have your cherry pie filling bubbling in no time.
-
Prep Your Cherries
Start by rinsing those beautiful cherries under cool water. If you haven’t already pitted them, do so gently to avoid losing any precious juice. I like to use a cherry pitter, which is a game-changer! If you don’t have one, a small knife will do—just be careful! -
Combine the Ingredients
In a medium saucepan, combine the pitted cherries, water, lemon juice, and sweetener of your choice (maple syrup, honey, or sugar). Give it a good stir to mix everything together. -
Make the Thickening Slurry
In a small bowl, mix the cornstarch with a few tablespoons of the cherry mixture, whisking until it’s fully dissolved. This prevents clumps from forming when you add it to the pot. -
Heat It Up
Place the saucepan over medium heat and let the mixture come to a gentle simmer. Stir occasionally to prevent sticking. You’ll notice the cherries start to soften and release their juices, creating a gorgeous, sticky sauce. This is where the magic happens, my friends! -
Add the Cornstarch Mixture
Once the mixture starts to bubble, add the cornstarch slurry. This is your thickening secret! Keep stirring for about another 5-7 minutes until the filling becomes thick and glossy. If you’d like, you can add the vanilla and optional almond extract at this point, too. -
Taste and Adjust
Now’s the time to taste your filling! Feel free to adjust the sweetness if you feel it’s necessary. Just remember, once heated and cooled, the flavors will settle, so don’t overdo it! -
Cool and Store
Remove the saucepan from the heat and let the filling cool to room temperature before transferring it to an airtight container. If you store it in the fridge, it’ll last up to a week, but trust me, it probably won’t stick around that long!
Serving Suggestions
When it comes to serving your delicious cherry pie filling, the options are endless! Pour it generously into a pre-baked pie crust, top it with a lovely layer of whipped cream, or scoop it over a slice of cheesecake. It also pairs deliciously with pancakes or waffles for a breakfast treat. Don’t forget to drizzle a bit of the syrupy goodness over vanilla ice cream—it’s pure bliss in every bite!
Recipe Variations
-
Mixed Berry Twist
Combine cherries with other berries like blueberries or raspberries for a mixed berry pie filling that’s bursting with flavor. -
Spicy Cherry Glaze
Add a teaspoon of cinnamon or a pinch of cayenne for a spiced variation that gives an unexpected flavor kick to your filling! -
Chocolate Cherry Sauce
Stir in some cocoa powder or melted dark chocolate to create a decadent chocolate cherry sauce perfect for topping desserts. -
Cherry Almond Delight
Swap out some of that vanilla extract for extra almond extract for a delightful nutty flavor that elevates the cherries beautifully. -
Sugar-Free Option
Use a sugar substitute like erythritol or stevia to create a delightful filling that’s friendly for low-sugar lifestyles.
Chef’s Notes
This cherry pie filling recipe has a special place in my heart. Over the years, I’ve experimented with various sweeteners and methods, but nothing quite beats the simplicity and comforting flavor of this version. I love how versatile this filling is; it can easily be adjusted to cater to your own tastes and preferences. Plus, who could resist the smile on someone’s face when they take a bite of freshly baked cherry pie? Feeding loved ones always warms my heart, reminding me why I fell in love with cooking in the first place.
FAQs and Troubleshooting
Q: Can I use frozen cherries instead of fresh?
Absolutely! Just make sure to thaw and drain the cherries beforehand to avoid excess moisture.
Q: My filling turned out too runny. What can I do?
If your filling is runny, you can return it to a saucepan and add a bit more cornstarch mixed with water over medium heat until it thickens to your desired consistency.
Q: How do I know when my filling is thick enough?
The filling should be thick enough to coat the back of a spoon. It will thicken further as it cools!
Q: Can I make this filling ahead of time?
Yes! This filling can be made in advance and stored in the fridge for up to a week or frozen for several months. Just make sure it’s fully cooled before storing.
And there you have it—a delightful journey into making cherry pie filling that’s both fun and rewarding. Whether enjoyed on its own or as a part of a dessert, this recipe is sure to spark joy in your kitchen! What will you create with your cherry pie filling? Let’s gather around the table, pass the butter, and dive into something delicious together!
PrintCherry Pie Filling
A delightful cherry pie filling made with sweet and tart cherries, perfect for pies or desserts.
- Prep Time: 10 minutes
- Cook Time: 15 minutes
- Total Time: 25 minutes
- Yield: 2 cups 1x
- Category: Dessert
- Method: Cooking
- Cuisine: American
- Diet: Vegetarian
Ingredients
- 4 ½ cups (1.5 lb) cherries, pitted
- ⅓ cup (80 ml) water
- 2 tablespoons (30 ml) lemon juice
- ⅔ cup maple syrup (210 g) or honey (226 g) or 1 cup white granulated sugar (200 g)
- ¼ cup (30 g) cornstarch
- 1 teaspoon vanilla extract
- ¼ teaspoon almond extract (optional)
- Pinch of salt
Instructions
- Prep your cherries by rinsing them and pitting them gently.
- Combine the pitted cherries, water, lemon juice, and sweetener in a medium saucepan.
- Make the thickening slurry by mixing cornstarch with a few tablespoons of the cherry mixture.
- Heat the saucepan over medium heat until the mixture comes to a gentle simmer.
- Add the cornstarch slurry once the mixture starts to bubble and stir for about 5-7 minutes until thickened.
- Taste and adjust the sweetness if necessary.
- Cool the filling to room temperature before storing in an airtight container.
Notes
This cherry pie filling is versatile and can be used in various desserts. It can also be made ahead of time and stored for later use.
Nutrition
- Serving Size: 1/4 cup
- Calories: 200
- Sugar: 30g
- Sodium: 5mg
- Fat: 0g
- Saturated Fat: 0g
- Unsaturated Fat: 0g
- Trans Fat: 0g
- Carbohydrates: 50g
- Fiber: 2g
- Protein: 1g
- Cholesterol: 0mg
Keywords: cherry pie filling, dessert filling, cherry sauce, sweet cherry recipe, summer dessert