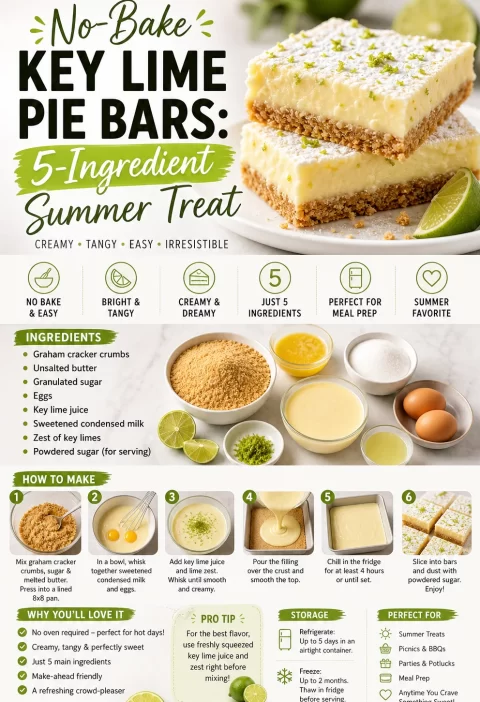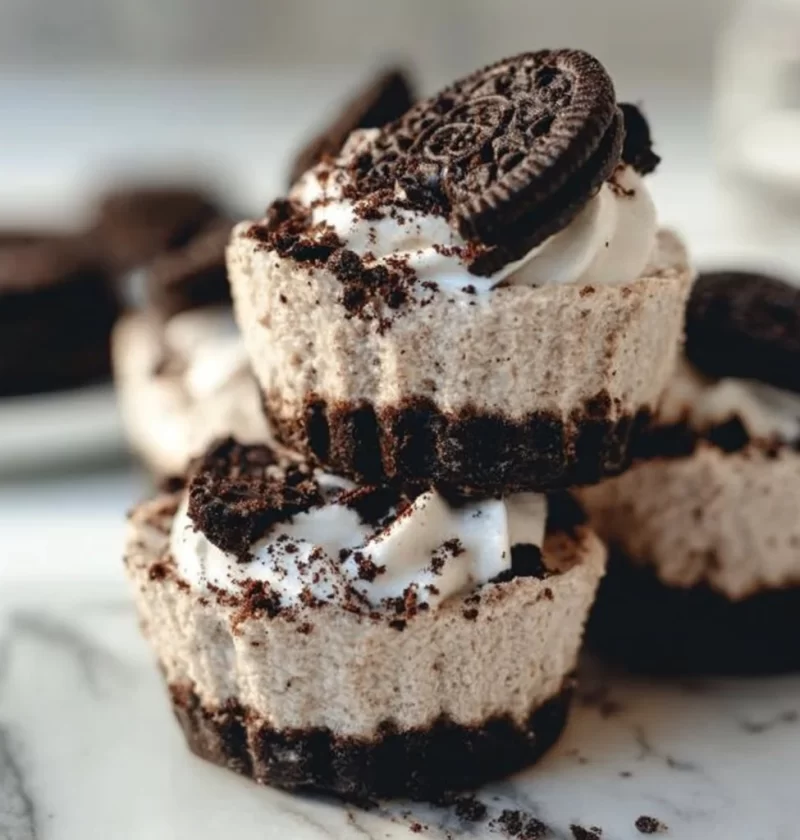
Healthy No-Bake Oreo Cheesecake Bites Recipe
Hey there, fellow foodies! I’m Tessa Montgomery from SweetLadle.com, and I’m excited to share a scrumptious treat that will knock your socks off without any baking required: Healthy No-Bake Oreo Cheesecake Bites! If you’re anything like me, you absolutely adore Oreos and the creaminess of cheesecake, but sometimes life gets busy, and the idea of making a whole cheesecake feels a bit overwhelming. That’s where these little bites come in. They’re not just easy to make; they’re also a lightened-up version that you can feel good about enjoying!
Imagine this: it’s a sunny afternoon, and you’re looking for something sweet, but you don’t want to spend hours in the kitchen. That’s when these no-bake cheesecake bites come to the rescue! In just a few steps and with just a few ingredients, you’re on your way to enjoying a delectable treat that’s perfect for snacking, entertaining, or even just indulging yourself on those days when you need a little something special.
Plus, these bites are incredibly versatile and customizable, fitting right into the vibe of any gathering or cozy night at home. So, grab your apron and let’s whip up a batch of these delightful no-bake cheesecake bites that’ll have everyone asking for more!
Personal Story
Let me take you back to a cozy afternoon during my college days when I decided to throw a small get-together for my friends. I wanted to make something that would impress them but wouldn’t require a culinary degree or any complicated steps; I was a busy student, after all! I rummaged through my kitchen and stumbled upon a tub of cream cheese and some leftover Oreos from a late-night snack stash. That’s when inspiration struck!
With just those two ingredients in mind, I started playing around and realized I could make something delicious without lifting a finger to bake. The laughter and joy of my friends as they devoured those bites were unforgettable. It sparked my love for creating quick, approachable desserts that break the mold of traditional recipes. Fast forward to today, and I am so thrilled to share this refined version of that original creation that is even healthier and suited for any occasion!
Ingredients
-
8 oz. fat-free cream cheese
The base of our cheesecake bites, providing that rich and creamy texture. You can substitute with reduced-fat cream cheese if you prefer a slightly richer taste. -
1/2 cup non-fat vanilla Greek yogurt
This adds a delightful creaminess and a hint of tang, while also being a great source of protein. If Greek yogurt isn’t your thing, you can use plain yogurt, but it might result in a softer texture. -
1 tsp. vanilla extract
Vanilla extract enhances the flavor, making these bites taste even more like cheesecake. For a fun twist, try using almond extract for a different flavor profile! -
1/4 tsp. salt
A pinch of salt helps to elevate the sweetness and balance the flavors. If you’re watching your salt intake, you can skip this, but it really does make a difference. -
8 oz. tub of low-fat Cool Whip
This lightens up the bites and gives them that fluffy cheesecake-like texture. If you want to make these dairy-free, try using a non-dairy whipped topping. -
24 Oreo thins
The star of the show! These cookies bring a perfect crunch and chocolatey richness to the cheesecake bites. If you’re in the mood for something different, you can swap these out for another type of cookie, like Newman’s Own Organics or gluten-free cookies.
Step-by-Step Instructions
-
Prepare the Ingredients
First things first, gather all your ingredients. Having everything prepped keeps the process smooth and enjoyable, like a pleasant kitchen dance party! -
Mix the Cream Cheese and Yogurt
In a medium mixing bowl, combine that delicious fat-free cream cheese with the non-fat vanilla Greek yogurt. Use a hand mixer to beat them together until smooth and creamy. Make sure there are no lumps—no one wants a lumpy cheesecake bite! -
Add the Flavorings
It’s time to add in the vanilla extract and salt. Mix again briefly until everything is incorporated. Those warm vanilla scents will start to permeate your kitchen, and trust me; they will have everyone’s mouths watering! -
Incorporate the Cool Whip
Now, gently fold in the tub of low-fat Cool Whip. "Folding" means you want to keep that light, airy texture, so be careful not to overmix! This technique is crucial for keeping your bites fluffy and delightful. -
Crush the Oreos
Grab your Oreo thins and crush them into fine crumbs. You can use a food processor for this or just place them in a zip-lock bag and smash them with a rolling pin—just be mindful of the crumbs flying everywhere like edible confetti! -
Combine Crumbs with Cheesecake Mixture
Stir about half of those crushed Oreos into your cheesecake mixture. Saving some for garnish adds a lovely texture and a beautiful touch when serving. -
Shape into Bites
Using a cookie scoop or your hands, form small balls of the cheesecake mixture. Place them on a parchment-lined baking sheet. It’s okay if they’re not perfect balls—handmade goodies have their own charm! -
Chill
Now comes the hardest part: waiting! Place the baking sheet in your refrigerator and allow the cheesecake bites to chill for at least 1 hour. This will help them set up nicely and make them easier to handle. -
Garnish and Serve
Once they’re nice and firm, you can roll them in the remaining Oreo crumbs for an added crunch and appearance boost. Serve them on a cute platter for an extra special touch!
Serving Suggestions
To really elevate your presentation, arrange your Healthy No-Bake Oreo Cheesecake Bites on a beautiful serving platter, perhaps with a drizzle of chocolate or a sprinkle of extra crushed Oreos around the edges. Pair with fresh berries for an extra touch of color and freshness. And don’t forget to set out some baby forks or toothpicks to make it easy and fun for guests to grab and go!
Recipe Variations
- Dairy-Free Delight: Substitute the cream cheese and Cool Whip with vegan alternatives for a completely dairy-free version.
- Nutty Fun: Add a couple of tablespoons of almond or peanut butter to the cream cheese mixture for a nutty twist.
- Minty Fresh: Add a few drops of peppermint extract for a refreshing minty Oreo cheesecake flavor. Perfect for festive occasions!
- Fruit Lovers: Mix in some finely chopped strawberries or raspberries into the cheesecake mixture for added flavor and color.
Chef’s Notes
Every time I whip up these no-bake bites, I can’t help but chuckle at the time I accidentally added way too much salt while experimenting! Let’s just say, it was a very salty experience (and a lesson learned). These bites have evolved over time, from a simple college treat into one of my go-to recipes for any gathering. They’ve received rave reviews from family and friends alike, proving that healthy doesn’t have to mean sacrificing flavor. They make you feel like you’re indulging, minus any guilt!
FAQs and Troubleshooting
-
Why are my cheesecake bites too soft?
They may need more chilling time in the fridge. Make sure to give them at least an hour to firm up nicely before serving. -
Can I use regular Oreos instead of Oreos thins?
Absolutely! The regular version will work just fine; you’ll just have a slightly richer texture. -
How do I store leftovers?
Keep them in an airtight container in the refrigerator for up to a week. They’re great for a quick snack! -
Can I freeze these bites?
Yes, you can! Just place them in a single layer in a freezer-safe container. Thaw in the fridge before serving again. They taste just as good!
Nutritional Info (Optional)
Each cheesecake bite contains approximately:
- Calories: 80
- Protein: 2g
- Carbohydrates: 11g
- Fat: 3g
(Note: Nutritional information will vary based on specific brands and measurements used.)
I hope you enjoyed my recipe for Healthy No-Bake Oreo Cheesecake Bites as much as I loved sharing it with you! Remember, baking and cooking should be fun and filled with love. So, get in that kitchen, make these bites, and savor every delightful moment. Happy baking!
PrintHealthy No-Bake Oreo Cheesecake Bites

A lightened-up version of traditional cheesecake bites, these no-bake treats combine creamy cheesecake with crunchy Oreo thins for a quick and delightful dessert.
- Prep Time: 15 minutes
- Cook Time: 0 minutes
- Total Time: 75 minutes
- Yield: 12 servings 1x
- Category: Dessert
- Method: No-Bake
- Cuisine: American
- Diet: Vegetarian
Ingredients
- 8 oz. fat-free cream cheese
- 1/2 cup non-fat vanilla Greek yogurt
- 1 tsp. vanilla extract
- 1/4 tsp. salt
- 8 oz. tub of low-fat Cool Whip
- 24 Oreo thins
Instructions
- Prepare the Ingredients – Gather all your ingredients for a smooth process.
- Mix the Cream Cheese and Yogurt – Combine cream cheese and yogurt until smooth.
- Add the Flavorings – Mix in vanilla extract and salt briefly.
- Incorporate the Cool Whip – Gently fold in Cool Whip without overmixing.
- Crush the Oreos – Crush Oreo thins into fine crumbs.
- Combine Crumbs with Cheesecake Mixture – Stir half of the crumbs into the cheesecake mixture.
- Shape into Bites – Form small balls and place on a baking sheet.
- Chill – Refrigerate for at least 1 hour to firm them up.
- Garnish and Serve – Roll in remaining Oreo crumbs before serving.
Notes
Try using vegan alternatives for a dairy-free version, or add almond butter for a nutty twist.
Nutrition
- Serving Size: 1 bite
- Calories: 80
- Sugar: 6g
- Sodium: 100mg
- Fat: 3g
- Saturated Fat: 1g
- Unsaturated Fat: 2g
- Trans Fat: 0g
- Carbohydrates: 11g
- Fiber: 0g
- Protein: 2g
- Cholesterol: 5mg
Keywords: cheesecake, no-bake, dessert, healthy, Oreo, quick snacks