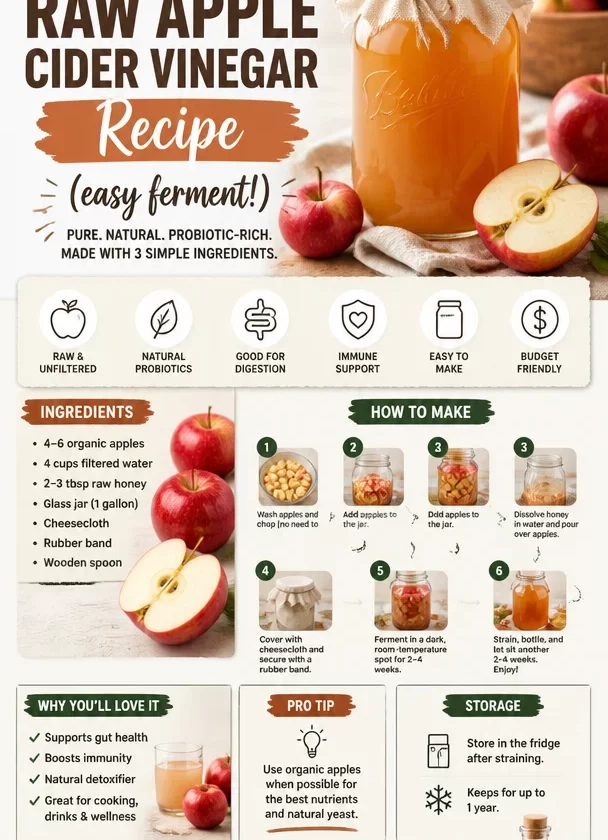
Homemade Raw Apple Cider Vinegar Recipe: Easy Ferment!
Introduction
Hey there, fellow food lovers! It’s Clara from Buttered Table, and today we’re diving into a recipe that’s not just a staple in the pantry but a delightful project that combines the beauty of fermentation with the natural sweetness of apples. It’s time to transform those leftover apple scraps into something incredible: Homemade Raw Apple Cider Vinegar!
Now, I know what you might be thinking. "Vinegar? Sounds complicated!" But trust me, this recipe is as easy as pie (or, should I say, as easy as apple pie?). Making your own apple cider vinegar at home is an unforgettable experience that fills your kitchen with sweet, tangy aromas, and it’s a perfect way to reduce food waste. Plus, there’s something magical about taking the simplest ingredients and turning them into a flavorful, probiotic-rich vinegar that packs a health punch.
I remember the first time I made apple cider vinegar like it was yesterday. I had just finished making applesauce for a family gathering, and there were tons of apple peels and cores leftover. Instead of tossing them in the compost, I decided to try my hand at fermenting them into vinegar. It was a chilly autumn afternoon, and the smell of those sweet apples filled my kitchen. Fast forward several weeks, and I was sipping on homemade salad dressings that tasted like pure sunshine!
What I love about making apple cider vinegar at home is not just the robust flavor; it’s about the experience—the bubbling of the fermentation, the waiting, the joys of creating something from scratch. It allows you to connect with your food, breathe in those delicious aromas, and understand the fermentation process. Are you ready to embark on this culinary journey? Grab your apron, and let’s get fermenting!
Personal Story
Ah, the memories of fall! One of my fondest experiences revolves around my grandmother’s kitchen—a place where laughter echoed and the scent of freshly baked pies wafted through the air. One crisp October afternoon, we gathered around her kitchen table to process a bushel of apples from the family orchard. She taught me the art of making applesauce, which she always insisted was best done with “imperfect” apples—those bruised and battered fruits were, in her words, full of character.
After we finished our applesauce, I noticed her carefully collecting the scraps—the peels and cores that most would discard. When I asked her what she was doing, she smiled knowingly and revealed her secret: she was making apple cider vinegar. It finally clicked! A light bulb moment where the scraps from our day of cooking were transforming into something even greater. That day, I learned not only about food but about sustainability, resourcefulness, and the beauty of preserving flavors. Now, every time I make my own apple cider vinegar, I think of her—sipping on the first splash of homemade dressing drizzled over fresh greens and remembering family meals filled with love, laughter, and unforgettable flavors.
Ingredients
Let’s talk about what you’ll need to get started on this delightful apple cider vinegar journey:
- Apples (4-6): Preferably organic to keep things natural! Any variety will work, but I love using sweet apples like Fuji or Honeycrisp for a naturally sweeter vinegar.
- Water (filtered or distilled): You’ll need enough to cover the apples completely, ensuring they don’t spoil. Using filtered water helps prevent any unwanted bacteria from interfering with your fermentation.
- Sugar (1 tablespoon): This acts as food for the natural yeasts present in the apple skins, aiding the fermentation process. If you prefer a healthier option, try using honey or maple syrup!
- A clean glass jar: Choose a large glass jar; it’s crucial for proper fermentation. Make sure it’s sterilized to keep unwanted bacteria at bay!
- A breathable cover: A coffee filter, clean cloth, or paper towel will allow air to flow while keeping insects out.
Step-by-Step Instructions
Now, let’s get down to business! Here’s a step-by-step guide to crafting your very own batch of raw apple cider vinegar.
-
Prep Your Apples
- Start by washing your apples thoroughly. Although we’ll be using the skins and cores, it’s important to get rid of any pesticides or wax. Chop the apples into quarters; there’s no need to peel them since the skin holds essential nutrients and wild yeast that aid fermentation!
-
Combine Ingredients
- Place your apple pieces into a clean glass jar, filling it about three-quarters full. It’s totally fine to mash them slightly with a wooden spoon; this helps release some of their juices. Next, dissolve a tablespoon of sugar in about a cup of filtered water, then pour it over the apples. Continue to add enough water to cover the apples completely, leaving about an inch of headspace at the top.
-
Fermentation Cover
- Cover the jar with a breathable fabric like a coffee filter or clean cloth. Secure it with a rubber band or string. This allows the mixture to breathe while keeping out dust and bugs. Remember, yeast loves air!
-
First Fermentation
- Now, find a warm, dark spot in your kitchen (around 60-80°F is perfect). Let it ferment for about 3-4 weeks. During this time, give it a little stir every few days to mix in any dry bits at the top and help promote even fermentation.
-
The Vinegar Transformation
- After about three weeks, you might notice some bubbles or foam developing on the surface. That’s a delicious sign of fermentation! Give it a taste test—you want it to be tangy, but not overly sour. If it’s still too sweet for your liking, let it ferment longer; this can take anywhere from 4-6 weeks depending on your kitchen conditions.
-
Straining the Mixture
- Once you love the tangy flavor, it’s time to strain the mixture! Use a fine mesh strainer or cheesecloth to separate the solid apple pieces from the liquid. Pour the liquid back into the jar, and don’t forget to taste it! If you find it lacking in flavor, you can even add a splash of store-bought apple cider vinegar to kickstart the acidity.
-
Second Fermentation
- Cover the jar again with the breathable cover and let it sit for another 3-4 weeks. This is where it continues to develop its flavors and acidity. Again, give it a taste every week—you’ll be amazed at how it changes!
-
Bottling Your Vinegar
- When you’ve hit that perfect acidity, it’s time for bottling! Use a funnel to pour your homemade apple cider vinegar into clean glass bottles. Don’t forget to label them! This vinegar will keep in your pantry for months, but trust me, it won’t last that long!
Serving Suggestions
Ready to enjoy your homemade apple cider vinegar? There are so many delightful ways to use it! Drizzle it over a fresh salad, splash it into marinades, or use it to make a tangy vinaigrette. And don’t forget about health elixirs—it can be mixed with agua for a refreshing tonic that aids digestion!
Recipe Variations
- Spiced Apple Cider Vinegar: Add a couple of cinnamon sticks or a few cloves to introduce a warm, spicy note to your vinegar. Perfect for fall flavors!
- Berry-Infused Cider Vinegar: Toss in some berries—raspberries or blackberries work wonderfully—to create a fruity twist that’s fantastic in dressings.
- Herb-Infused Version: Experiment by adding herbs like rosemary or thyme for a fragrant and savory take on apple cider vinegar.
- Citrus Zest: Add zest from oranges or lemons for a bright, refreshing zing that will elevate your culinary creations.
Chef’s Notes
You know, every time I make apple cider vinegar, I can’t help but think about how far we’ve come in our food journey. Fermentation used to be a necessity for preservation, and now it’s become a trendy endeavor. It’s amazing how such a simple process can yield rich, complex flavors that elevate our meals. Plus, my dog, Pistachio, always seems to sniff around my feet when I’m fermenting—maybe he’s trying to tell me he wants some homemade vinegar-based dog treats! I have to admit, it’s hard not to get attached to the jar sitting on my countertop, watching it bubble and transform. There’s something beautiful about nurturing that mixture like a little science project. The anticipation is half the fun!
FAQs and Troubleshooting
Q: What should I do if my vinegar smells bad?
A: If it smells rotten or has any signs of mold, it’s best to discard it. Good fermentation smells tangy and slightly sweet.
Q: Can I speed up the fermentation process?
A: While you can’t rush nature, using warmer temperatures slightly can help speed things up.
Q: How do I know when the vinegar is ready?
A: Taste it! It should have a tangy flavor.
Q: What if my vinegar doesn’t turn out as expected?
A: Don’t be discouraged! Fermentation can be a bit unpredictable. If it’s not sour enough, let it ferment longer. If it tastes off, trust your instincts and start anew!
Nutritional Info
While Apple Cider Vinegar is notoriously low in calories, its benefits come from its high concentration of acetic acid, which may help with digestion, and blood sugar levels, and is packed with probiotics.
So there you have it—your very own homemade raw apple cider vinegar recipe! I hope you’re as excited as I am to make this delectable ingredient at home. Remember, cooking is all about experimenting and having fun! I can’t wait to hear about your adventures in fermentation. Pull up a chair, pass the apple scraps, and let’s get to creating memories around food together!
PrintHomemade Raw Apple Cider Vinegar
A simple and delightful recipe for homemade raw apple cider vinegar, perfect for reducing food waste and enhancing your culinary creations.
- Prep Time: 15 minutes
- Cook Time: 28 days
- Total Time: 28 days 15 minutes
- Yield: 4 cups
- Category: Condiment
- Method: Fermentation
- Cuisine: American
- Diet: Vegan
Ingredients
- Apples (4-6) – preferably organic
- Water (filtered or distilled) – enough to cover the apples
- Sugar (1 tablespoon) – or honey/maple syrup
- A clean glass jar – large and sterilized
- A breathable cover – coffee filter or clean cloth
Instructions
- Wash your apples thoroughly to remove pesticides.
- Chop the apples into quarters without peeling them.
- Place apple pieces into a clean glass jar, filling it about three-quarters full.
- Dissolve a tablespoon of sugar in about a cup of filtered water and pour it over the apples.
- Add enough water to cover the apples completely, leaving an inch of headspace.
- Cover the jar with a breathable fabric and secure it with a rubber band.
- Let it ferment in a warm, dark spot for about 3-4 weeks.
- Stir the mixture every few days to promote even fermentation.
- Taste after about three weeks; if still sweet, let it ferment longer.
- Strain the mixture through a fine mesh strainer to separate solids from liquid.
- Cover the jar again and let it ferment for another 3-4 weeks.
- Bottle your homemade apple cider vinegar into clean glass bottles.
Notes
You can experiment with variations by adding spices, herbs, or citrus zest.
Nutrition
- Serving Size: 1 tablespoon
- Calories: 3
- Sugar: 1g
- Sodium: 1mg
- Fat: 0g
- Saturated Fat: 0g
- Unsaturated Fat: 0g
- Trans Fat: 0g
- Carbohydrates: 1g
- Fiber: 0g
- Protein: 0g
- Cholesterol: 0mg
Keywords: apple cider vinegar, fermentation, homemade vinegar