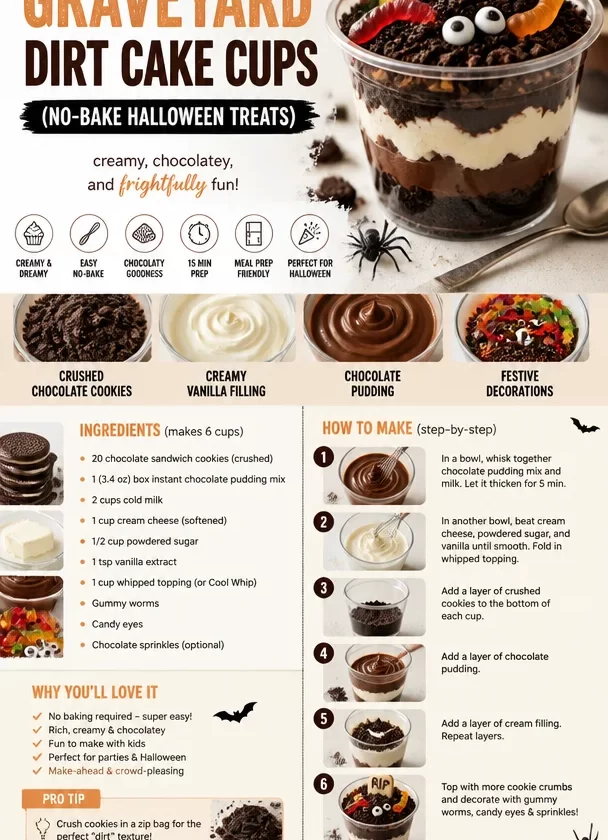
Graveyard Dirt Cake Cups: A Spooktacular Treat
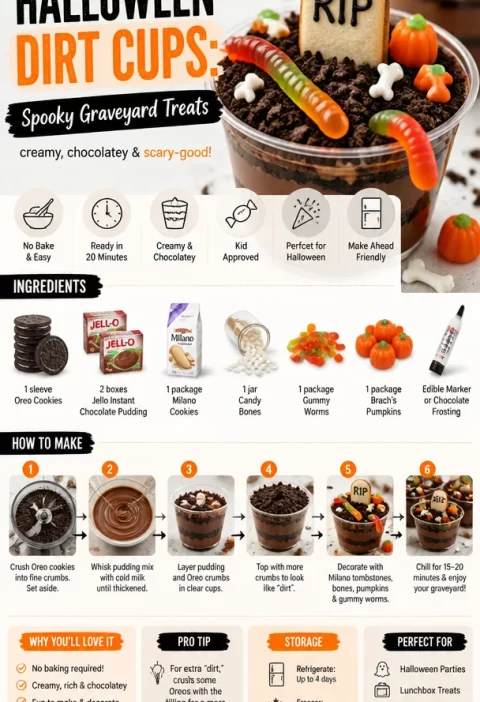
Ah, Halloween! A time for ghosts, goblins, and, most importantly, SUGAR. If you’re anything like me, you love embracing the festive spirit with treats that are as fun to look at as they are to eat. One of my all-time favorite spooky desserts to whip up for a Halloween gathering is none other than Graveyard Dirt Cake Cups. It combines the nostalgic delight of chocolatey goodness with a playful twist that both kids and adults will adore.
These delightful cups are not just a treat; they tell a story. With every bite, you can almost hear the echo of laughter from a hundred Halloween parties past, where sticky fingers grabbed treats and whispers of "Is that dirt?" filled the room. The idea behind the dessert is simple yet engaging: crushed chocolate cookies mimic the texture of dirt, velvety vanilla filling lends a creamy balance, and festive decorations like gummy worms and candy eyes bring the whole graveyard scene to life.
The beauty of Graveyard Dirt Cake Cups lies in their ease of preparation. You can throw these together in no time, making them an ideal last-minute addition to any Halloween soirée. Plus, since they come in individual cups, serving is a breeze! So put on your witch’s hat, grab your spatula, and let’s create a dessert that’s the perfect mix of creepy and delicious.
A Walk Down Memory Lane
I’ll never forget the first time I encountered dirt cake. It was at a friend’s Halloween party, and it was love at first sight. The dessert sat on the kitchen counter, shrouded in a mysterious fog of chocolate cookie crumble and decorated with creepy little gummy worms. I was a kid (and still a kid at heart!), and the idea of eating something that looked like dirt was both thrilling and slightly terrifying.
Fast forward a few years, and I made my first dirt cake for a Halloween potluck. As I layered the ingredients, I couldn’t help but chuckle. I sprinkled the crushed cookies on top, tossing a few gummy worms around, and it suddenly struck me: it wasn’t just a dessert. It was a conversation starter, a way to engage and interact with friends and family. Watching their reactions as they dug into the cups was priceless. That’s the spirit I aim to bring with my own Graveyard Dirt Cake Cups, which not only taste fabulous but also conjure nostalgic memories of sharing sweet moments around the table.
Ingredients
To whip up these Graveyard Dirt Cake Cups, you’ll need the following ingredients:
-
Crushed Chocolate Cookies
This is the base of our “dirt” layer. Oreos are a classic choice, but you can also substitute with any chocolate wafer cookies. If you want a gluten-free option, go for gluten-free chocolate cookies. -
Creamy Vanilla Filling
This luscious filling is what makes the dessert so delectable. You’ll need cream cheese, whipped topping, and a touch of sugar. If you’re dairy-free, you can use coconut cream instead. Just be sure to adjust the sweetness to taste! -
Chocolate Pudding
This adds an extra layer of richness! For a convenient option, instant pudding works wonders, but if you’re up for it, homemade pudding is a delightful treat. You could also explore vanilla pudding for a different flavor profile. -
Festive Decorations
Here’s where you can get creative! Gummy worms are a must, but you can also use candy eyes, Halloween sprinkles, or even edible glitter for a magical touch. If you want a healthier twist, try adding fruit gummy shapes or chocolate-covered almonds instead.
Ingredient Insights
- Crushed Chocolate Cookies: Try mixing different brands for a unique texture and flavor profile!
- Creamy Vanilla Filling: A splash of vanilla extract in your filling will elevate the flavor.
- Chocolate Pudding: Consider making it the day before for a deeper flavor; it lets those ingredients meld beautifully.
- Festive Decorations: If you’re making these for very young children, be cautious with items like candy eyes as they can be a choking hazard.
Step-by-Step Instructions
Now, let’s dive into how to create these enchanting Graveyard Dirt Cake Cups!
Step 1: Prepare the Chocolate Cookie Base
- Crush your chocolate cookies: Pop those cookies into a resealable bag and crush them using a rolling pin or your hands. You want a mix of fine crumbs and slightly larger pieces for texture.
- Chef Tip: If you’re short on time, you can use a food processor to speed up the crushing process!
Step 2: Whip Up the Creamy Vanilla Filling
- In a mixing bowl, combine 8 oz of cream cheese (softened), 1 cup of whipped topping, and 1/2 cup of powdered sugar. Use a hand mixer to blend until smooth and creamy.
- Chef Hack: If you don’t have a hand mixer, a whisk will do the job—just be prepared for a workout!
Step 3: Assemble the Layers
- In your serving cups, start by adding a layer of the creamy vanilla filling (about 1/3 of the cup).
- Follow with a layer of chocolate pudding (fill about halfway).
- Top with crushed cookies until the cup is filled to the brim.
- Chef Tip: Alternate layers for a more visually appealing cup!
Step 4: Add Those Festive Decorations
- Finally, add the finishing touches! Place gummy worms creeping over the top, sprinkle Halloween-themed decorations, or even use edible dirt (crushed Oreos or chocolate sprinkles) to give it an eerie look!
- Chef Insight: If you’re feeling extra creative, mold a small tombstone out of chocolate and place it atop the “dirt” for added spooky flair!
Serving Suggestions
When it comes to serving these delightful Graveyard Dirt Cake Cups, presentation is key! Arrange them on a spooky platter, perhaps with black lace or Halloween-themed decorations. You can even add some fresh mint leaves for a pop of color and a touch of freshness. Remember, the more creative you get, the more excitement there will be when your guests dig in!
Recipe Variations
Looking to switch things up? Here are some creative variations for your Graveyard Dirt Cake Cups:
- Peanut Butter Twist: Stir in some peanut butter into the vanilla filling for a rich, nutty flavor.
- Oreo Variations: Use mint-flavored Oreos for a refreshing take—perfect for garden parties or mint lovers!
- Fruit Layer: Add a layer of fresh raspberries or strawberries between the pudding and filling for a fruity element.
- Vegan Version: Substitute cream cheese with cashew cream and dairy-free whipped topping. Use non-dairy pudding, and you’ve got a vegan treat!
- Spicy Chocolate: Mix a bit of cinnamon or cayenne pepper into the cookie layer for an unexpected spicy kick.
Chef’s Notes
As time has passed, I’ve loved to see how this simple dirt cake recipe has evolved. From Halloween parties to birthday celebrations, I find that this dessert brings back a sense of nostalgia while still being adaptable. I remember an impromptu friends’ get-together where I whipped these up with whatever I had on hand—those gummy worms? I had claims they were from the “farm.” Little did they know there was a whole graveyard waiting to be devoured!
Seeing joy on friends’ faces as they enjoyed my Graveyard Dirt Cake Cups reminds me that food is more than just a meal; it’s a heartfelt connection and storytelling opportunity.
Frequently Asked Questions and Troubleshooting
1. Can I make this recipe ahead of time?
Absolutely! You can prepare the cups a day before your event. Just be sure to keep them in the refrigerator until you’re ready to serve to keep the filling fresh.
2. My pudding isn’t thickening up. What did I do wrong?
If you’re using instant pudding, ensure that you’re following the package instructions exactly. If still runny, consult the cooking time or tweak the whipping time.
3. How do I store leftovers?
Cover the cups with plastic wrap or transfer them to an airtight container and keep them in the refrigerator. They should stay fresh for up to three days.
4. Can I use different toppings?
Of course! Feel free to get creative with crunchy toppings like crumbled pretzels, chocolate chips, or even colorful sprinkles that scream Halloween!
Nutritional Info
Nutritional information can vary based on specific ingredient choices, but here’s a rough estimate per serving (one cup):
- Calories: 320
- Protein: 4g
- Fat: 16g
- Carbohydrates: 45g
- Fiber: 2g
- Sugars: 25g
So there you have it, my dear foodies! Your very own Graveyard Dirt Cake Cups just in time for the Halloween festivities. Get ready to share laughter, spooky stories, and, most importantly, some delicious chocolatey dirt cake cups with friends and family. Happy cooking and happy haunting!
PrintGraveyard Dirt Cake Cups
A fun and spooky dessert made with chocolate cookies, creamy vanilla filling, and festive decorations, perfect for Halloween gatherings.
- Prep Time: 15 minutes
- Cook Time: 0 minutes
- Total Time: 15 minutes
- Yield: 4 servings 1x
- Category: Dessert
- Method: No-Cook
- Cuisine: American
- Diet: Vegetarian
Ingredients
- Crushed Chocolate Cookies (Oreo or any chocolate wafer)
- 8 oz Cream Cheese (softened)
- 1 cup Whipped Topping
- 1/2 cup Powdered Sugar
- Chocolate Pudding (instant or homemade)
- Gummy Worms
- Candy Eyes
- Halloween Sprinkles or Edible Glitter
Instructions
- Crush your chocolate cookies in a resealable bag until you have fine crumbs and larger pieces.
- Combine cream cheese, whipped topping, and powdered sugar in a mixing bowl; blend until smooth.
- Layer in serving cups: start with vanilla filling, followed by chocolate pudding, then topped with crushed cookies.
- Add gummy worms and other festive decorations on top for a spooky look!
Notes
These dessert cups can be prepared a day ahead and stored in the refrigerator until serving. Consider variations like peanut butter filling for a unique twist.
Nutrition
- Serving Size: 1 cup
- Calories: 320
- Sugar: 25g
- Sodium: 250mg
- Fat: 16g
- Saturated Fat: 8g
- Unsaturated Fat: 6g
- Trans Fat: 0g
- Carbohydrates: 45g
- Fiber: 2g
- Protein: 4g
- Cholesterol: 30mg
Keywords: Halloween dessert, dirt cake, spooky treats, chocolate cups, festive decorations